- Mf series second half

Содержание
- 2. MF SERIES MAINTENANCE
- 3. MF SERIES MAINTENANCE The most important program on the maintenance of the Flaker machines is the
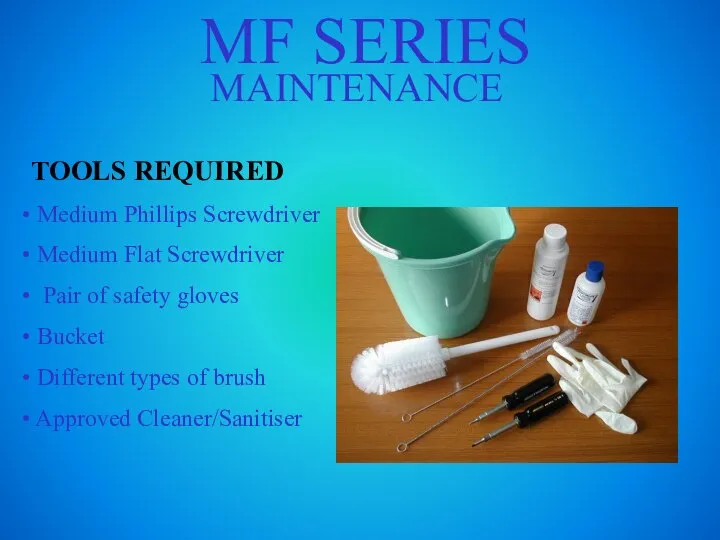
- 4. MF SERIES MAINTENANCE TOOLS REQUIRED Medium Phillips Screwdriver Medium Flat Screwdriver Pair of safety gloves Bucket
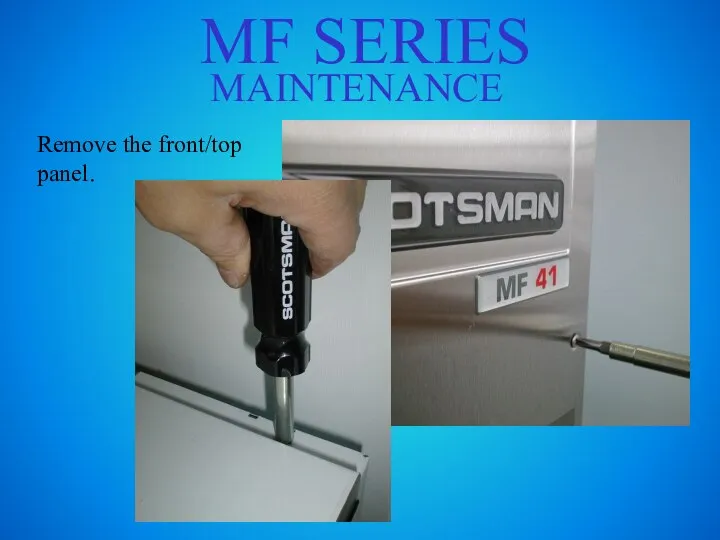
- 5. MF SERIES MAINTENANCE Remove the front/top panel.
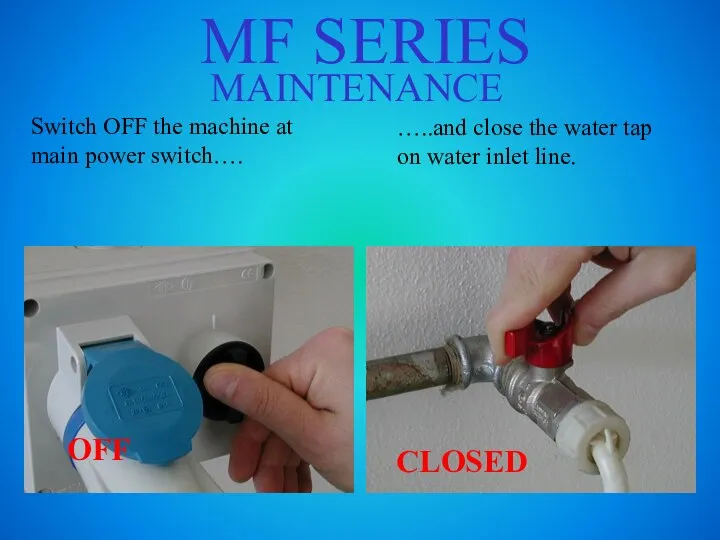
- 6. MF SERIES MAINTENANCE Switch OFF the machine at main power switch…. …..and close the water tap
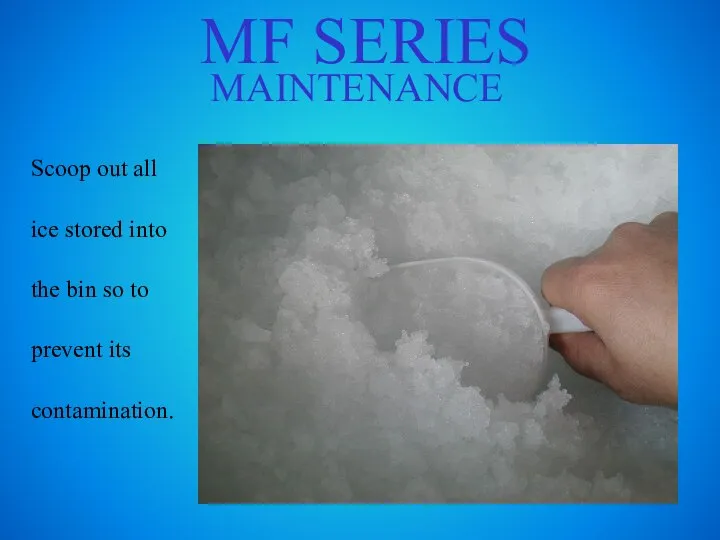
- 7. MF SERIES MAINTENANCE Scoop out all ice stored into the bin so to prevent its contamination.
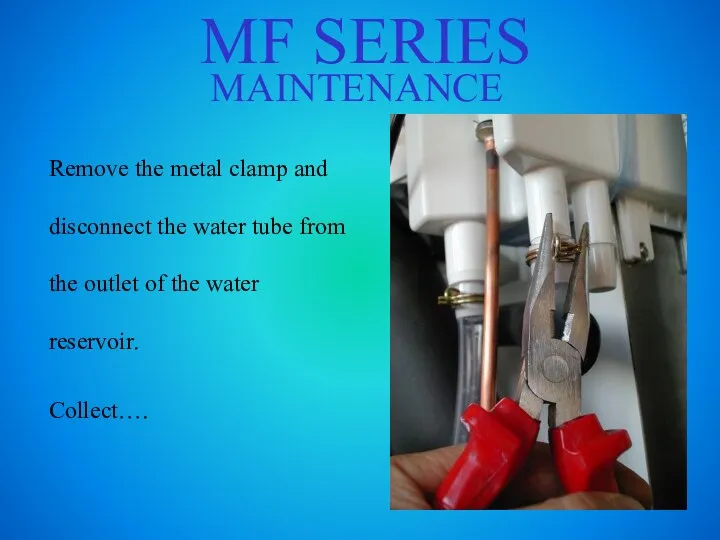
- 8. MF SERIES MAINTENANCE Remove the metal clamp and disconnect the water tube from the outlet of
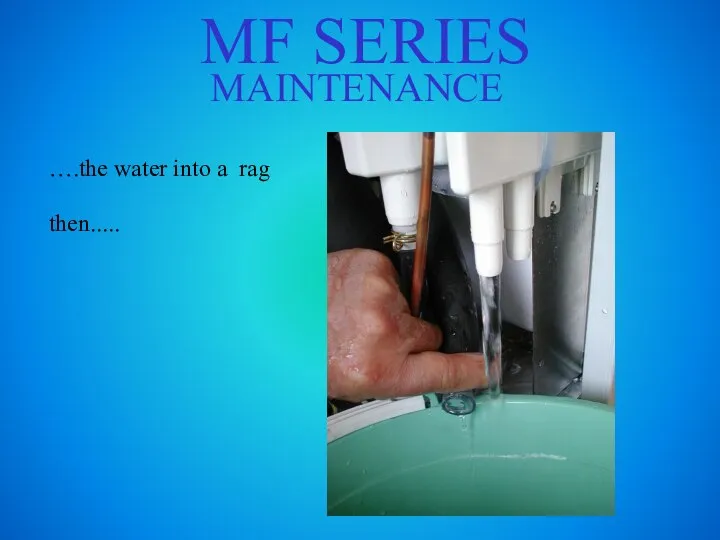
- 9. MF SERIES MAINTENANCE ….the water into a rag then.....
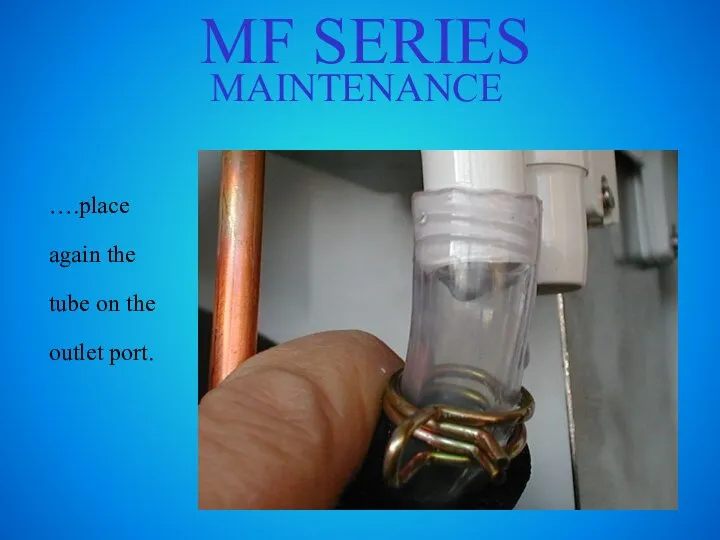
- 10. MF SERIES MAINTENANCE ….place again the tube on the outlet port.
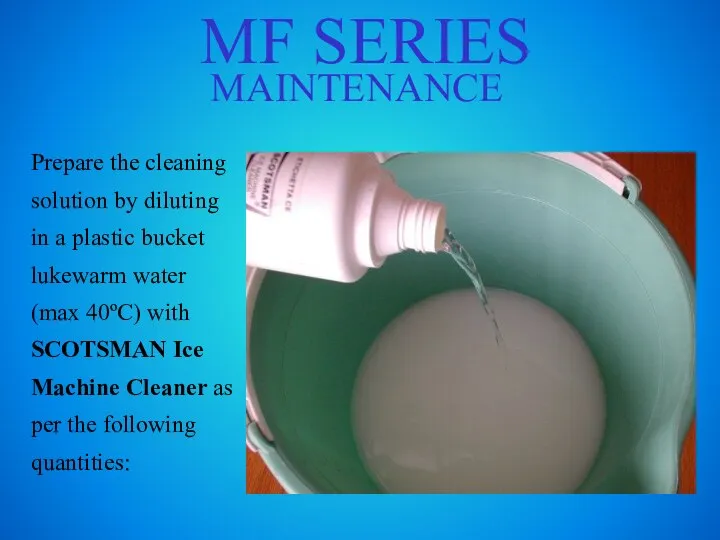
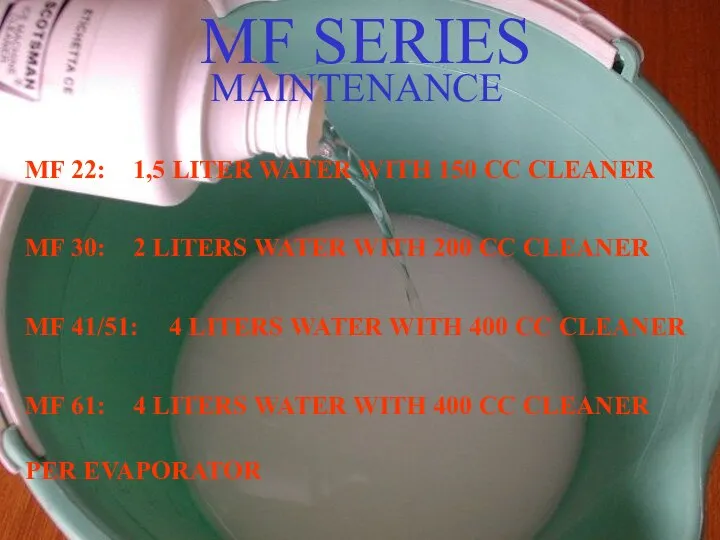
- 11. MF SERIES MAINTENANCE Prepare the cleaning solution by diluting in a plastic bucket lukewarm water (max
- 12. MF SERIES MAINTENANCE MF 22: 1,5 LITER WATER WITH 150 CC CLEANER MF 30: 2 LITERS
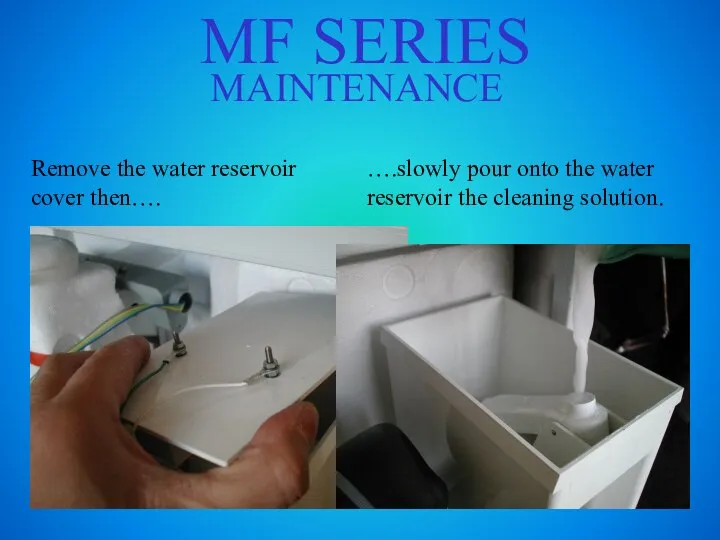
- 13. MF SERIES MAINTENANCE Remove the water reservoir cover then…. ….slowly pour onto the water reservoir the
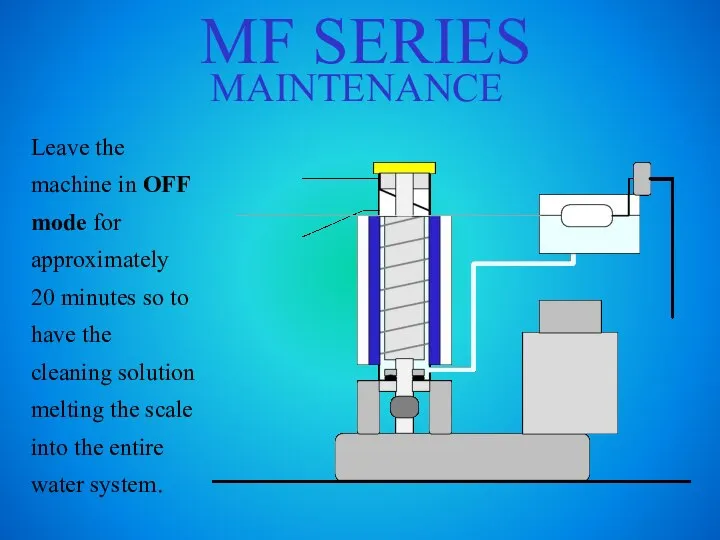
- 14. MF SERIES MAINTENANCE Leave the machine in OFF mode for approximately 20 minutes so to have
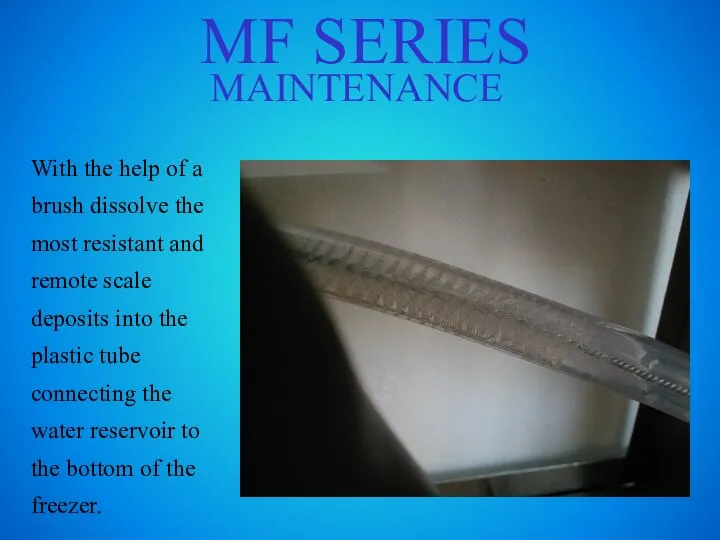
- 15. MF SERIES MAINTENANCE With the help of a brush dissolve the most resistant and remote scale
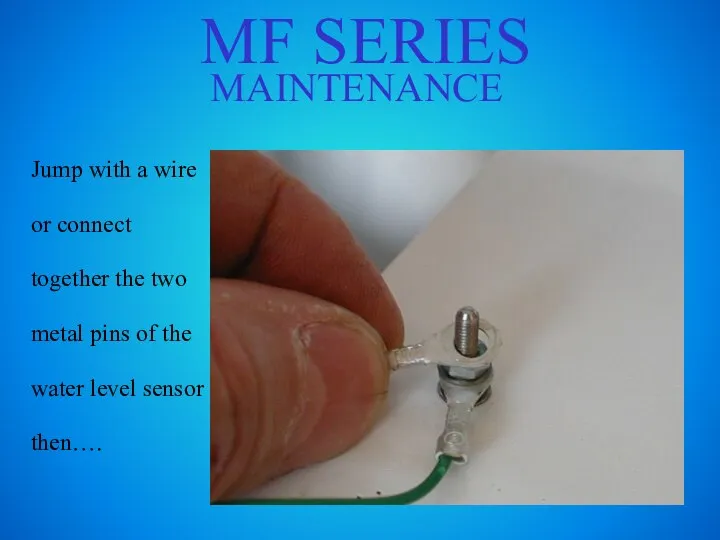
- 16. MF SERIES MAINTENANCE Jump with a wire or connect together the two metal pins of the
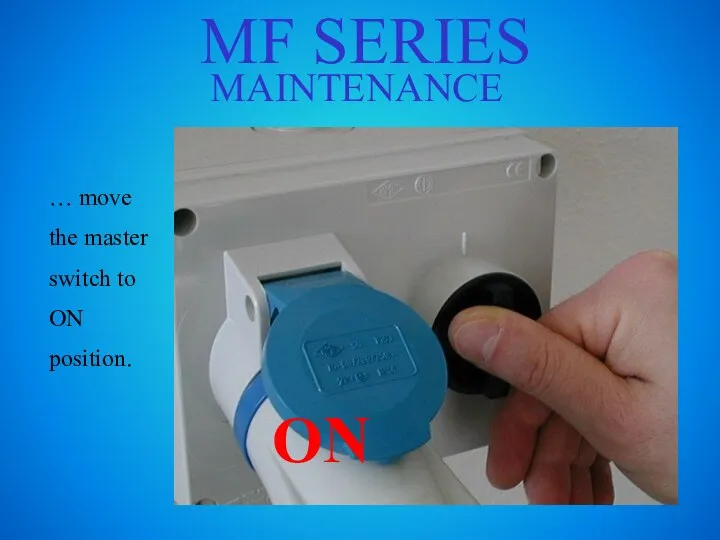
- 17. MF SERIES MAINTENANCE … move the master switch to ON position. ON
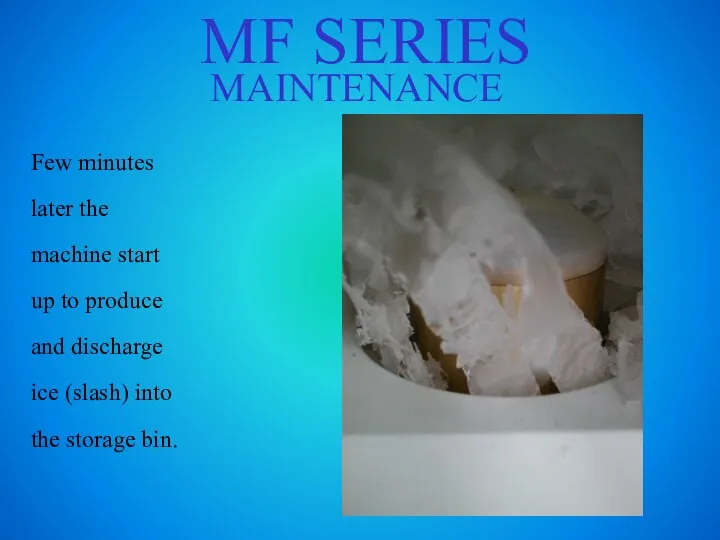
- 18. MF SERIES MAINTENANCE Few minutes later the machine start up to produce and discharge ice (slash)
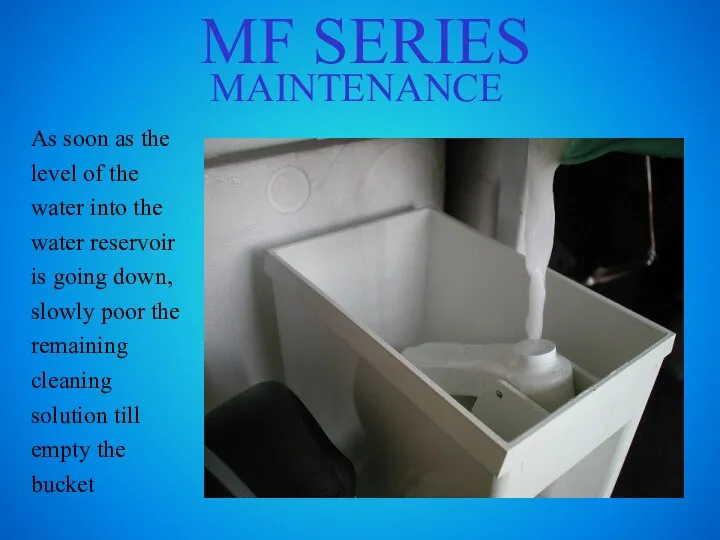
- 19. MF SERIES MAINTENANCE As soon as the level of the water into the water reservoir is
- 20. MF SERIES MAINTENANCE Once empty the bucket open the water tap so to allow new fresh
- 21. MF SERIES MAINTENANCE When sure that no more trace of cleaning solution is left into the
- 22. MF SERIES MAINTENANCE ….place again the water reservoir cover paying attention to remove the jumper between
- 23. MF SERIES MAINTENANCE Scoop out the flake ice produced with cleaning/sanitizing solution.
- 24. MF SERIES MAINTENANCE Wash the inside of the storage bin with sanitizing solution (1 cc sanitizer
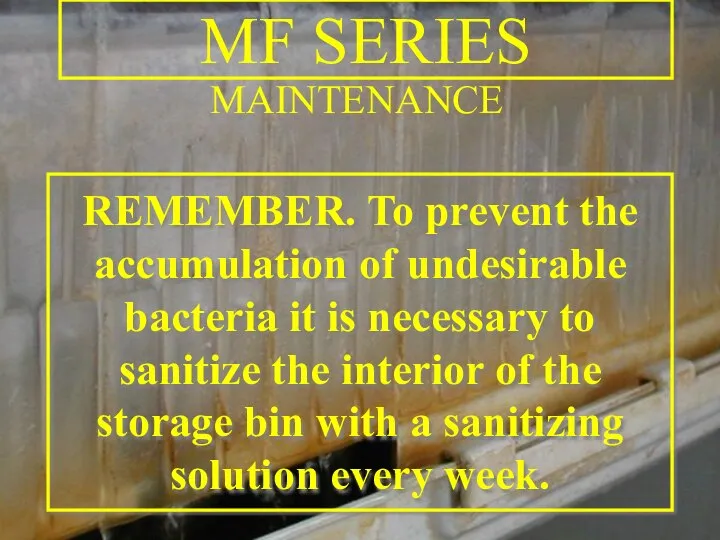
- 25. MAINTENANCE REMEMBER. To prevent the accumulation of undesirable bacteria it is necessary to sanitize the interior
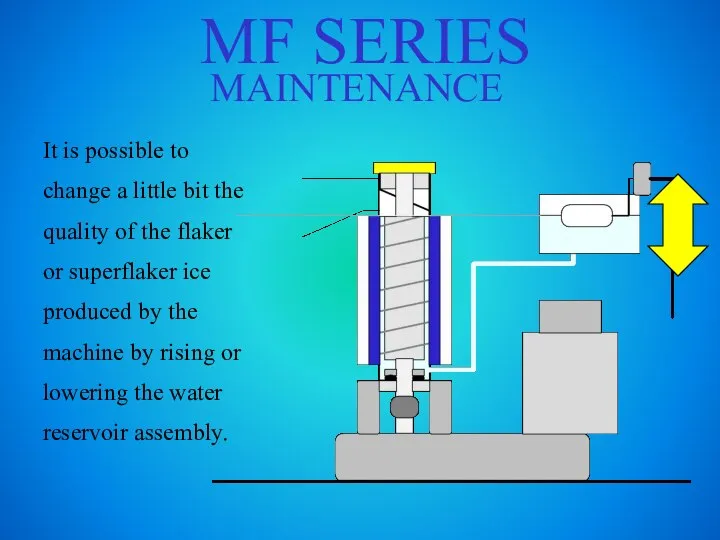
- 26. MF SERIES MAINTENANCE It is possible to change a little bit the quality of the flaker
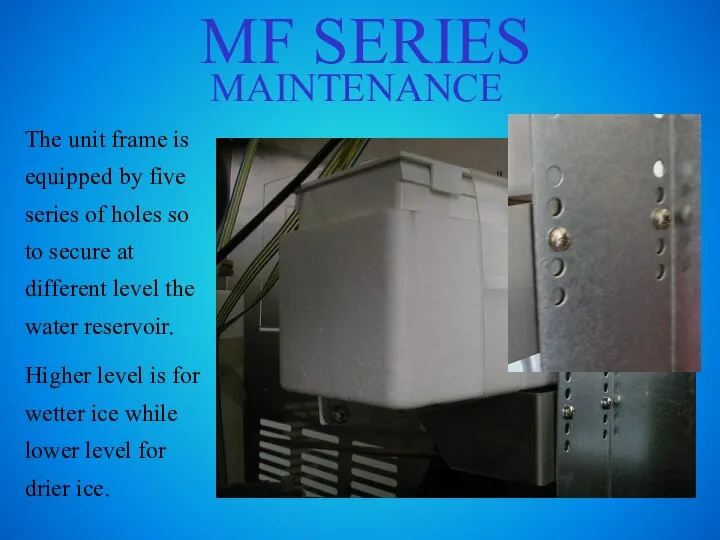
- 27. MF SERIES MAINTENANCE The unit frame is equipped by five series of holes so to secure
- 28. MF SERIES SERVICE ANALYSIS
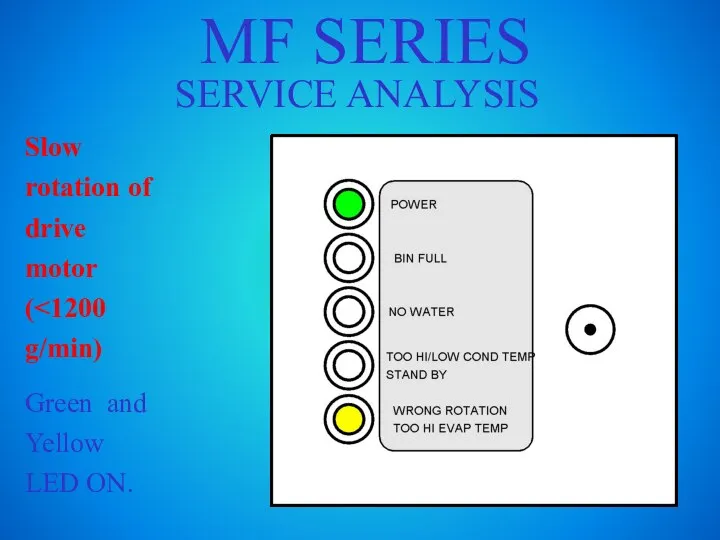
- 29. MF SERIES SERVICE ANALYSIS Bin Full situation: Green and Yellow LED ON.
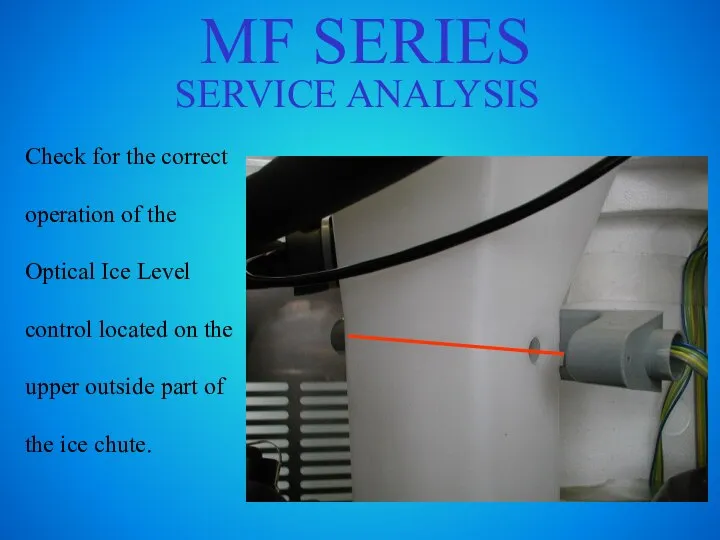
- 30. MF SERIES SERVICE ANALYSIS Check for the correct operation of the Optical Ice Level control located
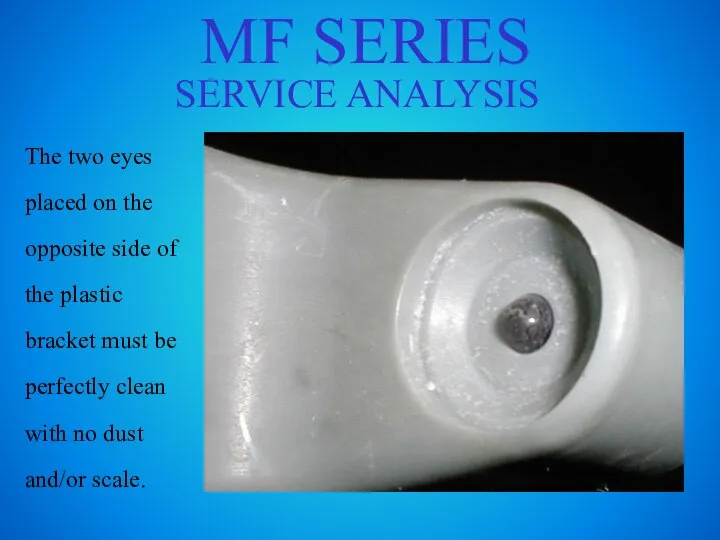
- 31. MF SERIES SERVICE ANALYSIS The two eyes placed on the opposite side of the plastic bracket
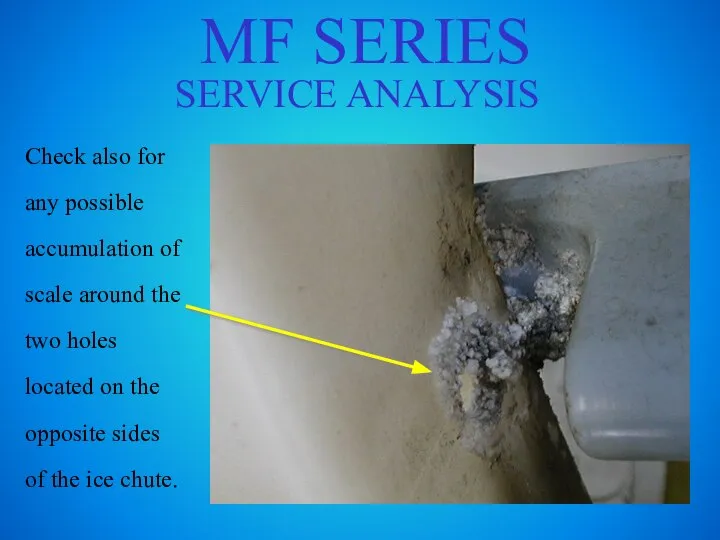
- 32. MF SERIES SERVICE ANALYSIS Check also for any possible accumulation of scale around the two holes
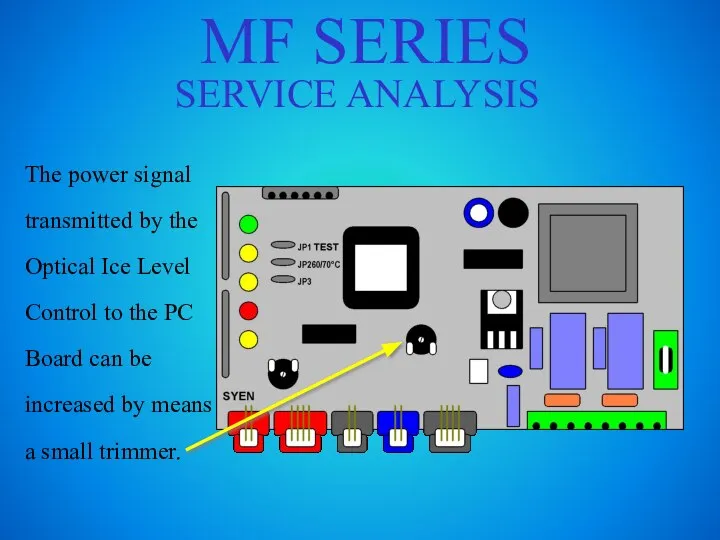
- 33. MF SERIES SERVICE ANALYSIS The power signal transmitted by the Optical Ice Level Control to the
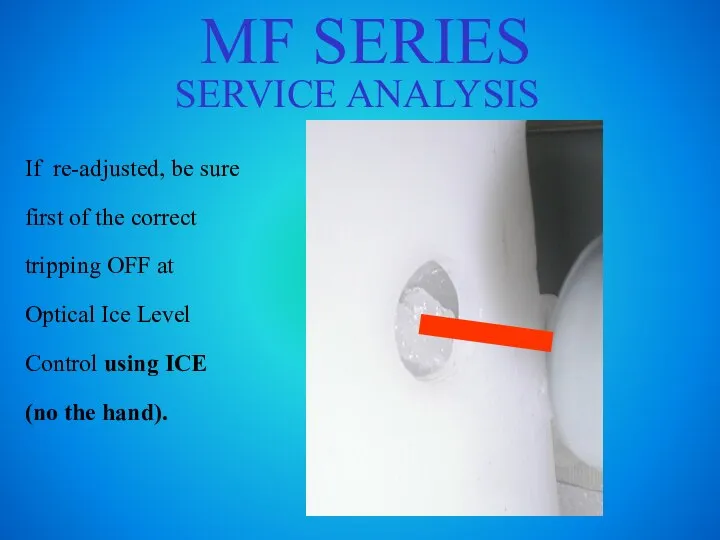
- 34. MF SERIES SERVICE ANALYSIS If re-adjusted, be sure first of the correct tripping OFF at Optical
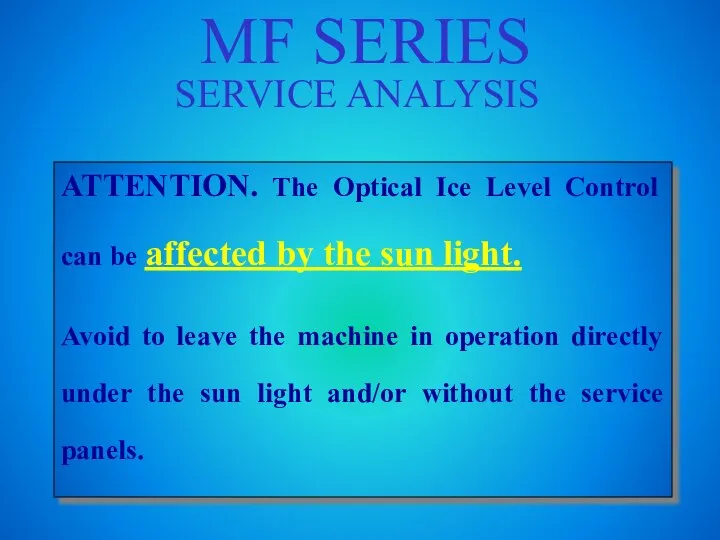
- 35. MF SERIES SERVICE ANALYSIS ATTENTION. The Optical Ice Level Control can be affected by the sun
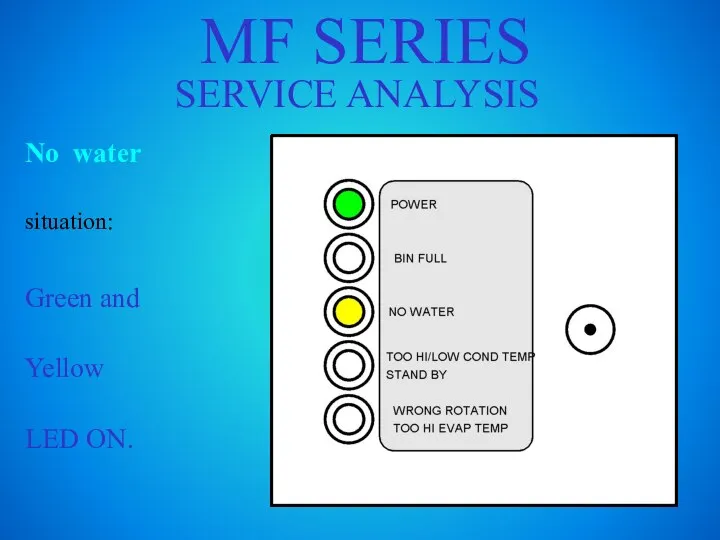
- 36. MF SERIES SERVICE ANALYSIS No water situation: Green and Yellow LED ON.
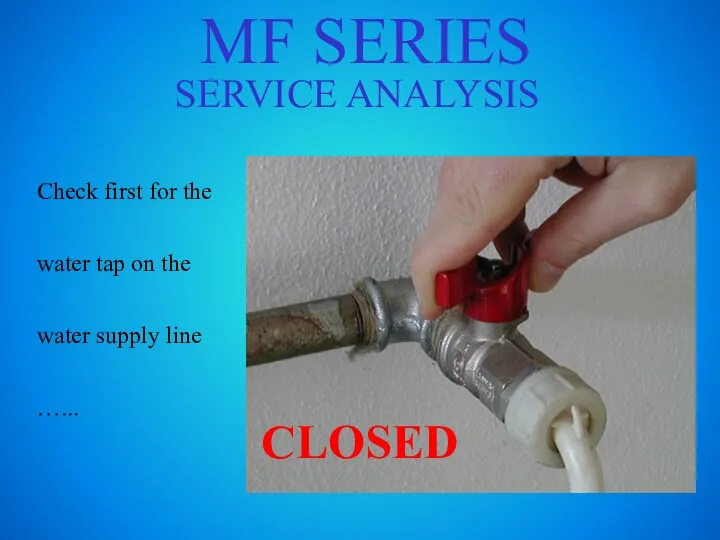
- 37. MF SERIES SERVICE ANALYSIS Check first for the water tap on the water supply line …...
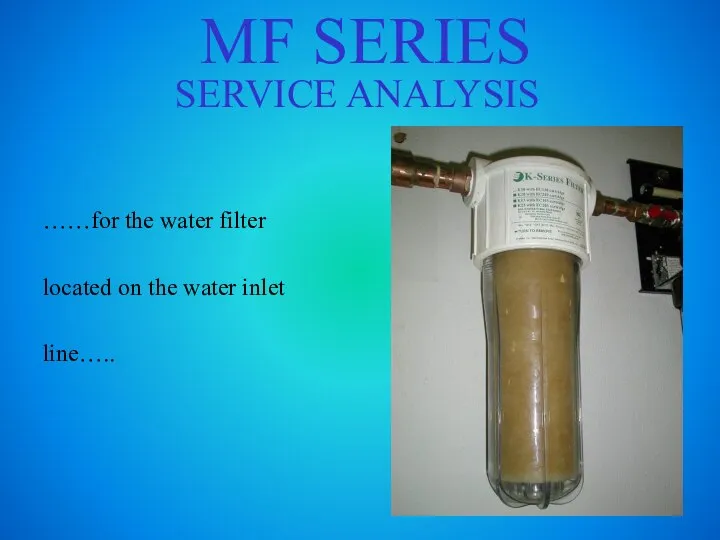
- 38. MF SERIES SERVICE ANALYSIS ……for the water filter located on the water inlet line…..
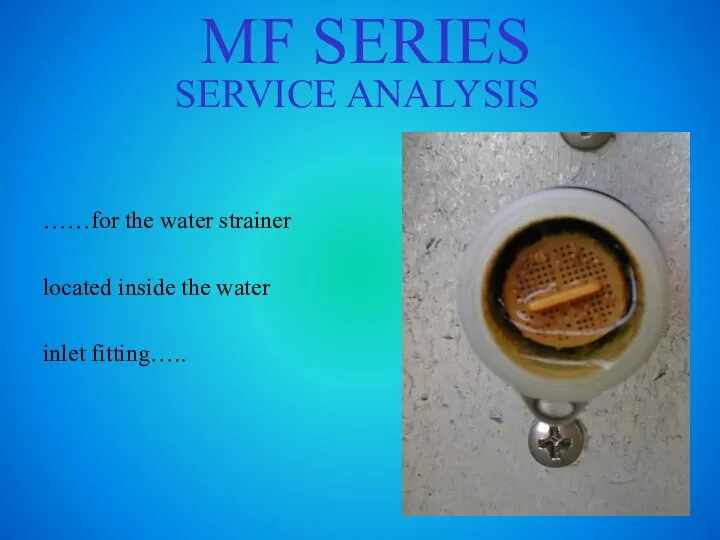
- 39. MF SERIES SERVICE ANALYSIS ……for the water strainer located inside the water inlet fitting…..
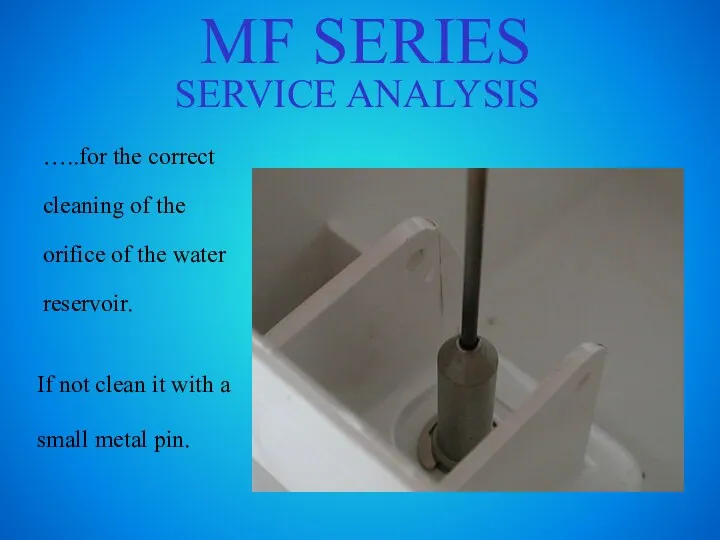
- 40. MF SERIES SERVICE ANALYSIS …..for the correct cleaning of the orifice of the water reservoir. If
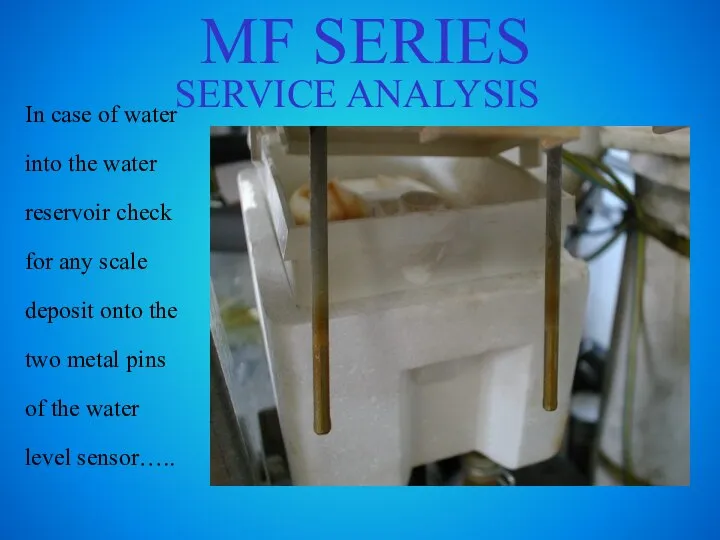
- 41. MF SERIES SERVICE ANALYSIS In case of water into the water reservoir check for any scale
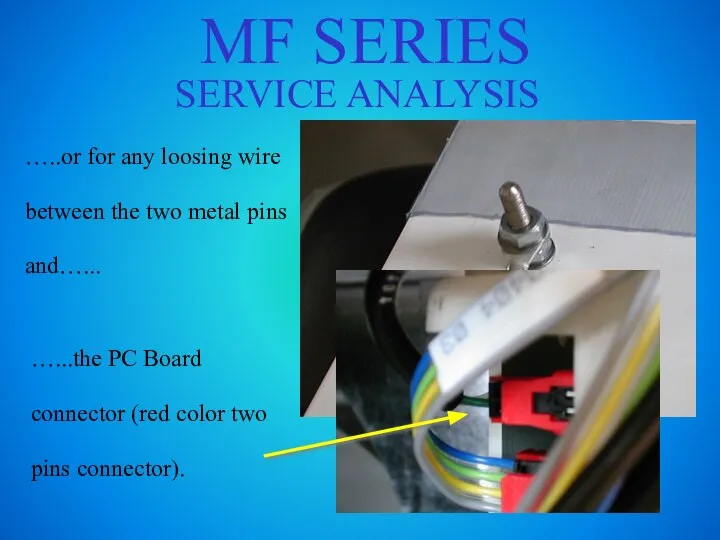
- 42. MF SERIES SERVICE ANALYSIS …..or for any loosing wire between the two metal pins and…... …...the
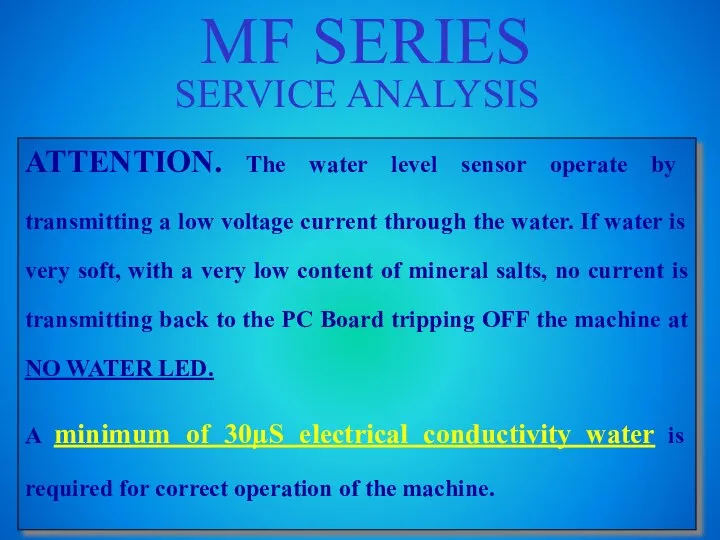
- 43. MF SERIES SERVICE ANALYSIS ATTENTION. The water level sensor operate by transmitting a low voltage current
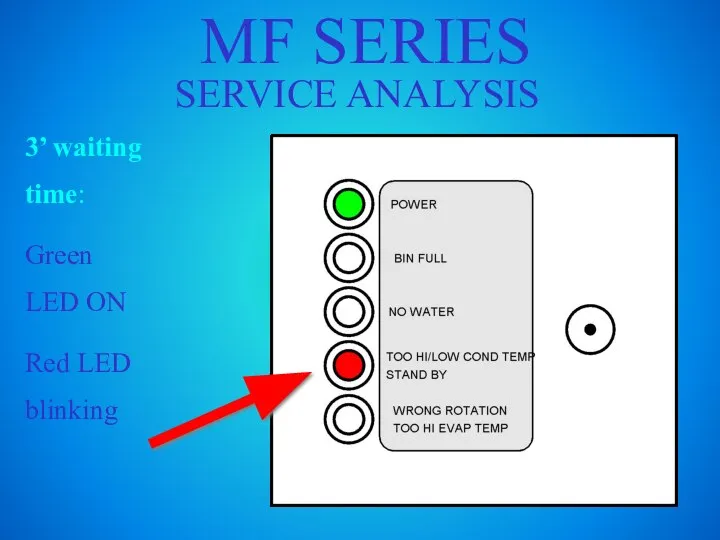
- 44. MF SERIES SERVICE ANALYSIS 3’ waiting time: Green LED ON Red LED blinking
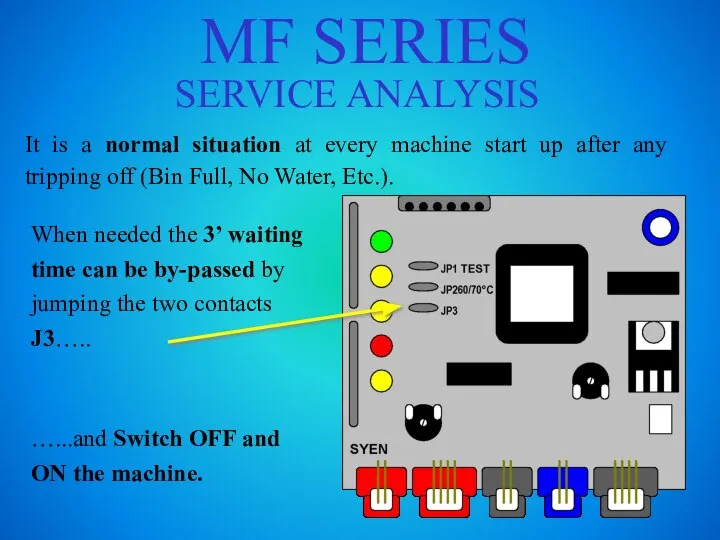
- 45. MF SERIES SERVICE ANALYSIS It is a normal situation at every machine start up after any
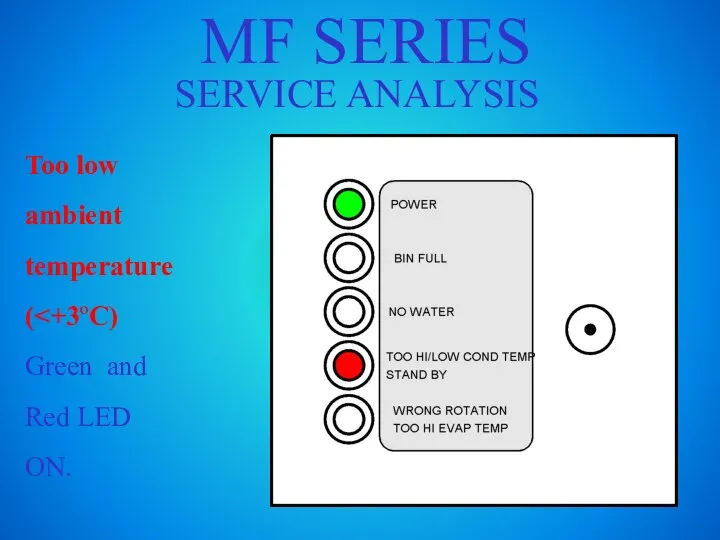
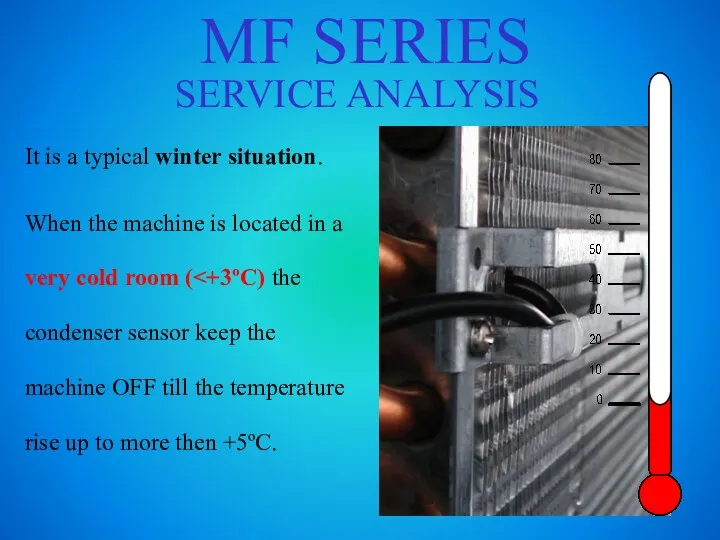
- 46. MF SERIES SERVICE ANALYSIS Too low ambient temperature(
- 47. MF SERIES SERVICE ANALYSIS It is a typical winter situation. When the machine is located in
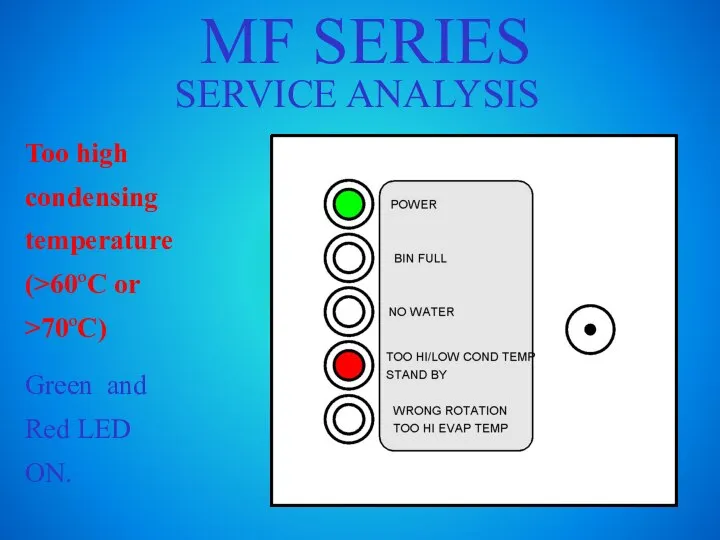
- 48. MF SERIES SERVICE ANALYSIS Too high condensing temperature (>60ºC or >70ºC) Green and Red LED ON.
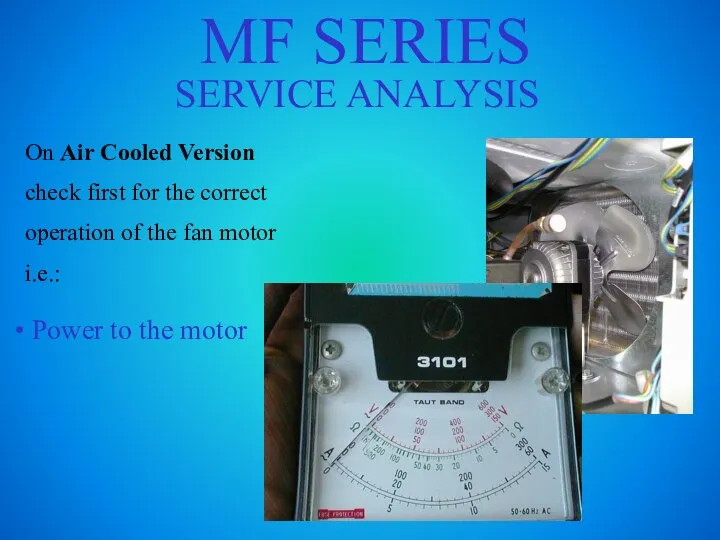
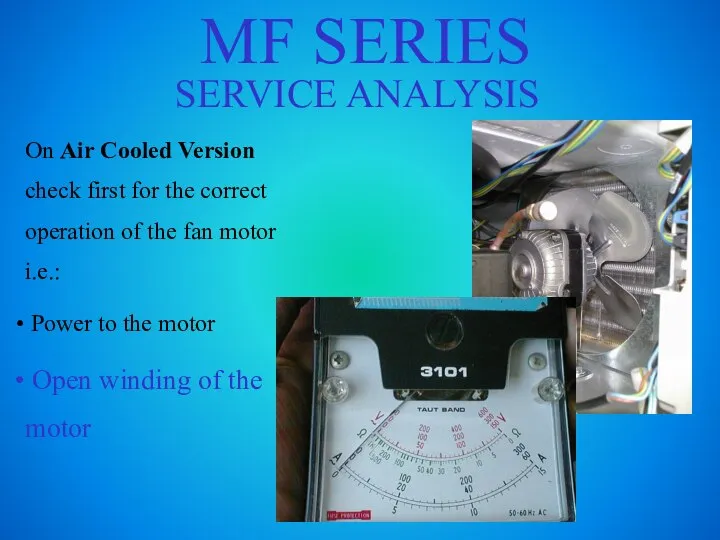
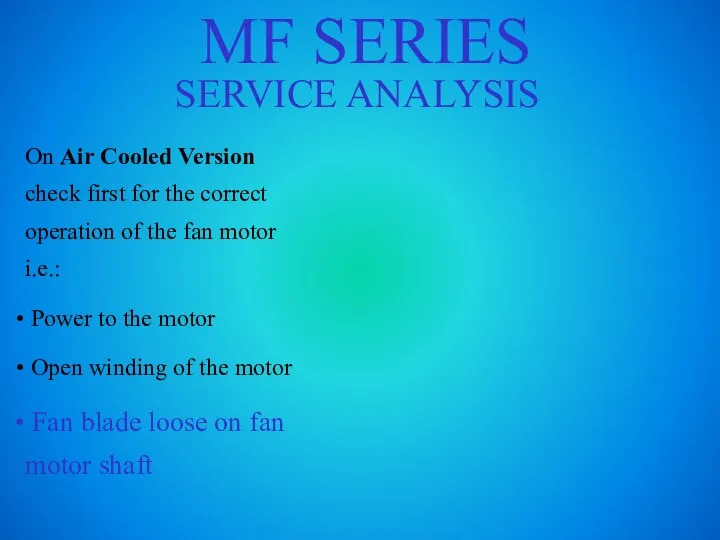
- 49. MF SERIES SERVICE ANALYSIS On Air Cooled Version check first for the correct operation of the
- 50. MF SERIES SERVICE ANALYSIS On Air Cooled Version check first for the correct operation of the
- 51. MF SERIES SERVICE ANALYSIS On Air Cooled Version check first for the correct operation of the
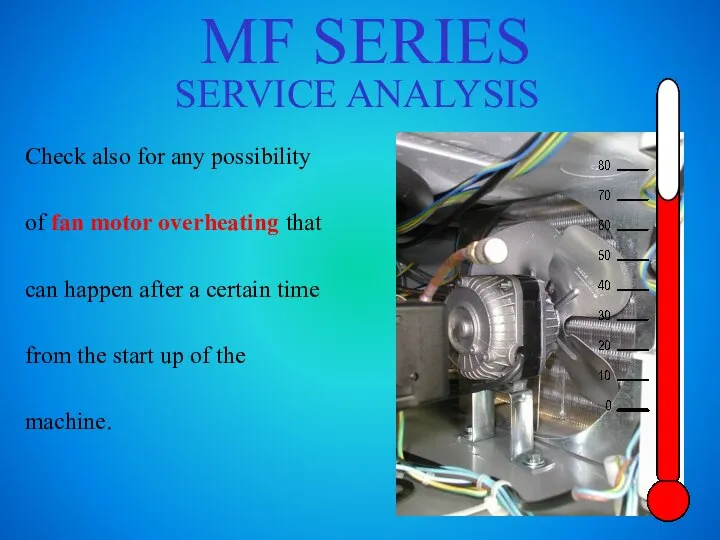
- 52. MF SERIES SERVICE ANALYSIS Check also for any possibility of fan motor overheating that can happen
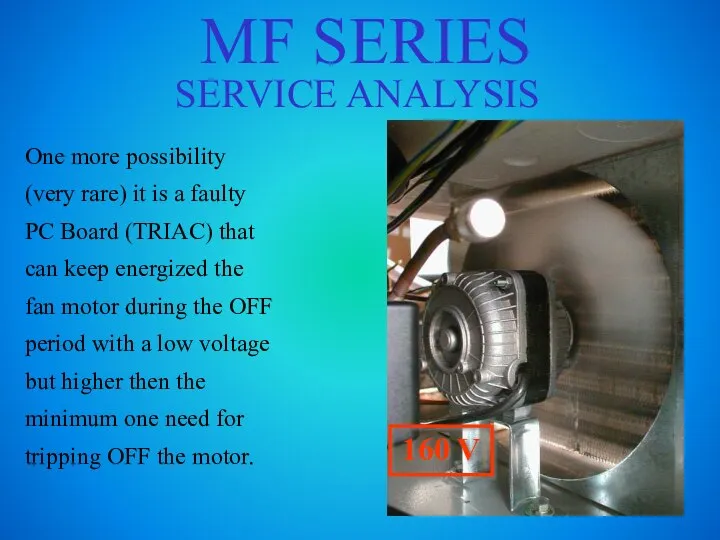
- 53. MF SERIES SERVICE ANALYSIS One more possibility (very rare) it is a faulty PC Board (TRIAC)
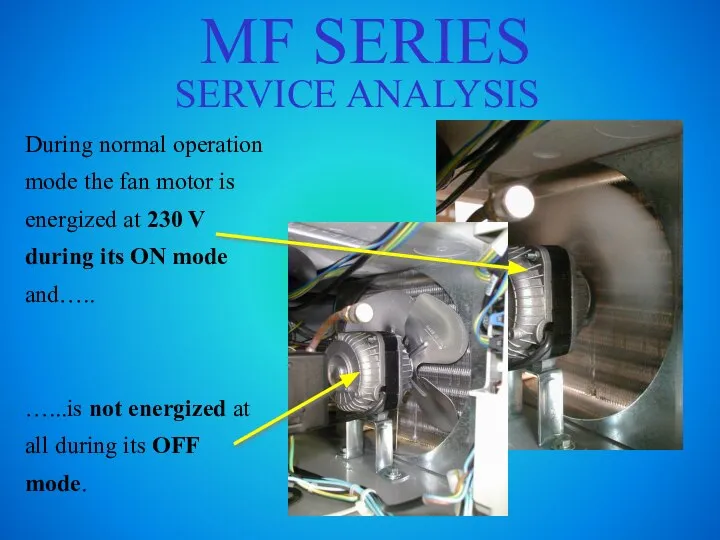
- 54. MF SERIES SERVICE ANALYSIS During normal operation mode the fan motor is energized at 230 V
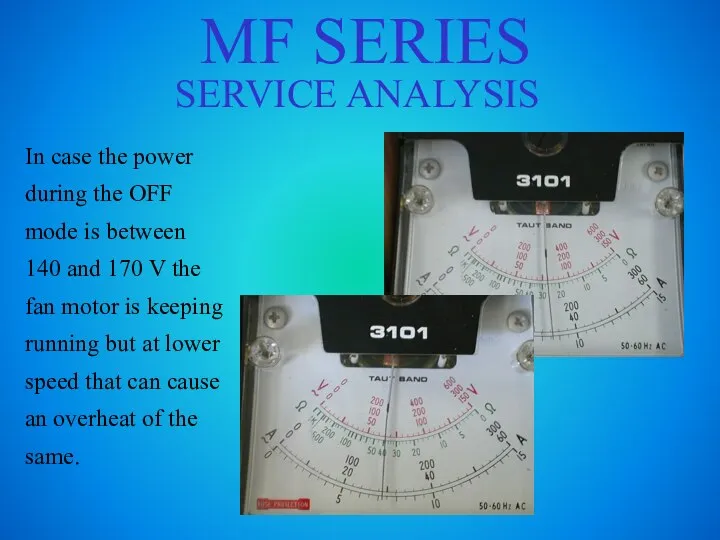
- 55. MF SERIES SERVICE ANALYSIS In case the power during the OFF mode is between 140 and
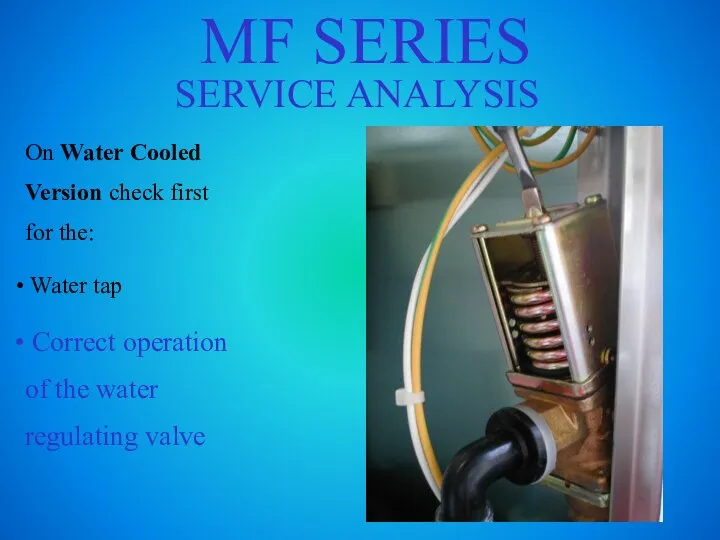
- 56. MF SERIES SERVICE ANALYSIS On Water Cooled Version check first for the: Water tap CLOSED
- 57. MF SERIES SERVICE ANALYSIS On Water Cooled Version check first for the: Water tap Correct operation
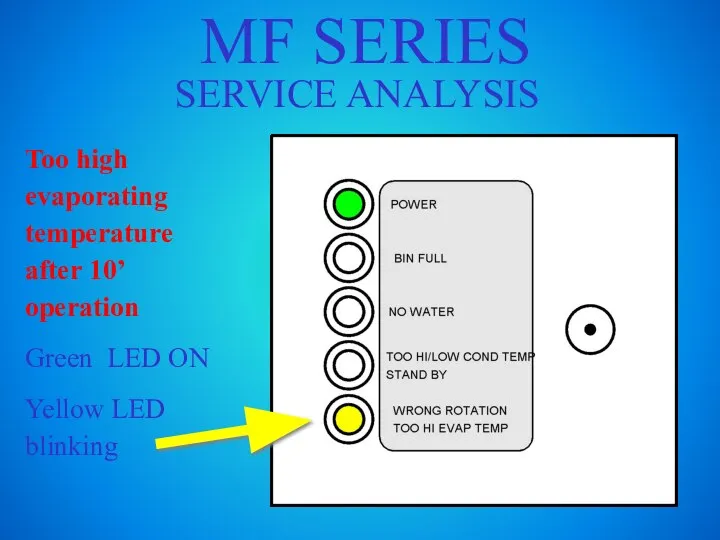
- 58. MF SERIES SERVICE ANALYSIS Too high evaporating temperature after 10’ operation Green LED ON Yellow LED
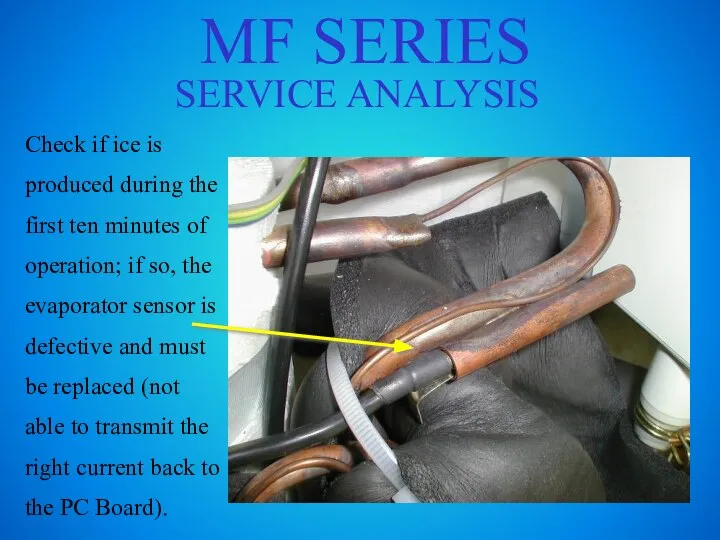
- 59. MF SERIES SERVICE ANALYSIS Check if ice is produced during the first ten minutes of operation;
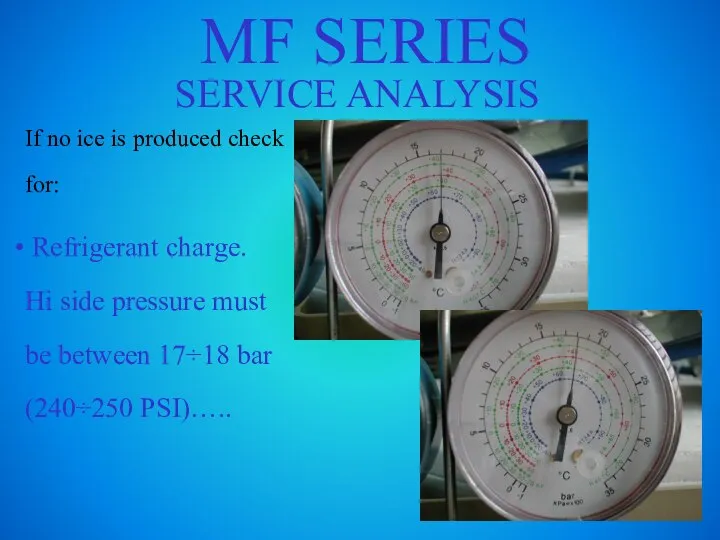
- 60. MF SERIES SERVICE ANALYSIS If no ice is produced check for: Refrigerant charge. Hi side pressure
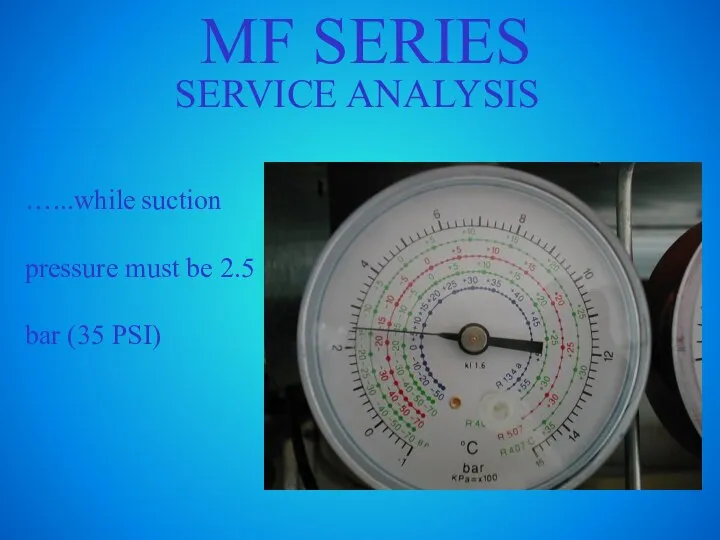
- 61. MF SERIES SERVICE ANALYSIS …...while suction pressure must be 2.5 bar (35 PSI)
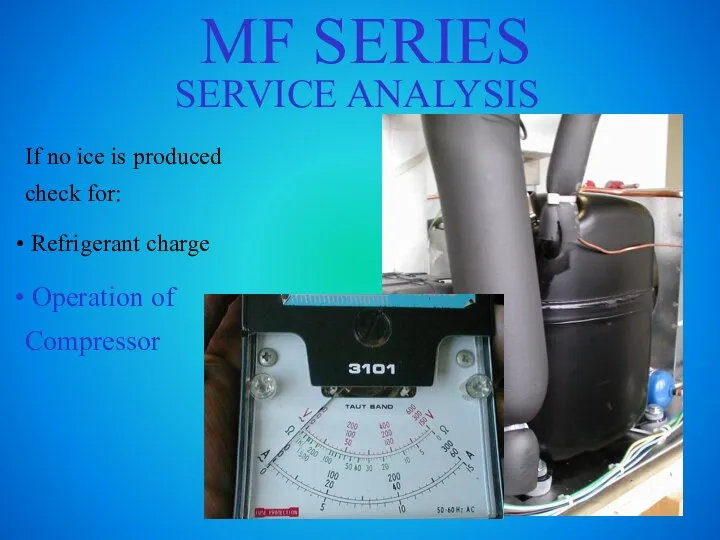
- 62. MF SERIES SERVICE ANALYSIS If no ice is produced check for: Refrigerant charge Operation of Compressor
- 63. MF SERIES SERVICE ANALYSIS If no ice is produced check for: Refrigerant charge Operation of Compressor
- 64. MF SERIES SERVICE ANALYSIS No rotation of drive motor Green and Yellow LED ON.
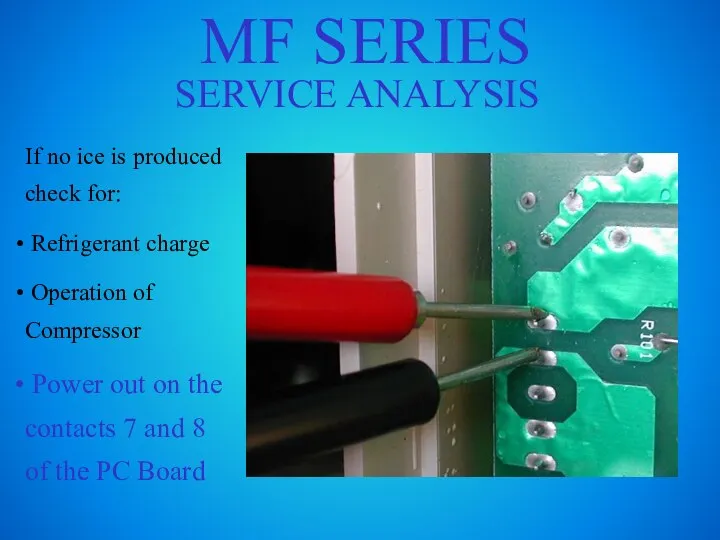
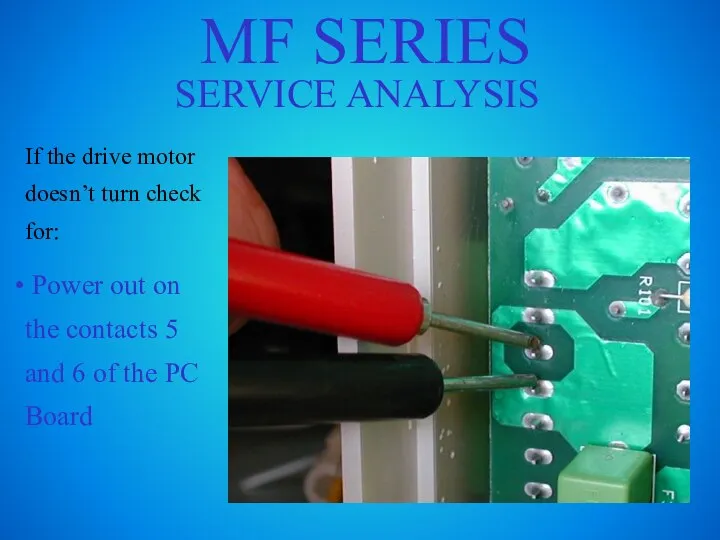
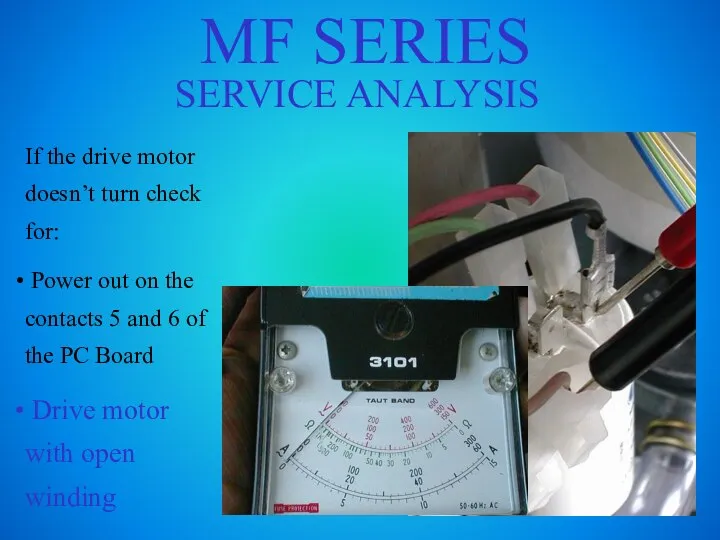
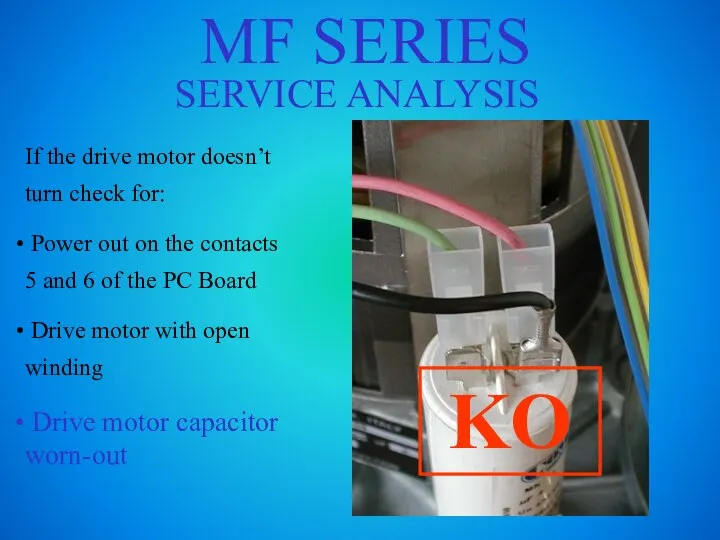
- 65. MF SERIES SERVICE ANALYSIS If the drive motor doesn’t turn check for: Power out on the
- 66. MF SERIES SERVICE ANALYSIS If the drive motor doesn’t turn check for: Power out on the
- 67. MF SERIES SERVICE ANALYSIS If the drive motor doesn’t turn check for: Power out on the
- 68. MF SERIES SERVICE ANALYSIS If the drive motor doesn’t turn check for: Power out on the
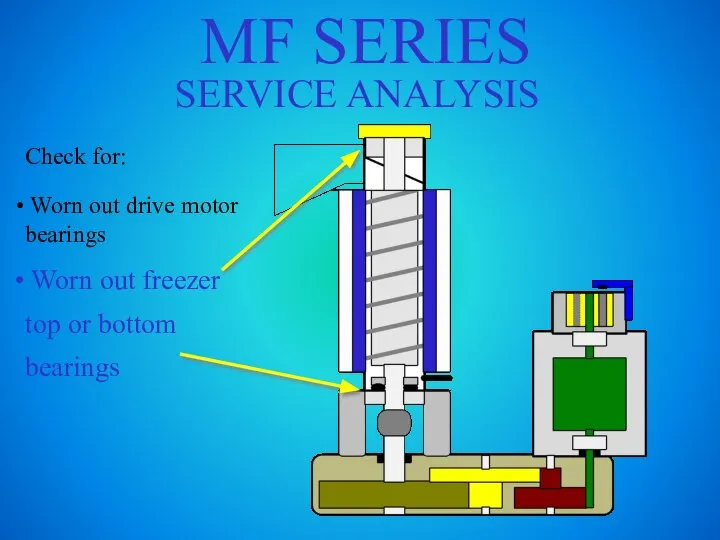
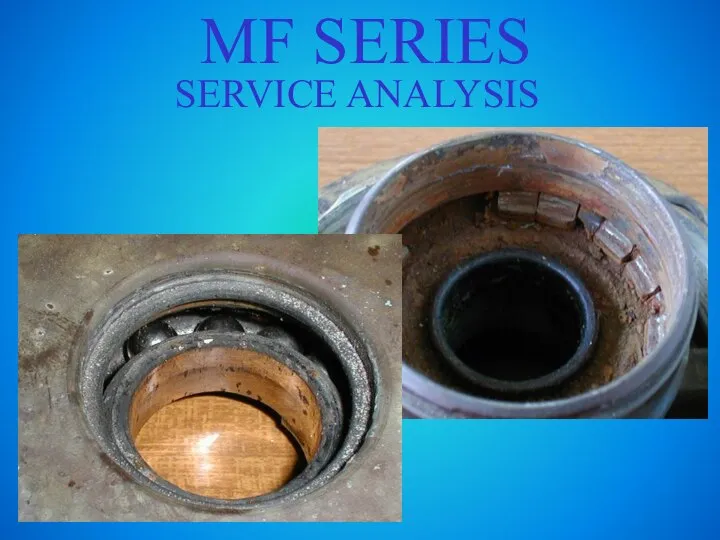
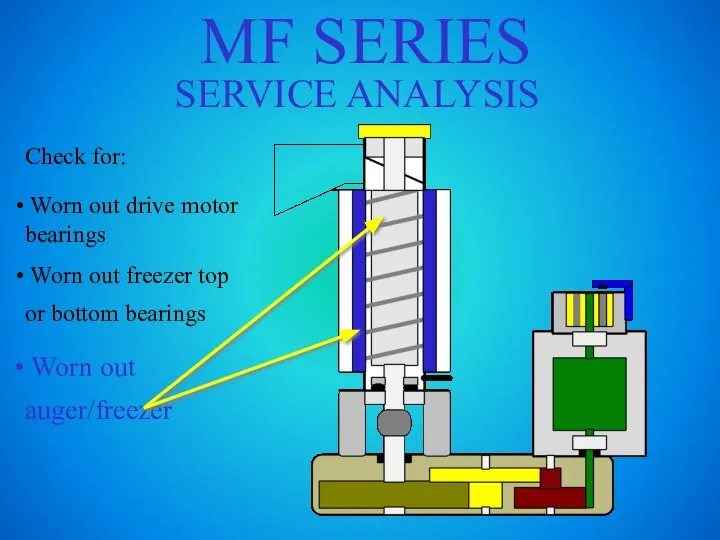
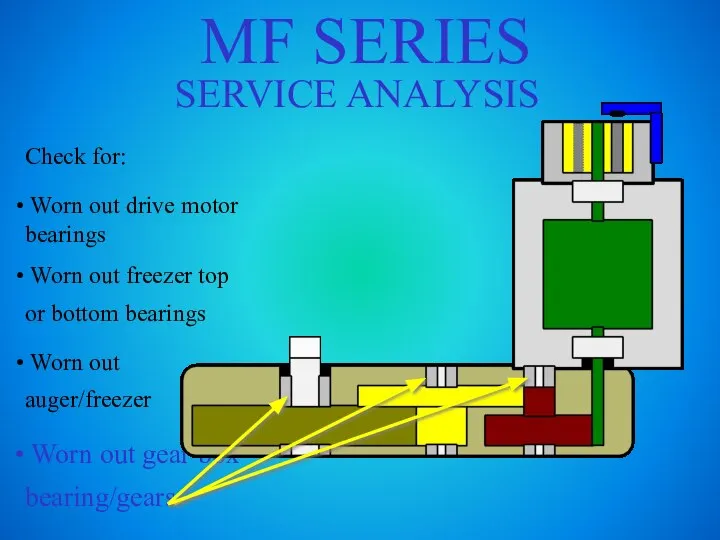
- 69. MF SERIES SERVICE ANALYSIS Slow rotation of drive motor ( Green and Yellow LED ON.
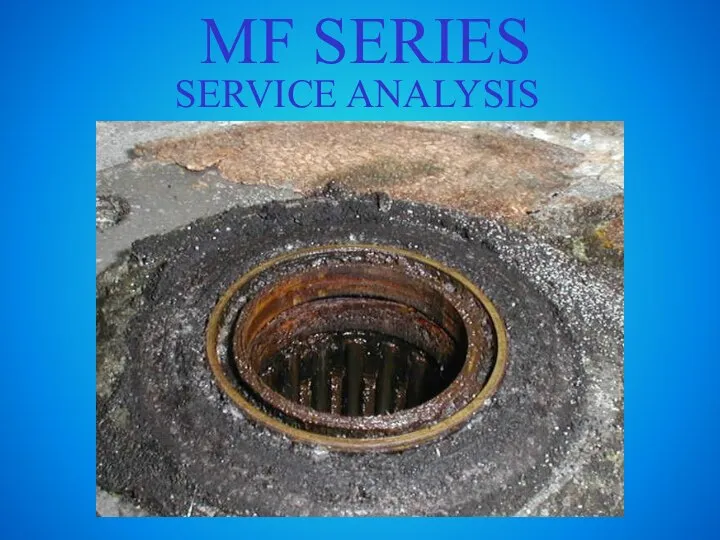
- 70. MF SERIES SERVICE ANALYSIS Check for: Worn out drive motor bearings
- 71. MF SERIES SERVICE ANALYSIS Check for: Worn out drive motor bearings Worn out freezer top or
- 72. MF SERIES SERVICE ANALYSIS
- 73. MF SERIES SERVICE ANALYSIS Check for: Worn out drive motor bearings Worn out freezer top or
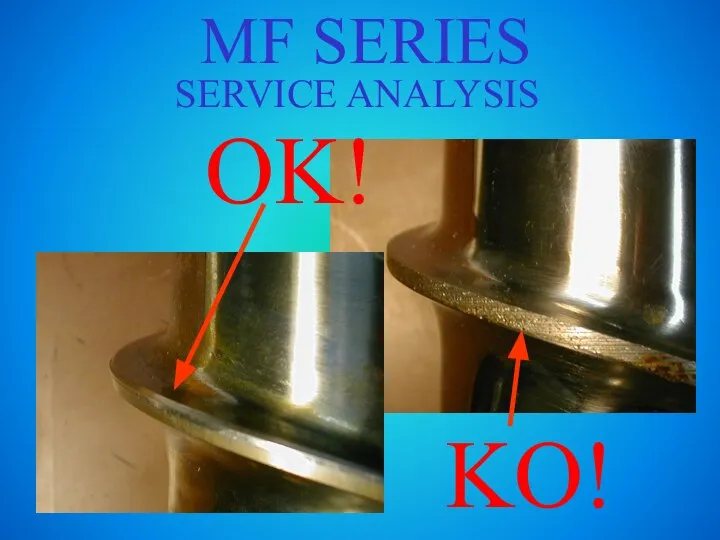
- 74. MF SERIES SERVICE ANALYSIS OK! KO!
- 75. MF SERIES SERVICE ANALYSIS Check for: Worn out drive motor bearings Worn out freezer top or
- 76. MF SERIES SERVICE ANALYSIS
- 77. MF SERIES SERVICE ANALYSIS Wrong rotation of drive motor (opposite direction) Green and Yellow LED ON.
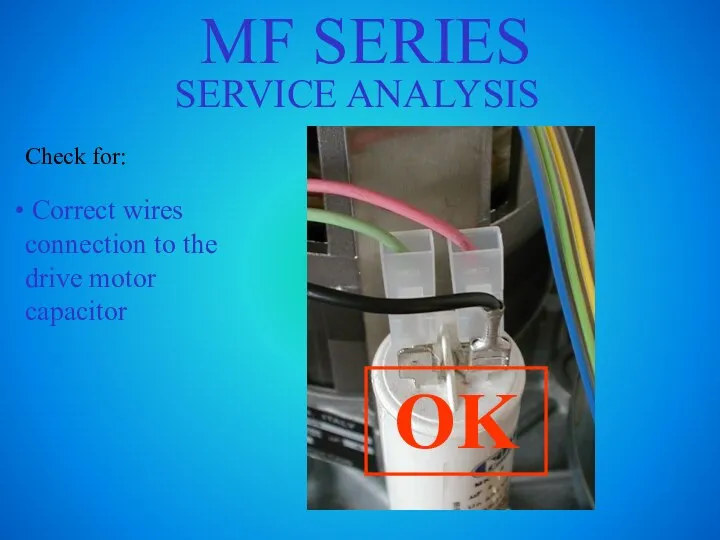
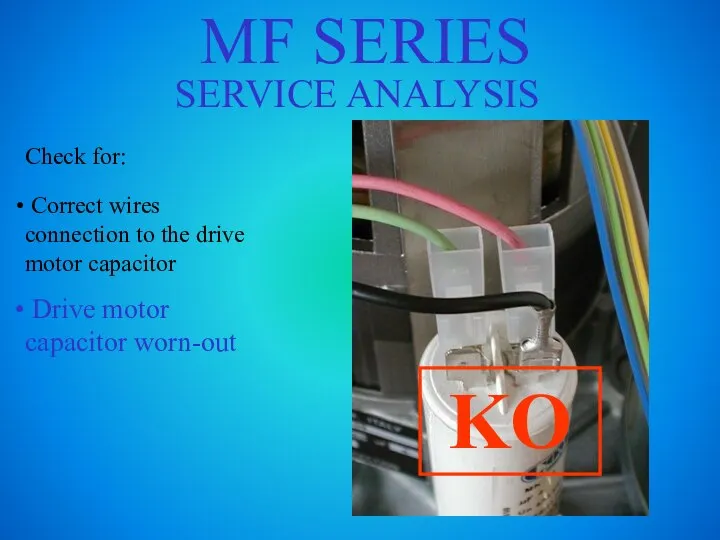
- 78. MF SERIES SERVICE ANALYSIS Check for: Correct wires connection to the drive motor capacitor OK
- 79. MF SERIES SERVICE ANALYSIS Check for: Correct wires connection to the drive motor capacitor Drive motor
- 80. MF SERIES SERVICE ANALYSIS Check for: Correct wires connection to the drive motor capacitor Drive motor
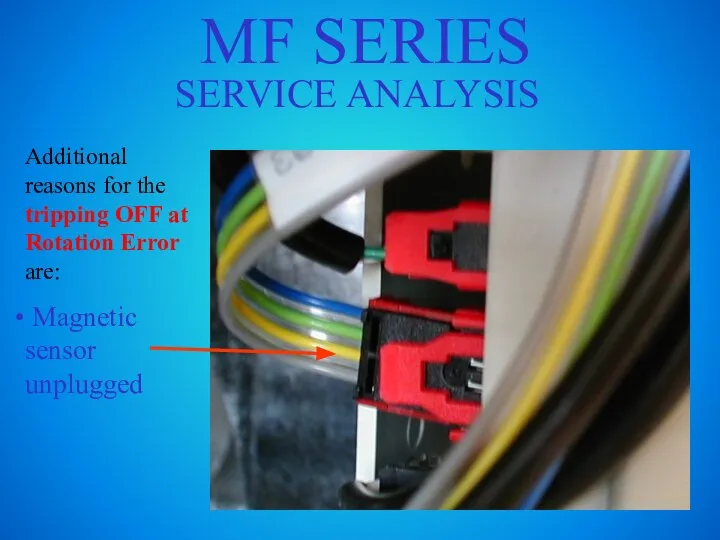
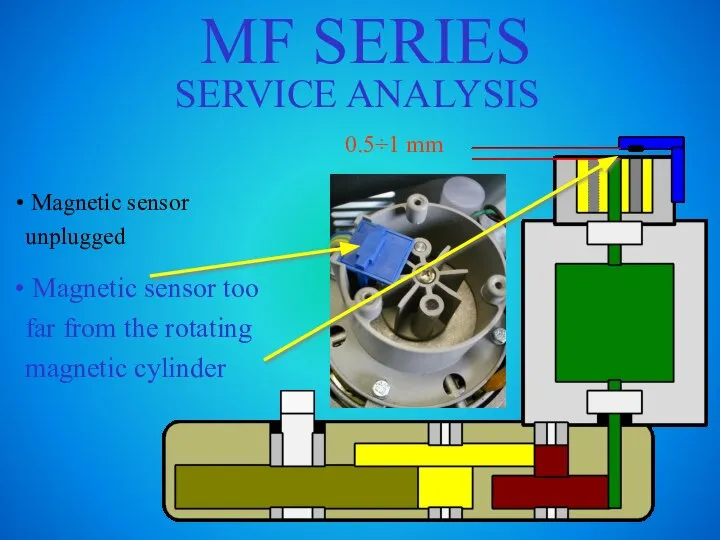
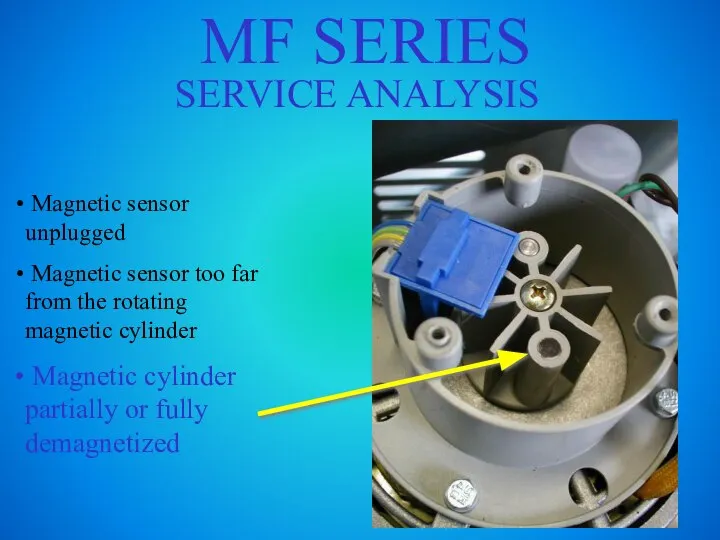
- 81. MF SERIES SERVICE ANALYSIS Additional reasons for the tripping OFF at Rotation Error are: Magnetic sensor
- 82. MF SERIES SERVICE ANALYSIS Magnetic sensor unplugged Magnetic sensor too far from the rotating magnetic cylinder
- 83. MF SERIES SERVICE ANALYSIS Magnetic sensor unplugged Magnetic sensor too far from the rotating magnetic cylinder
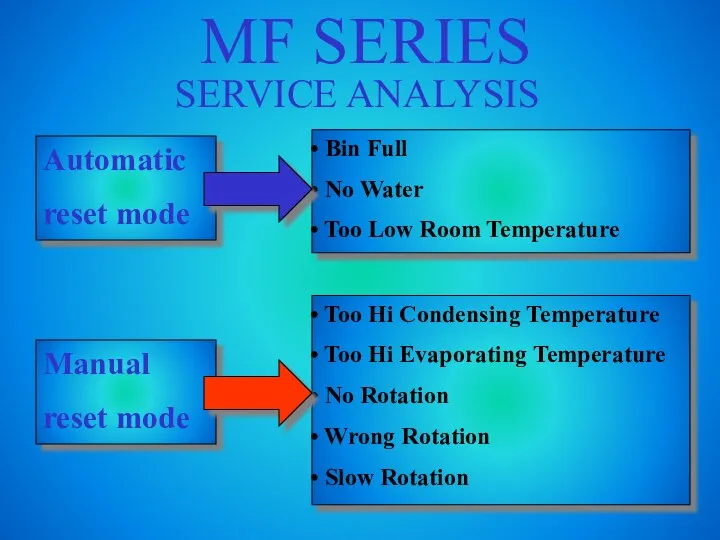
- 84. MF SERIES SERVICE ANALYSIS Automatic reset mode Manual reset mode Bin Full No Water Too Low
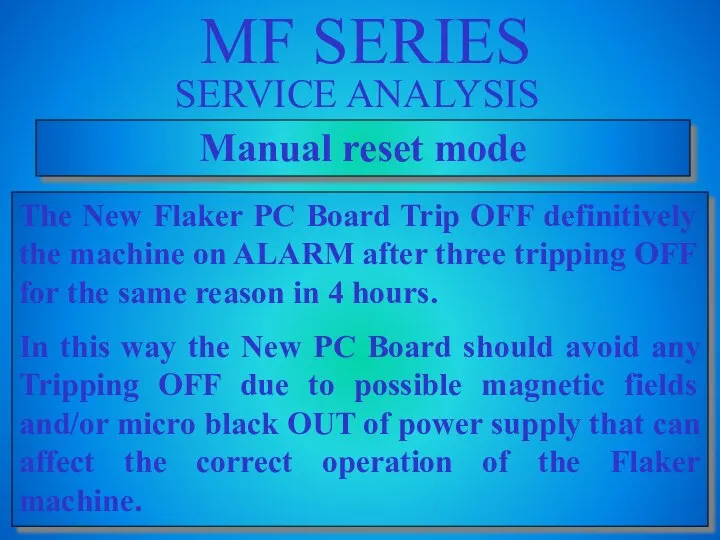
- 85. MF SERIES SERVICE ANALYSIS Manual reset mode The New Flaker PC Board Trip OFF definitively the
- 86. MF SERIES REPLACEMENT OF THE AUGER, WATER SEAL AND BEARINGS
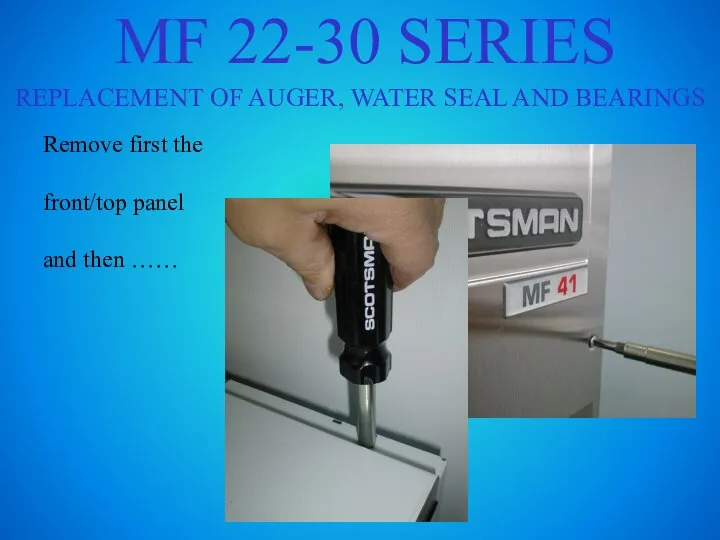
- 87. MF 22-30 SERIES REPLACEMENT OF AUGER, WATER SEAL AND BEARINGS Remove first the front/top panel and
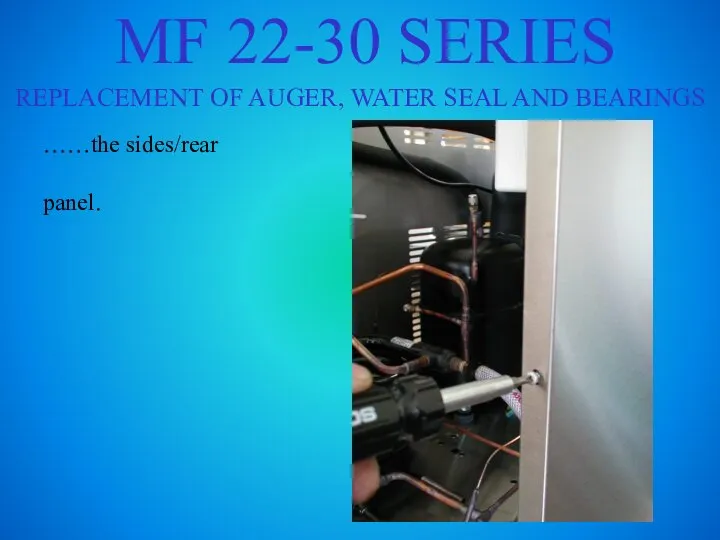
- 88. MF 22-30 SERIES REPLACEMENT OF AUGER, WATER SEAL AND BEARINGS ……the sides/rear panel.
- 89. MF 22-30 SERIES REPLACEMENT OF AUGER, WATER SEAL AND BEARINGS Unloose the wing nut then…... …..remove
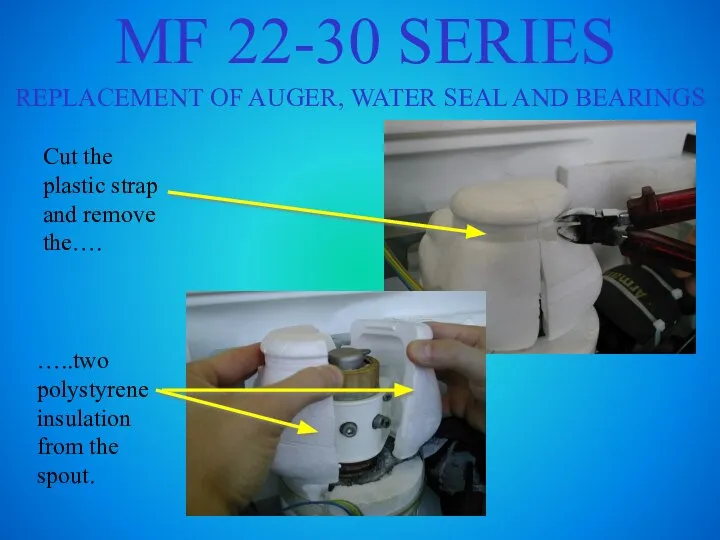
- 90. MF 22-30 SERIES REPLACEMENT OF AUGER, WATER SEAL AND BEARINGS Cut the plastic strap and remove
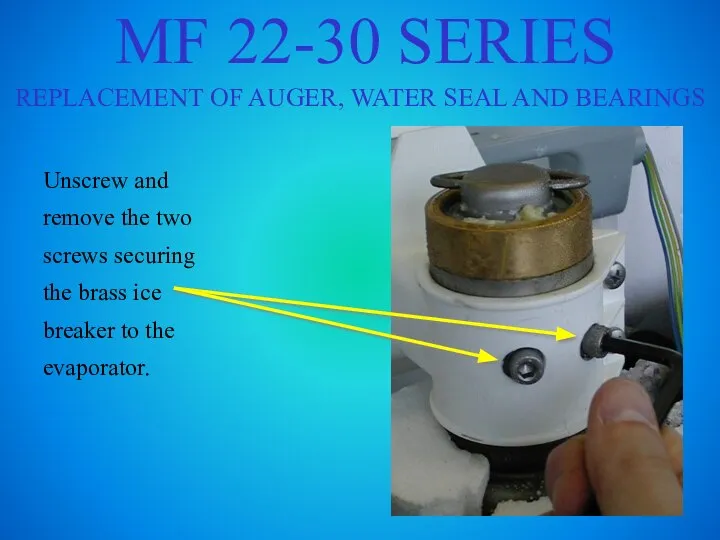
- 91. MF 22-30 SERIES REPLACEMENT OF AUGER, WATER SEAL AND BEARINGS Unscrew and remove the two screws
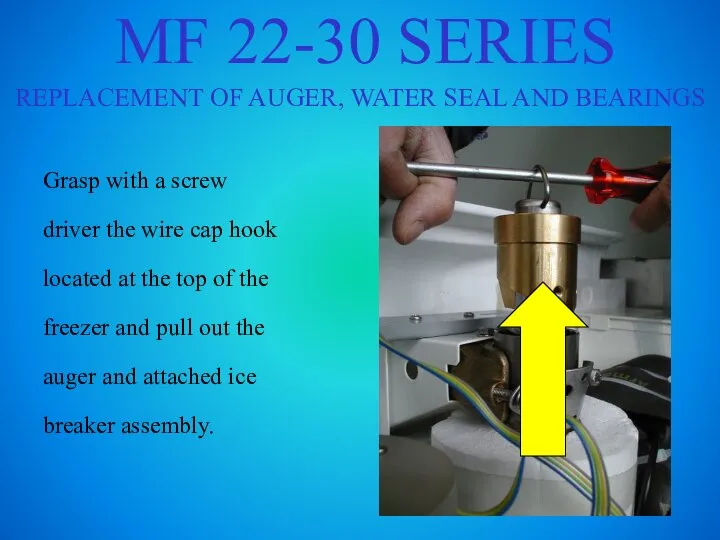
- 92. MF 22-30 SERIES REPLACEMENT OF AUGER, WATER SEAL AND BEARINGS Grasp with a screw driver the
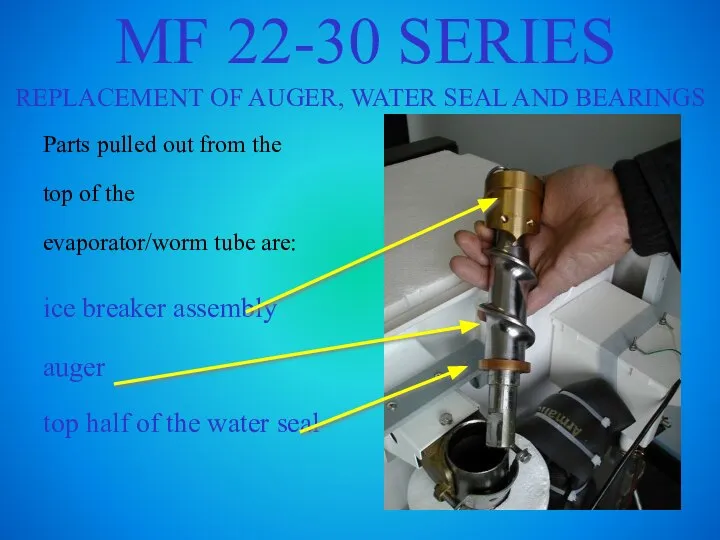
- 93. MF 22-30 SERIES REPLACEMENT OF AUGER, WATER SEAL AND BEARINGS Parts pulled out from the top
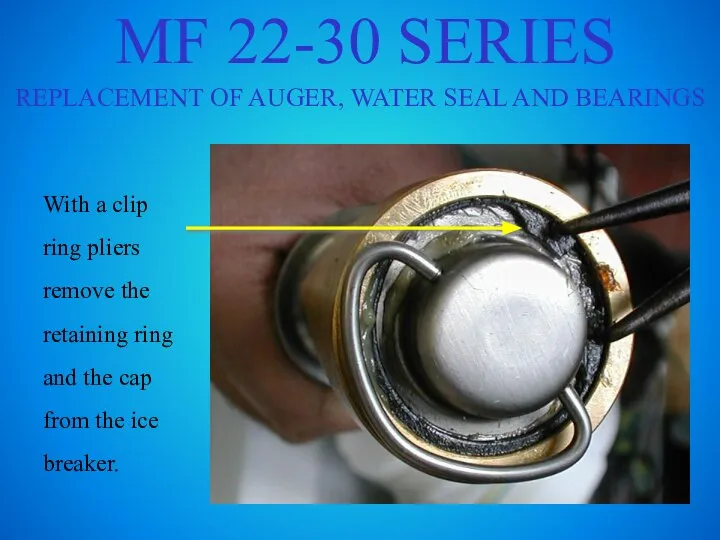
- 94. MF 22-30 SERIES REPLACEMENT OF AUGER, WATER SEAL AND BEARINGS With a clip ring pliers remove
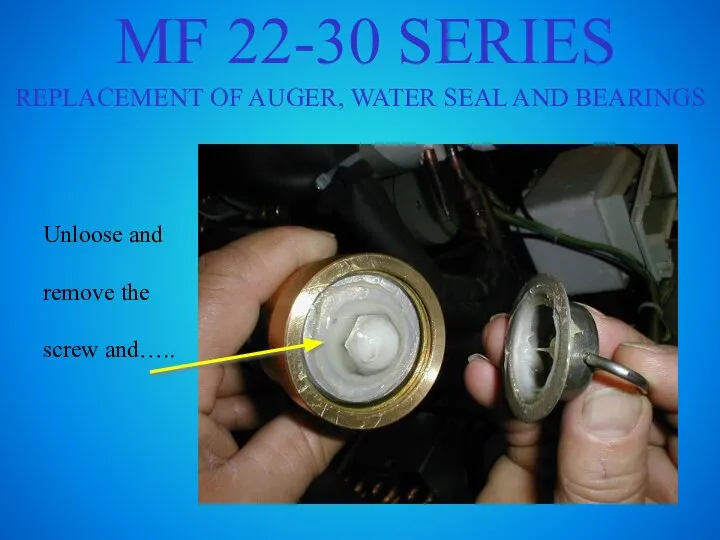
- 95. MF 22-30 SERIES REPLACEMENT OF AUGER, WATER SEAL AND BEARINGS Unloose and remove the screw and…..
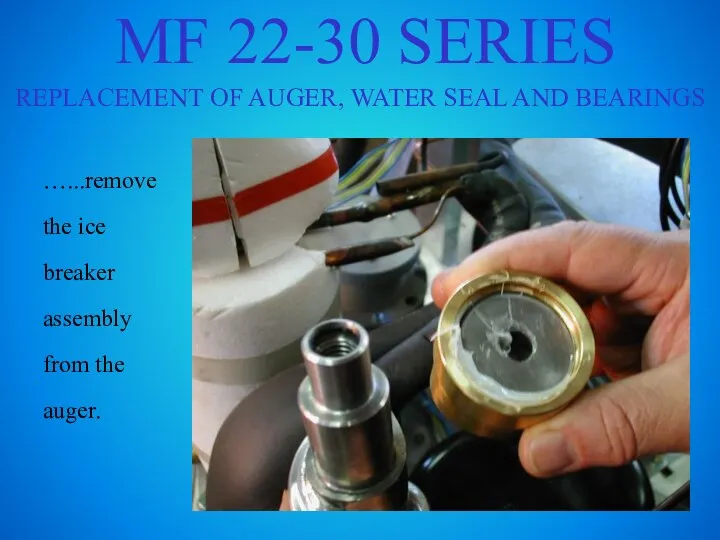
- 96. MF 22-30 SERIES REPLACEMENT OF AUGER, WATER SEAL AND BEARINGS …...remove the ice breaker assembly from
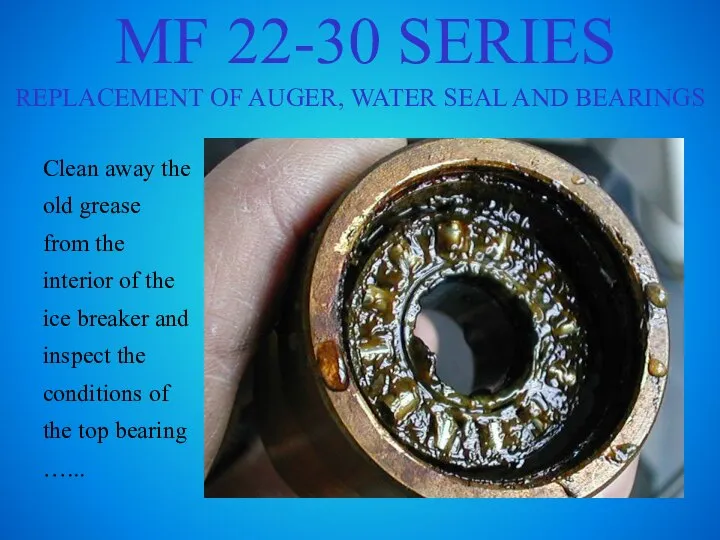
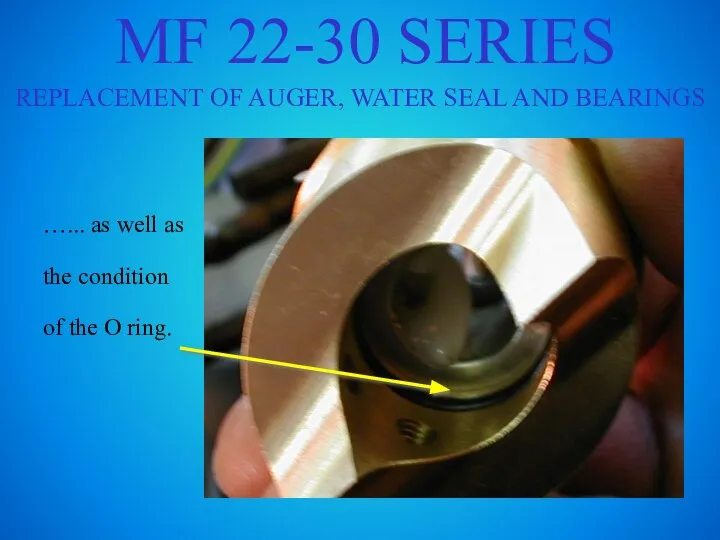
- 97. MF 22-30 SERIES REPLACEMENT OF AUGER, WATER SEAL AND BEARINGS Clean away the old grease from
- 98. MF 22-30 SERIES REPLACEMENT OF AUGER, WATER SEAL AND BEARINGS …... as well as the condition
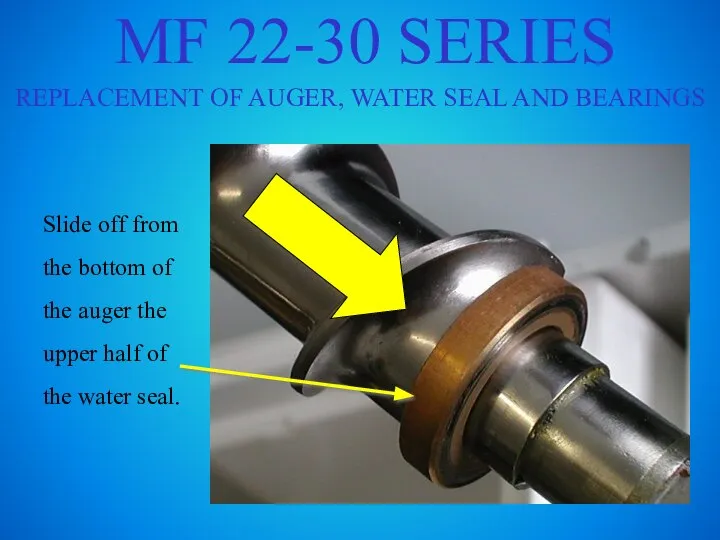
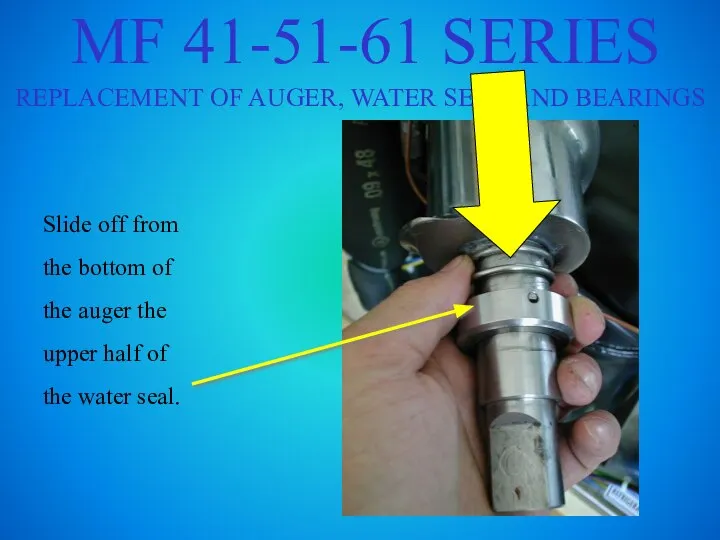
- 99. MF 22-30 SERIES REPLACEMENT OF AUGER, WATER SEAL AND BEARINGS Slide off from the bottom of
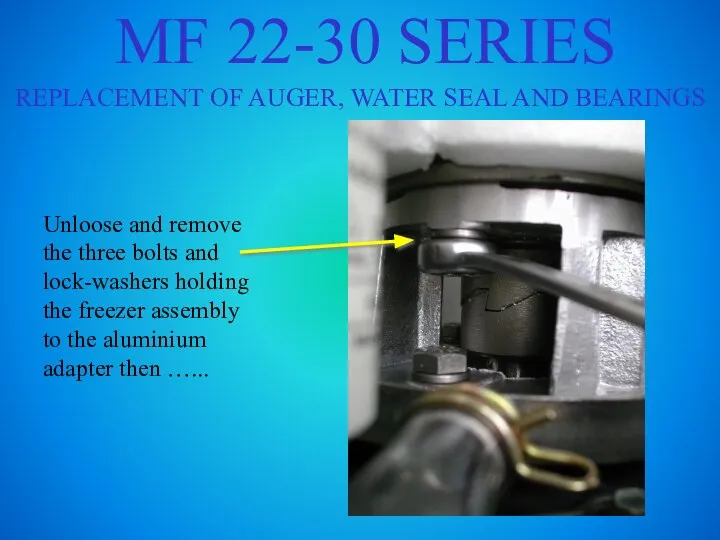
- 100. MF 22-30 SERIES REPLACEMENT OF AUGER, WATER SEAL AND BEARINGS Unloose and remove the three bolts
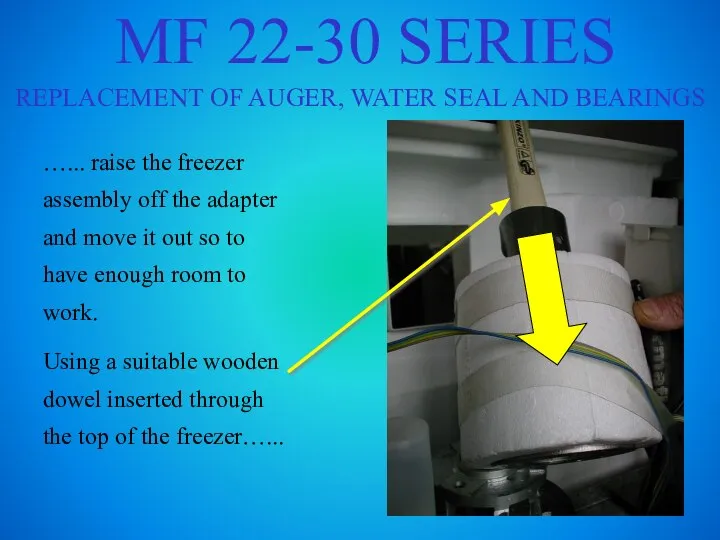
- 101. MF 22-30 SERIES REPLACEMENT OF AUGER, WATER SEAL AND BEARINGS …... raise the freezer assembly off
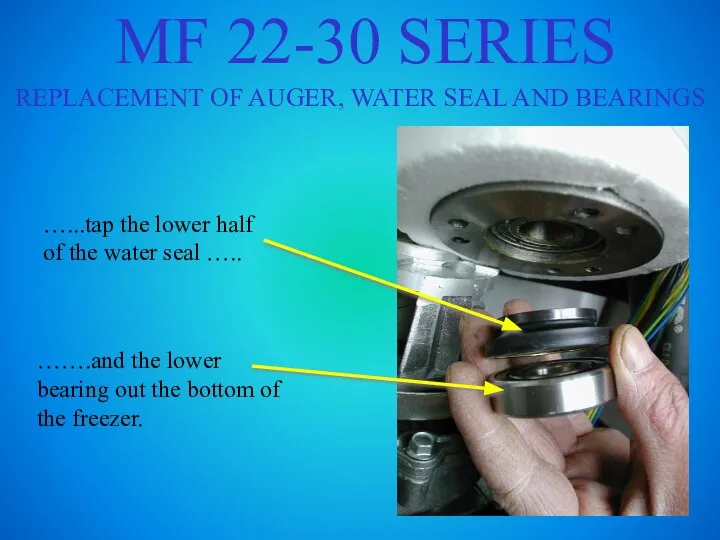
- 102. MF 22-30 SERIES REPLACEMENT OF AUGER, WATER SEAL AND BEARINGS …...tap the lower half of the
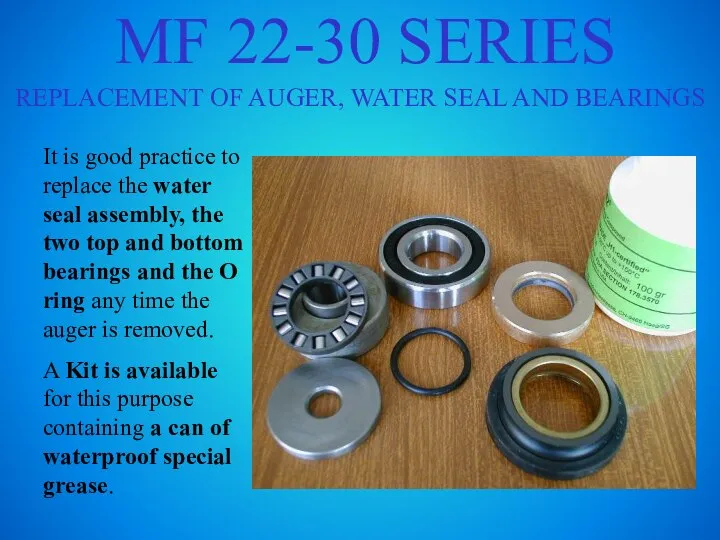
- 103. MF 22-30 SERIES REPLACEMENT OF AUGER, WATER SEAL AND BEARINGS It is good practice to replace
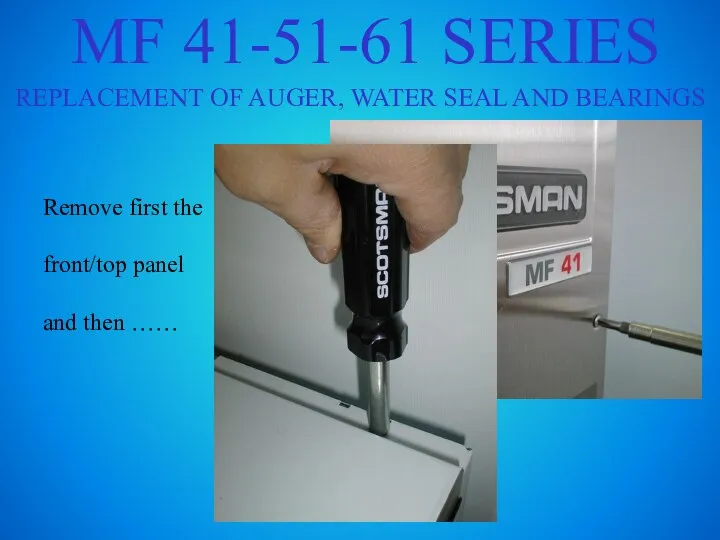
- 104. MF 41-51-61 SERIES REPLACEMENT OF AUGER, WATER SEAL AND BEARINGS Remove first the front/top panel and
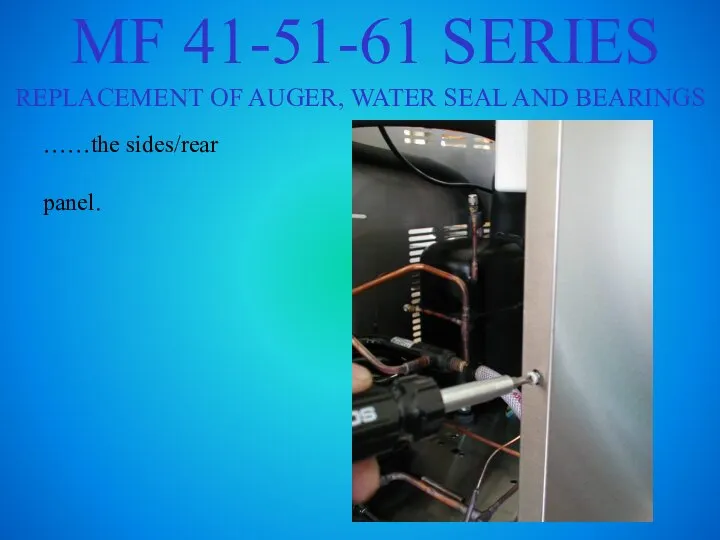
- 105. MF 41-51-61 SERIES REPLACEMENT OF AUGER, WATER SEAL AND BEARINGS ……the sides/rear panel.
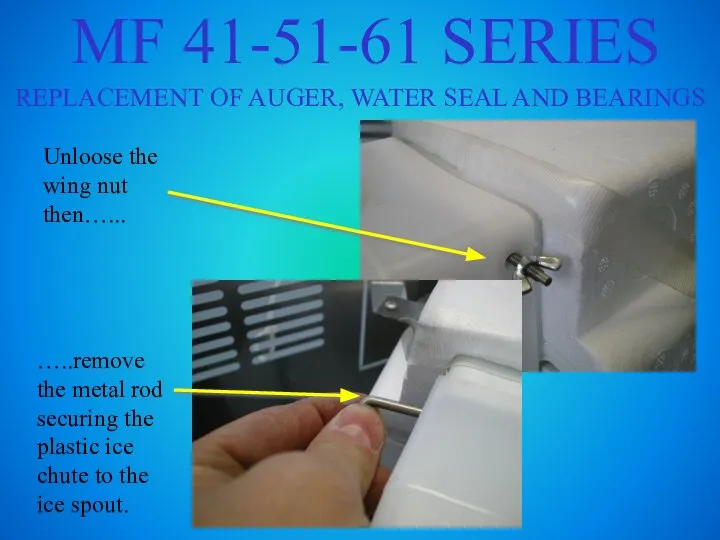
- 106. REPLACEMENT OF AUGER, WATER SEAL AND BEARINGS Unloose the wing nut then…... …..remove the metal rod
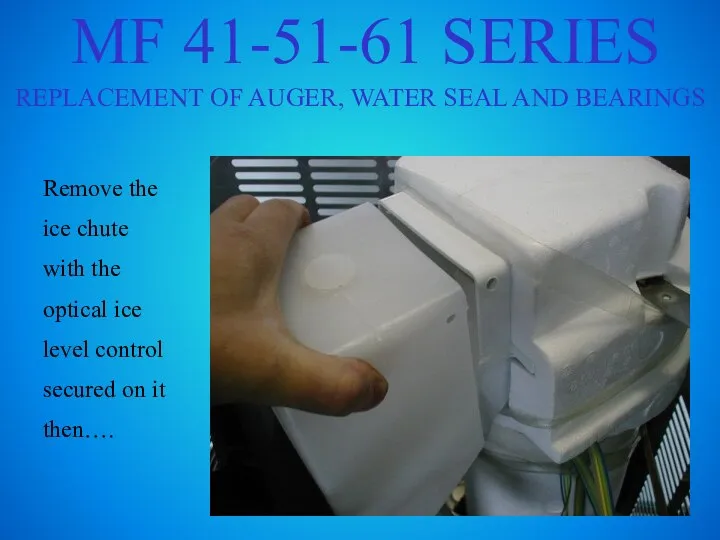
- 107. MF 41-51-61 SERIES REPLACEMENT OF AUGER, WATER SEAL AND BEARINGS Remove the ice chute with the
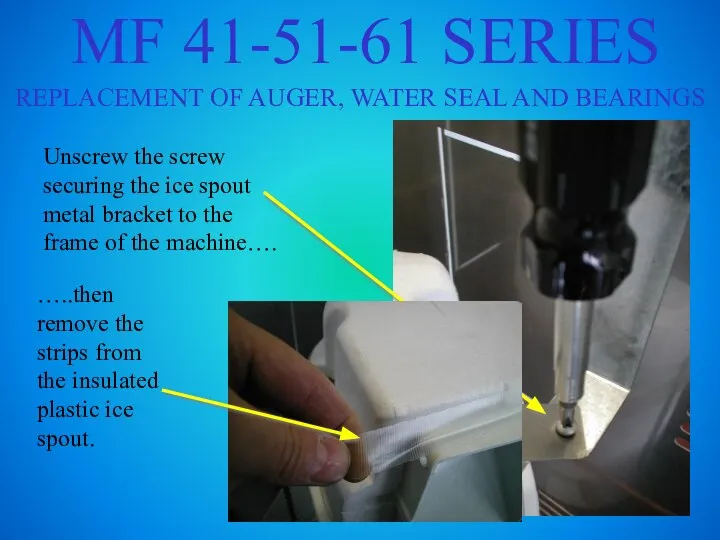
- 108. MF 41-51-61 SERIES REPLACEMENT OF AUGER, WATER SEAL AND BEARINGS Unscrew the screw securing the ice
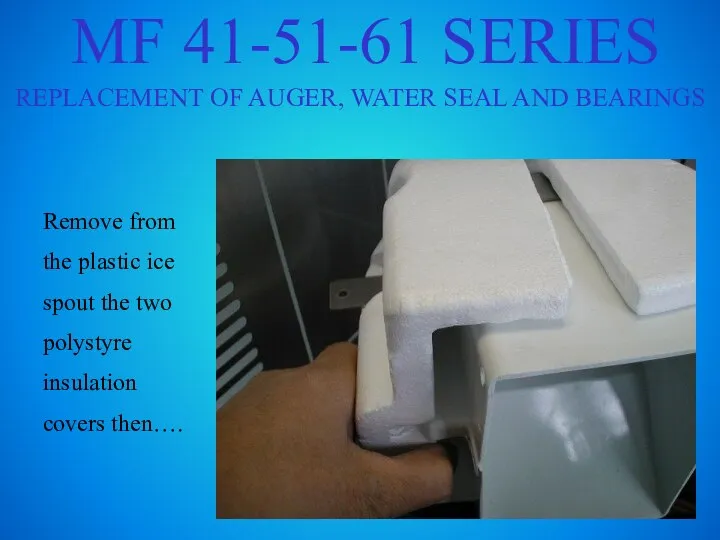
- 109. MF 41-51-61 SERIES REPLACEMENT OF AUGER, WATER SEAL AND BEARINGS Remove from the plastic ice spout
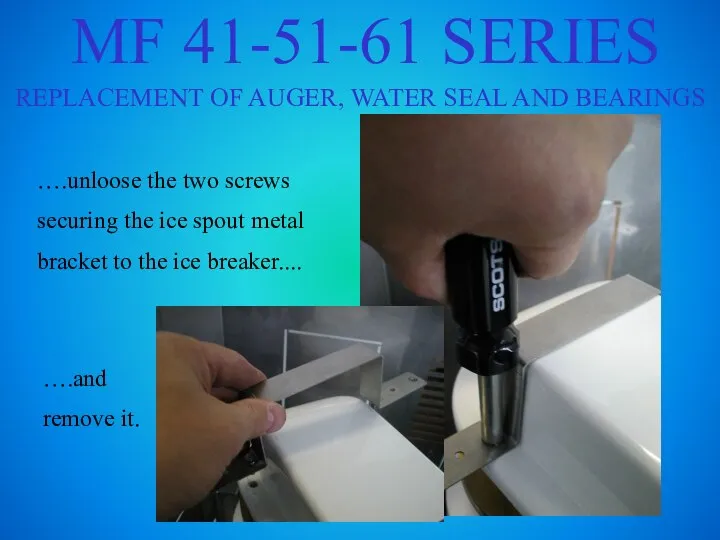
- 110. MF 41-51-61 SERIES REPLACEMENT OF AUGER, WATER SEAL AND BEARINGS ….unloose the two screws securing the
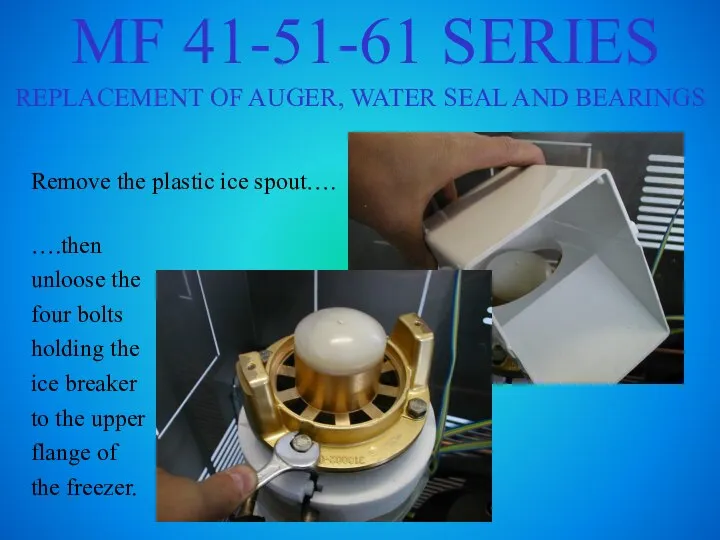
- 111. MF 41-51-61 SERIES REPLACEMENT OF AUGER, WATER SEAL AND BEARINGS Remove the plastic ice spout…. ….then
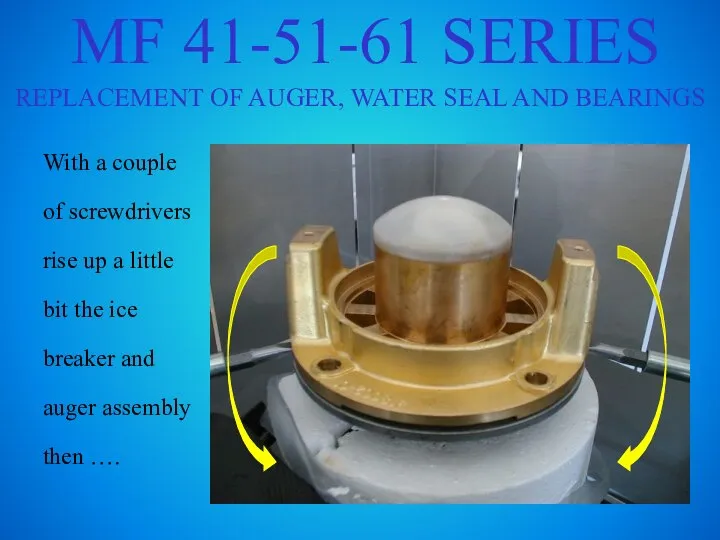
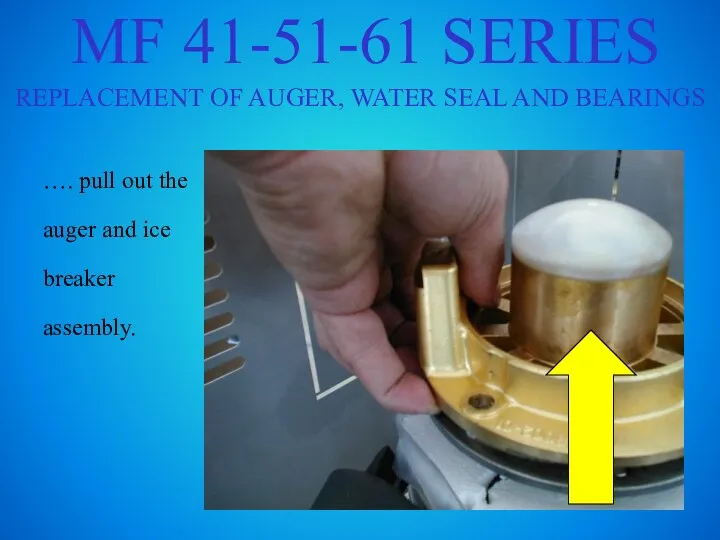
- 112. MF 41-51-61 SERIES REPLACEMENT OF AUGER, WATER SEAL AND BEARINGS With a couple of screwdrivers rise
- 113. MF 41-51-61 SERIES REPLACEMENT OF AUGER, WATER SEAL AND BEARINGS …. pull out the auger and
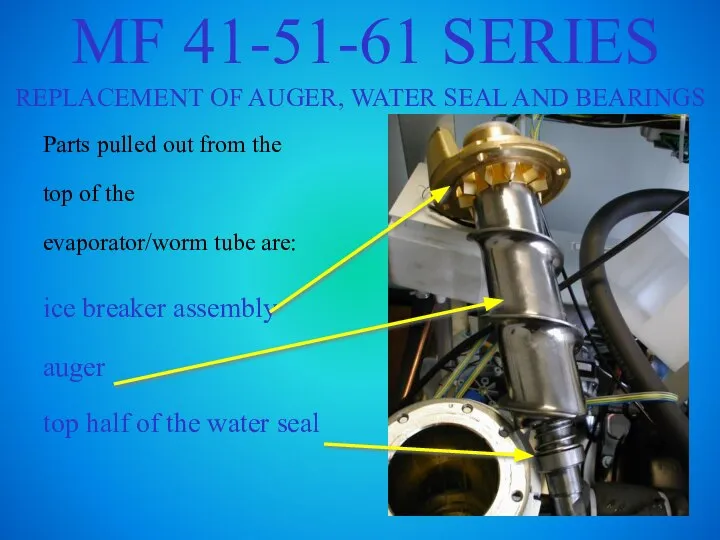
- 114. MF 41-51-61 SERIES REPLACEMENT OF AUGER, WATER SEAL AND BEARINGS Parts pulled out from the top
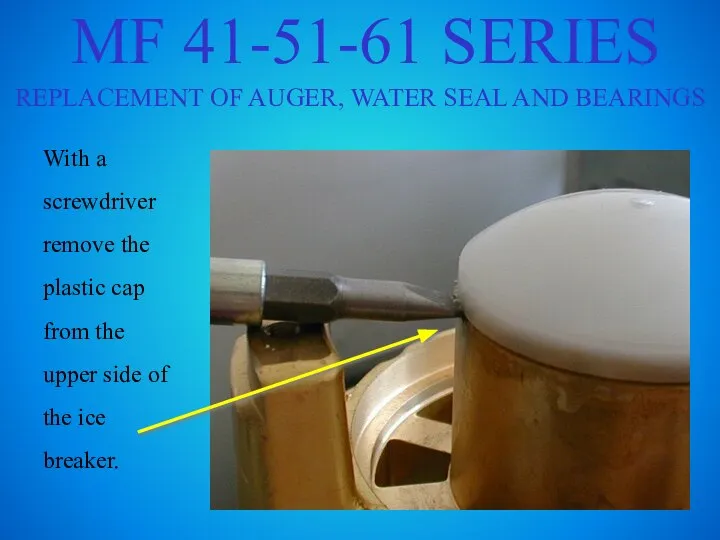
- 115. MF 41-51-61 SERIES REPLACEMENT OF AUGER, WATER SEAL AND BEARINGS With a screwdriver remove the plastic
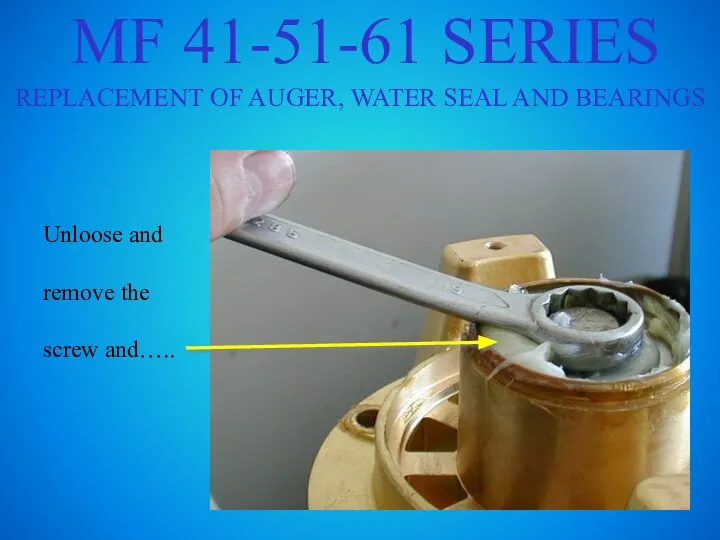
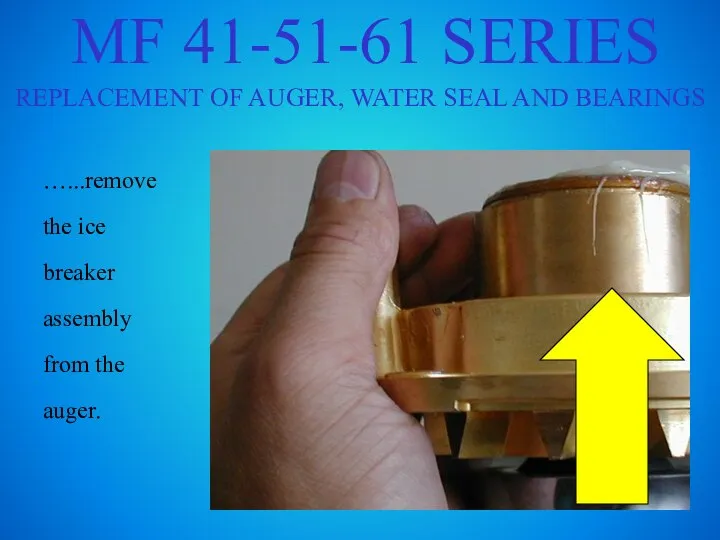
- 116. MF 41-51-61 SERIES REPLACEMENT OF AUGER, WATER SEAL AND BEARINGS Unloose and remove the screw and…..
- 117. MF 41-51-61 SERIES REPLACEMENT OF AUGER, WATER SEAL AND BEARINGS …...remove the ice breaker assembly from
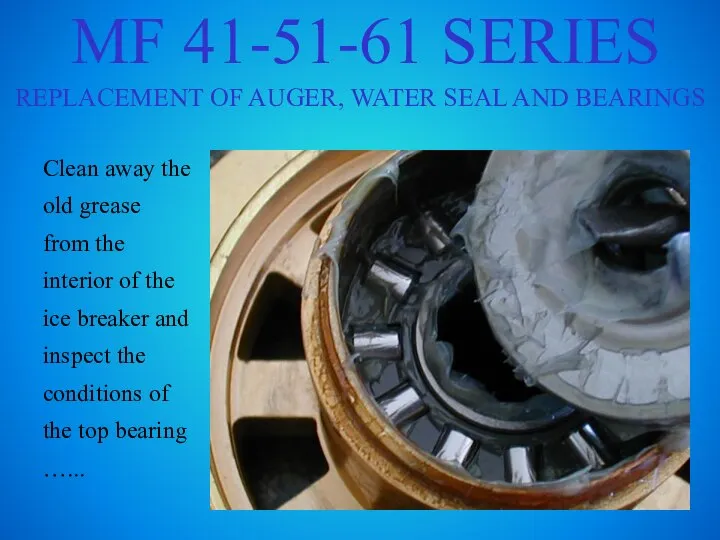
- 118. MF 41-51-61 SERIES REPLACEMENT OF AUGER, WATER SEAL AND BEARINGS Clean away the old grease from
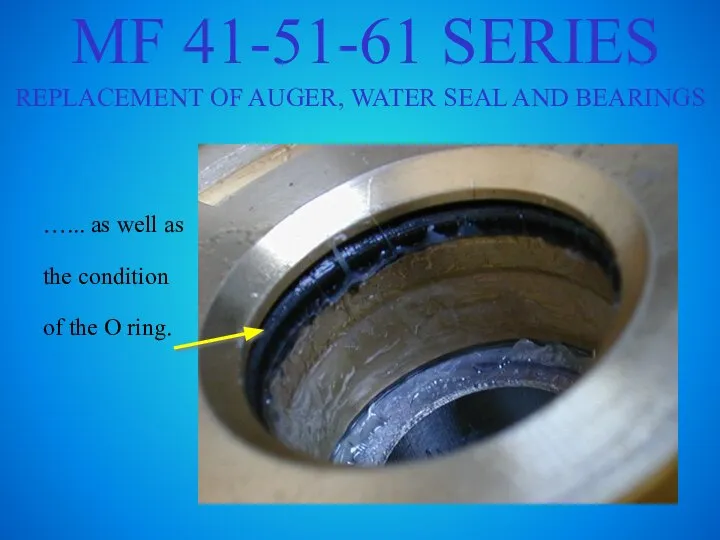
- 119. MF 41-51-61 SERIES REPLACEMENT OF AUGER, WATER SEAL AND BEARINGS …... as well as the condition
- 120. MF 41-51-61 SERIES REPLACEMENT OF AUGER, WATER SEAL AND BEARINGS Slide off from the bottom of
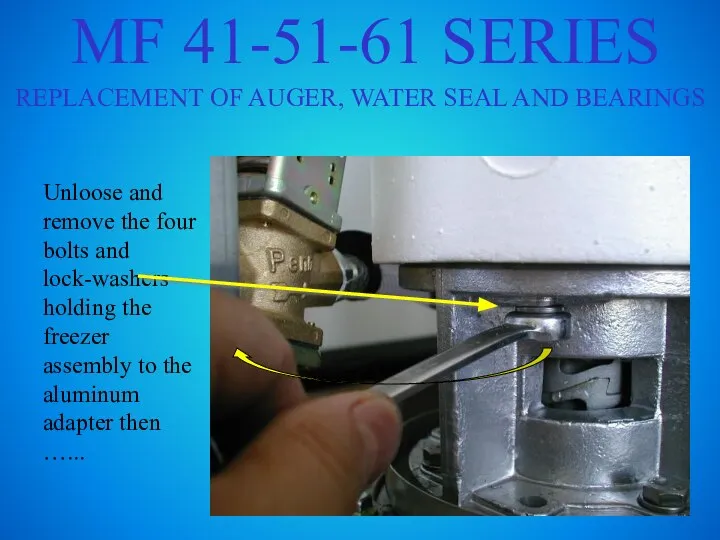
- 121. MF 41-51-61 SERIES REPLACEMENT OF AUGER, WATER SEAL AND BEARINGS Unloose and remove the four bolts
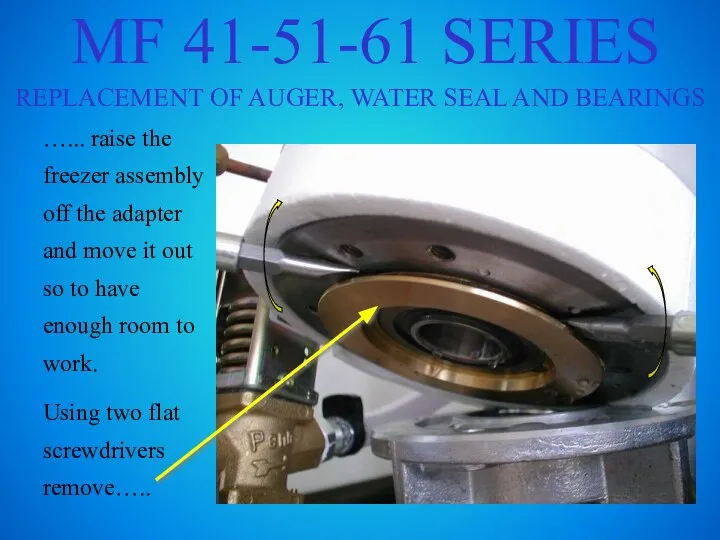
- 122. MF 41-51-61 SERIES REPLACEMENT OF AUGER, WATER SEAL AND BEARINGS …... raise the freezer assembly off
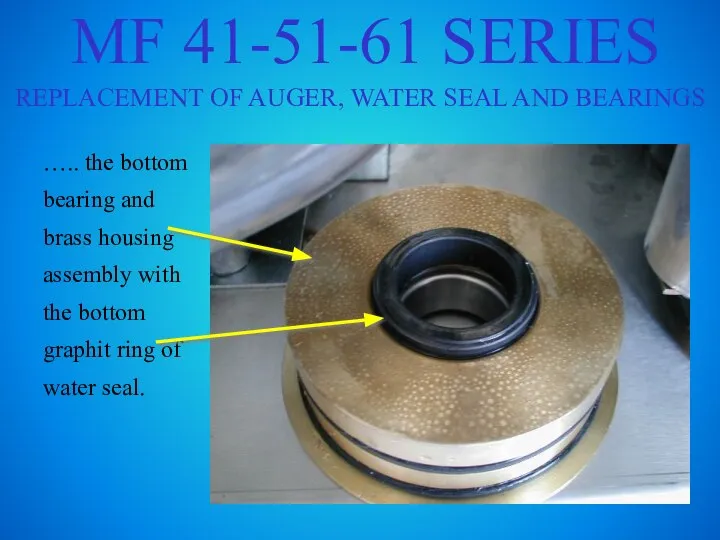
- 123. MF 41-51-61 SERIES REPLACEMENT OF AUGER, WATER SEAL AND BEARINGS ….. the bottom bearing and brass
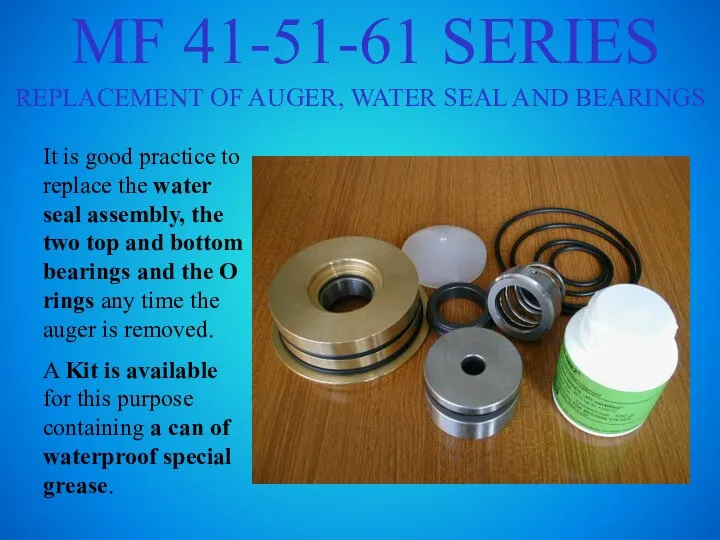
- 124. MF 41-51-61 SERIES REPLACEMENT OF AUGER, WATER SEAL AND BEARINGS It is good practice to replace
- 126. Скачать презентацию

Слайд 3MF SERIES
MAINTENANCE
The most important program on the maintenance of the Flaker machines
MF SERIES
MAINTENANCE
The most important program on the maintenance of the Flaker machines

Слайд 4MF SERIES
MAINTENANCE
TOOLS REQUIRED
Medium Phillips Screwdriver
Medium Flat Screwdriver
Pair of safety
MF SERIES
MAINTENANCE
TOOLS REQUIRED
Medium Phillips Screwdriver
Medium Flat Screwdriver
Pair of safety
Слайд 5MF SERIES
MAINTENANCE
Remove the front/top panel.
MF SERIES
MAINTENANCE
Remove the front/top panel.
Слайд 6MF SERIES
MAINTENANCE
Switch OFF the machine at main power switch….
…..and close the water
MF SERIES
MAINTENANCE
Switch OFF the machine at main power switch….
…..and close the water
Слайд 7MF SERIES
MAINTENANCE
Scoop out all ice stored into the bin so to prevent
MF SERIES
MAINTENANCE
Scoop out all ice stored into the bin so to prevent
Слайд 8MF SERIES
MAINTENANCE
Remove the metal clamp and disconnect the water tube from the
MF SERIES
MAINTENANCE
Remove the metal clamp and disconnect the water tube from the
Слайд 9MF SERIES
MAINTENANCE
….the water into a rag then.....
MF SERIES
MAINTENANCE
….the water into a rag then.....
Слайд 10MF SERIES
MAINTENANCE
….place again the tube on the outlet port.
MF SERIES
MAINTENANCE
….place again the tube on the outlet port.
Слайд 11MF SERIES
MAINTENANCE
Prepare the cleaning solution by diluting in a plastic bucket lukewarm
MF SERIES
MAINTENANCE
Prepare the cleaning solution by diluting in a plastic bucket lukewarm
Слайд 12MF SERIES
MAINTENANCE
MF 22: 1,5 LITER WATER WITH 150 CC CLEANER
MF 30: 2 LITERS WATER
MF SERIES
MAINTENANCE
MF 22: 1,5 LITER WATER WITH 150 CC CLEANER
MF 30: 2 LITERS WATER
Слайд 13MF SERIES
MAINTENANCE
Remove the water reservoir cover then….
….slowly pour onto the water reservoir
MF SERIES
MAINTENANCE
Remove the water reservoir cover then….
….slowly pour onto the water reservoir
Слайд 14MF SERIES
MAINTENANCE
Leave the machine in OFF mode for approximately 20 minutes so
MF SERIES
MAINTENANCE
Leave the machine in OFF mode for approximately 20 minutes so
Слайд 15MF SERIES
MAINTENANCE
With the help of a brush dissolve the most resistant and
MF SERIES
MAINTENANCE
With the help of a brush dissolve the most resistant and
Слайд 16MF SERIES
MAINTENANCE
Jump with a wire or connect together the two metal pins
MF SERIES
MAINTENANCE
Jump with a wire or connect together the two metal pins
Слайд 17MF SERIES
MAINTENANCE
… move the master switch to ON position.
ON
MF SERIES
MAINTENANCE
… move the master switch to ON position.
ON
Слайд 18MF SERIES
MAINTENANCE
Few minutes later the machine start up to produce and discharge
MF SERIES
MAINTENANCE
Few minutes later the machine start up to produce and discharge
Слайд 19MF SERIES
MAINTENANCE
As soon as the level of the water into the water
MF SERIES
MAINTENANCE
As soon as the level of the water into the water
Слайд 20MF SERIES
MAINTENANCE
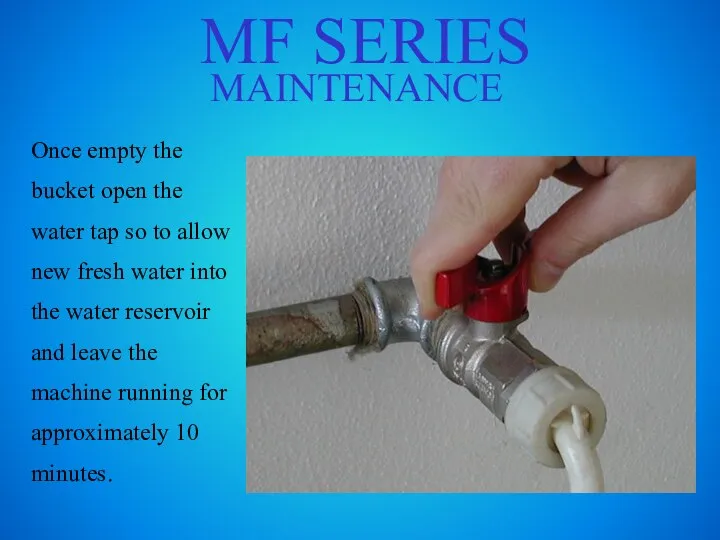
Once empty the bucket open the water tap so to allow
MF SERIES
MAINTENANCE
Once empty the bucket open the water tap so to allow
Слайд 21MF SERIES
MAINTENANCE
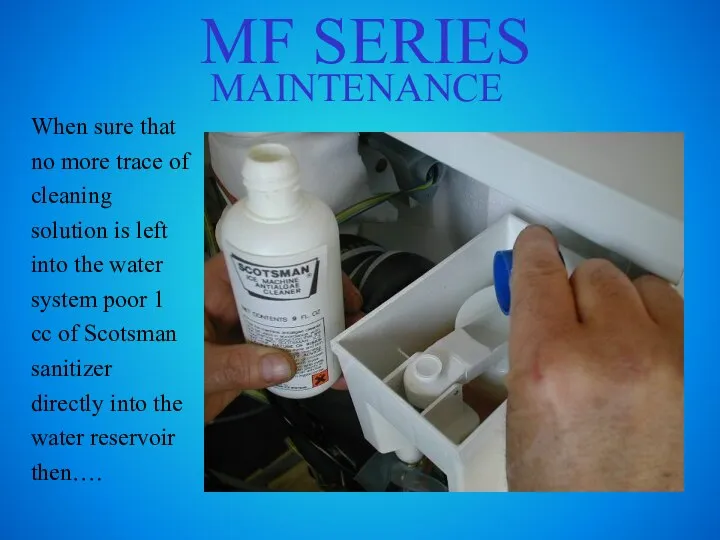
When sure that no more trace of cleaning solution is left
MF SERIES
MAINTENANCE
When sure that no more trace of cleaning solution is left
Слайд 22MF SERIES
MAINTENANCE
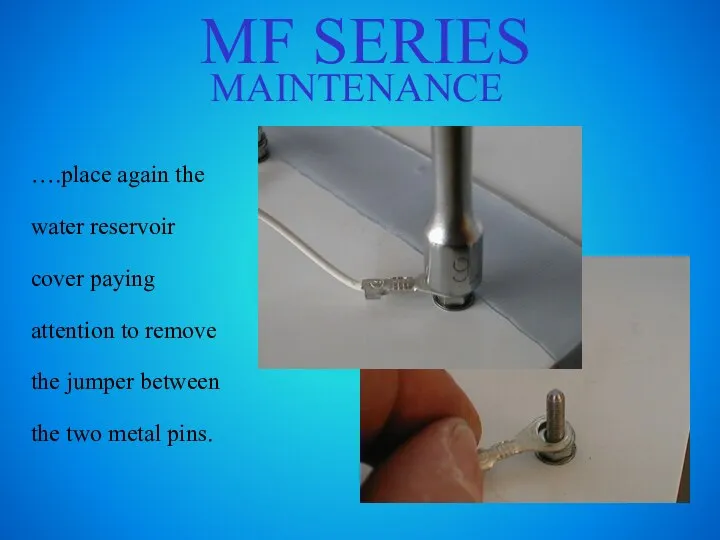
….place again the water reservoir cover paying attention to remove the
MF SERIES
MAINTENANCE
….place again the water reservoir cover paying attention to remove the
Слайд 23MF SERIES
MAINTENANCE
Scoop out the flake ice produced with cleaning/sanitizing solution.
MF SERIES
MAINTENANCE
Scoop out the flake ice produced with cleaning/sanitizing solution.

Слайд 24MF SERIES
MAINTENANCE
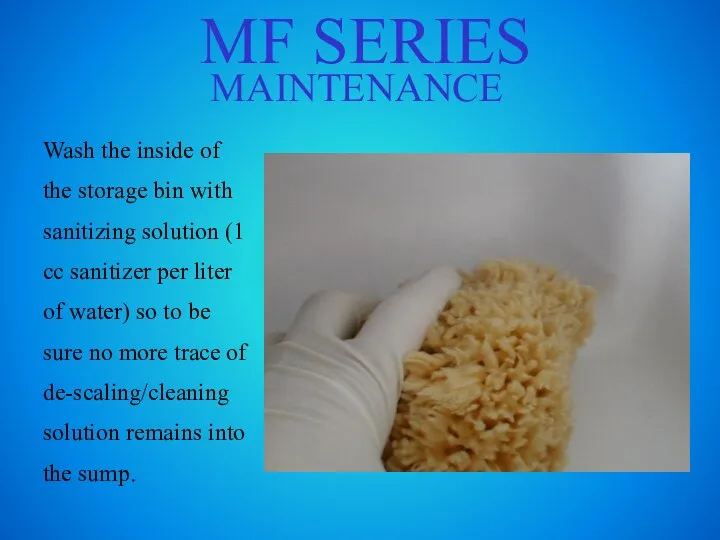
Wash the inside of the storage bin with sanitizing solution (1
MF SERIES
MAINTENANCE
Wash the inside of the storage bin with sanitizing solution (1
Слайд 25MAINTENANCE
REMEMBER. To prevent the accumulation of undesirable bacteria it is necessary to
MAINTENANCE
REMEMBER. To prevent the accumulation of undesirable bacteria it is necessary to
Слайд 26MF SERIES
MAINTENANCE
It is possible to change a little bit the quality of
MF SERIES
MAINTENANCE
It is possible to change a little bit the quality of
Слайд 27MF SERIES
MAINTENANCE
The unit frame is equipped by five series of holes so
MF SERIES
MAINTENANCE
The unit frame is equipped by five series of holes so
Слайд 28MF SERIES
SERVICE ANALYSIS
MF SERIES
SERVICE ANALYSIS

Слайд 29MF SERIES
SERVICE ANALYSIS
Bin Full situation:
Green and Yellow LED ON.
MF SERIES
SERVICE ANALYSIS
Bin Full situation:
Green and Yellow LED ON.

Слайд 30MF SERIES
SERVICE ANALYSIS
Check for the correct operation of the Optical Ice Level
MF SERIES
SERVICE ANALYSIS
Check for the correct operation of the Optical Ice Level
Слайд 31MF SERIES
SERVICE ANALYSIS
The two eyes placed on the opposite side of the
MF SERIES
SERVICE ANALYSIS
The two eyes placed on the opposite side of the
Слайд 32MF SERIES
SERVICE ANALYSIS
Check also for any possible accumulation of scale around the
MF SERIES
SERVICE ANALYSIS
Check also for any possible accumulation of scale around the
Слайд 33MF SERIES
SERVICE ANALYSIS
The power signal transmitted by the Optical Ice Level Control
MF SERIES
SERVICE ANALYSIS
The power signal transmitted by the Optical Ice Level Control
Слайд 34MF SERIES
SERVICE ANALYSIS
If re-adjusted, be sure first of the correct tripping OFF
MF SERIES
SERVICE ANALYSIS
If re-adjusted, be sure first of the correct tripping OFF
Слайд 35MF SERIES
SERVICE ANALYSIS
ATTENTION. The Optical Ice Level Control can be affected by
MF SERIES
SERVICE ANALYSIS
ATTENTION. The Optical Ice Level Control can be affected by
Слайд 36MF SERIES
SERVICE ANALYSIS
No water situation:
Green and Yellow LED ON.
MF SERIES
SERVICE ANALYSIS
No water situation:
Green and Yellow LED ON.
Слайд 37MF SERIES
SERVICE ANALYSIS
Check first for the water tap on the water supply
MF SERIES
SERVICE ANALYSIS
Check first for the water tap on the water supply
Слайд 38MF SERIES
SERVICE ANALYSIS
……for the water filter located on the water inlet line…..
MF SERIES
SERVICE ANALYSIS
……for the water filter located on the water inlet line…..
Слайд 39MF SERIES
SERVICE ANALYSIS
……for the water strainer located inside the water inlet fitting…..
MF SERIES
SERVICE ANALYSIS
……for the water strainer located inside the water inlet fitting…..
Слайд 40MF SERIES
SERVICE ANALYSIS
…..for the correct cleaning of the orifice of the water
MF SERIES
SERVICE ANALYSIS
…..for the correct cleaning of the orifice of the water
Слайд 41MF SERIES
SERVICE ANALYSIS
In case of water into the water reservoir check for
MF SERIES
SERVICE ANALYSIS
In case of water into the water reservoir check for
Слайд 42MF SERIES
SERVICE ANALYSIS
…..or for any loosing wire between the two metal pins
MF SERIES
SERVICE ANALYSIS
…..or for any loosing wire between the two metal pins
Слайд 43MF SERIES
SERVICE ANALYSIS
ATTENTION. The water level sensor operate by transmitting a low
MF SERIES
SERVICE ANALYSIS
ATTENTION. The water level sensor operate by transmitting a low
Слайд 44MF SERIES
SERVICE ANALYSIS
3’ waiting time:
Green LED ON
Red LED blinking
MF SERIES
SERVICE ANALYSIS
3’ waiting time:
Green LED ON
Red LED blinking
Слайд 45MF SERIES
SERVICE ANALYSIS
It is a normal situation at every machine start up
MF SERIES
SERVICE ANALYSIS
It is a normal situation at every machine start up
Слайд 46MF SERIES
SERVICE ANALYSIS
Too low ambient temperature(<+3ºC) Green and Red LED ON.
MF SERIES
SERVICE ANALYSIS
Too low ambient temperature(<+3ºC) Green and Red LED ON.
Слайд 47MF SERIES
SERVICE ANALYSIS
It is a typical winter situation.
When the machine is located
MF SERIES
SERVICE ANALYSIS
It is a typical winter situation.
When the machine is located
Слайд 48MF SERIES
SERVICE ANALYSIS
Too high condensing temperature (>60ºC or >70ºC)
Green and Red LED
MF SERIES
SERVICE ANALYSIS
Too high condensing temperature (>60ºC or >70ºC)
Green and Red LED
Слайд 49MF SERIES
SERVICE ANALYSIS
On Air Cooled Version check first for the correct operation
MF SERIES
SERVICE ANALYSIS
On Air Cooled Version check first for the correct operation
Слайд 50MF SERIES
SERVICE ANALYSIS
On Air Cooled Version check first for the correct operation
MF SERIES
SERVICE ANALYSIS
On Air Cooled Version check first for the correct operation
Слайд 51MF SERIES
SERVICE ANALYSIS
On Air Cooled Version check first for the correct operation
MF SERIES
SERVICE ANALYSIS
On Air Cooled Version check first for the correct operation
Слайд 52MF SERIES
SERVICE ANALYSIS
Check also for any possibility of fan motor overheating that
MF SERIES
SERVICE ANALYSIS
Check also for any possibility of fan motor overheating that
Слайд 53MF SERIES
SERVICE ANALYSIS
One more possibility (very rare) it is a faulty PC
MF SERIES
SERVICE ANALYSIS
One more possibility (very rare) it is a faulty PC
Слайд 54MF SERIES
SERVICE ANALYSIS
During normal operation mode the fan motor is energized at
MF SERIES
SERVICE ANALYSIS
During normal operation mode the fan motor is energized at
Слайд 55MF SERIES
SERVICE ANALYSIS
In case the power during the OFF mode is between
MF SERIES
SERVICE ANALYSIS
In case the power during the OFF mode is between
Слайд 56MF SERIES
SERVICE ANALYSIS
On Water Cooled Version check first for the:
Water tap
CLOSED
MF SERIES
SERVICE ANALYSIS
On Water Cooled Version check first for the:
Water tap
CLOSED

Слайд 57MF SERIES
SERVICE ANALYSIS
On Water Cooled Version check first for the:
Water tap
MF SERIES
SERVICE ANALYSIS
On Water Cooled Version check first for the:
Water tap
Слайд 58MF SERIES
SERVICE ANALYSIS
Too high evaporating temperature after 10’ operation
Green LED ON
Yellow LED
MF SERIES
SERVICE ANALYSIS
Too high evaporating temperature after 10’ operation
Green LED ON
Yellow LED
Слайд 59MF SERIES
SERVICE ANALYSIS
Check if ice is produced during the first ten minutes
MF SERIES
SERVICE ANALYSIS
Check if ice is produced during the first ten minutes
Слайд 60MF SERIES
SERVICE ANALYSIS
If no ice is produced check for:
Refrigerant charge. Hi
MF SERIES
SERVICE ANALYSIS
If no ice is produced check for:
Refrigerant charge. Hi
Слайд 61MF SERIES
SERVICE ANALYSIS
…...while suction pressure must be 2.5 bar (35 PSI)
MF SERIES
SERVICE ANALYSIS
…...while suction pressure must be 2.5 bar (35 PSI)
Слайд 62MF SERIES
SERVICE ANALYSIS
If no ice is produced check for:
Refrigerant charge
Operation
MF SERIES
SERVICE ANALYSIS
If no ice is produced check for:
Refrigerant charge
Operation
Слайд 63MF SERIES
SERVICE ANALYSIS
If no ice is produced check for:
Refrigerant charge
Operation
MF SERIES
SERVICE ANALYSIS
If no ice is produced check for:
Refrigerant charge
Operation
Слайд 64MF SERIES
SERVICE ANALYSIS
No rotation of drive motor
Green and Yellow LED ON.
MF SERIES
SERVICE ANALYSIS
No rotation of drive motor
Green and Yellow LED ON.

Слайд 65MF SERIES
SERVICE ANALYSIS
If the drive motor doesn’t turn check for:
Power out
MF SERIES
SERVICE ANALYSIS
If the drive motor doesn’t turn check for:
Power out
Слайд 66MF SERIES
SERVICE ANALYSIS
If the drive motor doesn’t turn check for:
Power out
MF SERIES
SERVICE ANALYSIS
If the drive motor doesn’t turn check for:
Power out
Слайд 67MF SERIES
SERVICE ANALYSIS
If the drive motor doesn’t turn check for:
Power out
MF SERIES
SERVICE ANALYSIS
If the drive motor doesn’t turn check for:
Power out
Слайд 68MF SERIES
SERVICE ANALYSIS
If the drive motor doesn’t turn check for:
Power out
MF SERIES
SERVICE ANALYSIS
If the drive motor doesn’t turn check for:
Power out
Слайд 69MF SERIES
SERVICE ANALYSIS
Slow rotation of drive motor (<1200 g/min)
Green and Yellow LED
MF SERIES
SERVICE ANALYSIS
Slow rotation of drive motor (<1200 g/min)
Green and Yellow LED
Слайд 70MF SERIES
SERVICE ANALYSIS
Check for:
Worn out drive motor bearings
MF SERIES
SERVICE ANALYSIS
Check for:
Worn out drive motor bearings
Слайд 71MF SERIES
SERVICE ANALYSIS
Check for:
Worn out drive motor bearings
Worn out
MF SERIES
SERVICE ANALYSIS
Check for:
Worn out drive motor bearings
Worn out
Слайд 72MF SERIES
SERVICE ANALYSIS
MF SERIES
SERVICE ANALYSIS
Слайд 73MF SERIES
SERVICE ANALYSIS
Check for:
Worn out drive motor bearings
Worn out
MF SERIES
SERVICE ANALYSIS
Check for:
Worn out drive motor bearings
Worn out
Слайд 74MF SERIES
SERVICE ANALYSIS
OK!
KO!
MF SERIES
SERVICE ANALYSIS
OK!
KO!
Слайд 75MF SERIES
SERVICE ANALYSIS
Check for:
Worn out drive motor bearings
Worn out
MF SERIES
SERVICE ANALYSIS
Check for:
Worn out drive motor bearings
Worn out
Слайд 76MF SERIES
SERVICE ANALYSIS
MF SERIES
SERVICE ANALYSIS
Слайд 77MF SERIES
SERVICE ANALYSIS
Wrong rotation of drive motor (opposite direction)
Green and Yellow LED
MF SERIES
SERVICE ANALYSIS
Wrong rotation of drive motor (opposite direction)
Green and Yellow LED

Слайд 78MF SERIES
SERVICE ANALYSIS
Check for:
Correct wires connection to the drive motor capacitor
MF SERIES
SERVICE ANALYSIS
Check for:
Correct wires connection to the drive motor capacitor
Слайд 79MF SERIES
SERVICE ANALYSIS
Check for:
Correct wires connection to the drive motor capacitor
MF SERIES
SERVICE ANALYSIS
Check for:
Correct wires connection to the drive motor capacitor
Слайд 80MF SERIES
SERVICE ANALYSIS
Check for:
Correct wires connection to the drive motor capacitor
MF SERIES
SERVICE ANALYSIS
Check for:
Correct wires connection to the drive motor capacitor
Слайд 81MF SERIES
SERVICE ANALYSIS
Additional reasons for the tripping OFF at Rotation Error are:
MF SERIES
SERVICE ANALYSIS
Additional reasons for the tripping OFF at Rotation Error are:
Слайд 82MF SERIES
SERVICE ANALYSIS
Magnetic sensor unplugged
Magnetic sensor too far from the
MF SERIES
SERVICE ANALYSIS
Magnetic sensor unplugged
Magnetic sensor too far from the
Слайд 83MF SERIES
SERVICE ANALYSIS
Magnetic sensor unplugged
Magnetic sensor too far from the
MF SERIES
SERVICE ANALYSIS
Magnetic sensor unplugged
Magnetic sensor too far from the
Слайд 84MF SERIES
SERVICE ANALYSIS
Automatic
reset mode
Manual
reset mode
Bin Full
No Water
Too Low Room
MF SERIES
SERVICE ANALYSIS
Automatic
reset mode
Manual
reset mode
Bin Full
No Water
Too Low Room
Слайд 85MF SERIES
SERVICE ANALYSIS
Manual reset mode
The New Flaker PC Board Trip OFF definitively
MF SERIES
SERVICE ANALYSIS
Manual reset mode
The New Flaker PC Board Trip OFF definitively
Слайд 86MF SERIES
REPLACEMENT OF THE AUGER, WATER SEAL AND BEARINGS
MF SERIES
REPLACEMENT OF THE AUGER, WATER SEAL AND BEARINGS

Слайд 87MF 22-30 SERIES
REPLACEMENT OF AUGER, WATER SEAL AND BEARINGS
Remove first the front/top
MF 22-30 SERIES
REPLACEMENT OF AUGER, WATER SEAL AND BEARINGS
Remove first the front/top
Слайд 88MF 22-30 SERIES
REPLACEMENT OF AUGER, WATER SEAL AND BEARINGS
……the sides/rear panel.
MF 22-30 SERIES
REPLACEMENT OF AUGER, WATER SEAL AND BEARINGS
……the sides/rear panel.
Слайд 89MF 22-30 SERIES
REPLACEMENT OF AUGER, WATER SEAL AND BEARINGS
Unloose the wing nut
MF 22-30 SERIES
REPLACEMENT OF AUGER, WATER SEAL AND BEARINGS
Unloose the wing nut

Слайд 90MF 22-30 SERIES
REPLACEMENT OF AUGER, WATER SEAL AND BEARINGS
Cut the plastic strap
MF 22-30 SERIES
REPLACEMENT OF AUGER, WATER SEAL AND BEARINGS
Cut the plastic strap
Слайд 91MF 22-30 SERIES
REPLACEMENT OF AUGER, WATER SEAL AND BEARINGS
Unscrew and remove the
MF 22-30 SERIES
REPLACEMENT OF AUGER, WATER SEAL AND BEARINGS
Unscrew and remove the
Слайд 92MF 22-30 SERIES
REPLACEMENT OF AUGER, WATER SEAL AND BEARINGS
Grasp with a screw
MF 22-30 SERIES
REPLACEMENT OF AUGER, WATER SEAL AND BEARINGS
Grasp with a screw
Слайд 93MF 22-30 SERIES
REPLACEMENT OF AUGER, WATER SEAL AND BEARINGS
Parts pulled out from
MF 22-30 SERIES
REPLACEMENT OF AUGER, WATER SEAL AND BEARINGS
Parts pulled out from
Слайд 94MF 22-30 SERIES
REPLACEMENT OF AUGER, WATER SEAL AND BEARINGS
With a clip ring
MF 22-30 SERIES
REPLACEMENT OF AUGER, WATER SEAL AND BEARINGS
With a clip ring
Слайд 95MF 22-30 SERIES
REPLACEMENT OF AUGER, WATER SEAL AND BEARINGS
Unloose and remove the
MF 22-30 SERIES
REPLACEMENT OF AUGER, WATER SEAL AND BEARINGS
Unloose and remove the
Слайд 96MF 22-30 SERIES
REPLACEMENT OF AUGER, WATER SEAL AND BEARINGS
…...remove the ice breaker
MF 22-30 SERIES
REPLACEMENT OF AUGER, WATER SEAL AND BEARINGS
…...remove the ice breaker
Слайд 97MF 22-30 SERIES
REPLACEMENT OF AUGER, WATER SEAL AND BEARINGS
Clean away the old
MF 22-30 SERIES
REPLACEMENT OF AUGER, WATER SEAL AND BEARINGS
Clean away the old
Слайд 98MF 22-30 SERIES
REPLACEMENT OF AUGER, WATER SEAL AND BEARINGS
…... as well as
MF 22-30 SERIES
REPLACEMENT OF AUGER, WATER SEAL AND BEARINGS
…... as well as
Слайд 99MF 22-30 SERIES
REPLACEMENT OF AUGER, WATER SEAL AND BEARINGS
Slide off from the
MF 22-30 SERIES
REPLACEMENT OF AUGER, WATER SEAL AND BEARINGS
Slide off from the
Слайд 100MF 22-30 SERIES
REPLACEMENT OF AUGER, WATER SEAL AND BEARINGS
Unloose and remove the
MF 22-30 SERIES
REPLACEMENT OF AUGER, WATER SEAL AND BEARINGS
Unloose and remove the
Слайд 101MF 22-30 SERIES
REPLACEMENT OF AUGER, WATER SEAL AND BEARINGS
…... raise the freezer
MF 22-30 SERIES
REPLACEMENT OF AUGER, WATER SEAL AND BEARINGS
…... raise the freezer
Слайд 102MF 22-30 SERIES
REPLACEMENT OF AUGER, WATER SEAL AND BEARINGS
…...tap the lower half
MF 22-30 SERIES
REPLACEMENT OF AUGER, WATER SEAL AND BEARINGS
…...tap the lower half
Слайд 103MF 22-30 SERIES
REPLACEMENT OF AUGER, WATER SEAL AND BEARINGS
It is good practice
MF 22-30 SERIES
REPLACEMENT OF AUGER, WATER SEAL AND BEARINGS
It is good practice
Слайд 104MF 41-51-61 SERIES
REPLACEMENT OF AUGER, WATER SEAL AND BEARINGS
Remove first the front/top
MF 41-51-61 SERIES
REPLACEMENT OF AUGER, WATER SEAL AND BEARINGS
Remove first the front/top
Слайд 105MF 41-51-61 SERIES
REPLACEMENT OF AUGER, WATER SEAL AND BEARINGS
……the sides/rear panel.
MF 41-51-61 SERIES
REPLACEMENT OF AUGER, WATER SEAL AND BEARINGS
……the sides/rear panel.
Слайд 106REPLACEMENT OF AUGER, WATER SEAL AND BEARINGS
Unloose the wing nut then…...
…..remove
REPLACEMENT OF AUGER, WATER SEAL AND BEARINGS
Unloose the wing nut then…...
…..remove
Слайд 107MF 41-51-61 SERIES
REPLACEMENT OF AUGER, WATER SEAL AND BEARINGS
Remove the ice chute
MF 41-51-61 SERIES
REPLACEMENT OF AUGER, WATER SEAL AND BEARINGS
Remove the ice chute
Слайд 108MF 41-51-61 SERIES
REPLACEMENT OF AUGER, WATER SEAL AND BEARINGS
Unscrew the screw securing
MF 41-51-61 SERIES
REPLACEMENT OF AUGER, WATER SEAL AND BEARINGS
Unscrew the screw securing
Слайд 109MF 41-51-61 SERIES
REPLACEMENT OF AUGER, WATER SEAL AND BEARINGS
Remove from the plastic
MF 41-51-61 SERIES
REPLACEMENT OF AUGER, WATER SEAL AND BEARINGS
Remove from the plastic
Слайд 110MF 41-51-61 SERIES
REPLACEMENT OF AUGER, WATER SEAL AND BEARINGS
….unloose the two screws
MF 41-51-61 SERIES
REPLACEMENT OF AUGER, WATER SEAL AND BEARINGS
….unloose the two screws
Слайд 111MF 41-51-61 SERIES
REPLACEMENT OF AUGER, WATER SEAL AND BEARINGS
Remove the plastic ice
MF 41-51-61 SERIES
REPLACEMENT OF AUGER, WATER SEAL AND BEARINGS
Remove the plastic ice
Слайд 112MF 41-51-61 SERIES
REPLACEMENT OF AUGER, WATER SEAL AND BEARINGS
With a couple of
MF 41-51-61 SERIES
REPLACEMENT OF AUGER, WATER SEAL AND BEARINGS
With a couple of
Слайд 113MF 41-51-61 SERIES
REPLACEMENT OF AUGER, WATER SEAL AND BEARINGS
…. pull out the
MF 41-51-61 SERIES
REPLACEMENT OF AUGER, WATER SEAL AND BEARINGS
…. pull out the
Слайд 114MF 41-51-61 SERIES
REPLACEMENT OF AUGER, WATER SEAL AND BEARINGS
Parts pulled out from
MF 41-51-61 SERIES
REPLACEMENT OF AUGER, WATER SEAL AND BEARINGS
Parts pulled out from
Слайд 115MF 41-51-61 SERIES
REPLACEMENT OF AUGER, WATER SEAL AND BEARINGS
With a screwdriver remove
MF 41-51-61 SERIES
REPLACEMENT OF AUGER, WATER SEAL AND BEARINGS
With a screwdriver remove
Слайд 116MF 41-51-61 SERIES
REPLACEMENT OF AUGER, WATER SEAL AND BEARINGS
Unloose and remove the
MF 41-51-61 SERIES
REPLACEMENT OF AUGER, WATER SEAL AND BEARINGS
Unloose and remove the
Слайд 117MF 41-51-61 SERIES
REPLACEMENT OF AUGER, WATER SEAL AND BEARINGS
…...remove the ice breaker
MF 41-51-61 SERIES
REPLACEMENT OF AUGER, WATER SEAL AND BEARINGS
…...remove the ice breaker
Слайд 118MF 41-51-61 SERIES
REPLACEMENT OF AUGER, WATER SEAL AND BEARINGS
Clean away the old
MF 41-51-61 SERIES
REPLACEMENT OF AUGER, WATER SEAL AND BEARINGS
Clean away the old
Слайд 119MF 41-51-61 SERIES
REPLACEMENT OF AUGER, WATER SEAL AND BEARINGS
…... as well as
MF 41-51-61 SERIES
REPLACEMENT OF AUGER, WATER SEAL AND BEARINGS
…... as well as
Слайд 120MF 41-51-61 SERIES
REPLACEMENT OF AUGER, WATER SEAL AND BEARINGS
Slide off from the
MF 41-51-61 SERIES
REPLACEMENT OF AUGER, WATER SEAL AND BEARINGS
Slide off from the
Слайд 121MF 41-51-61 SERIES
REPLACEMENT OF AUGER, WATER SEAL AND BEARINGS
Unloose and remove the
MF 41-51-61 SERIES
REPLACEMENT OF AUGER, WATER SEAL AND BEARINGS
Unloose and remove the
Слайд 122MF 41-51-61 SERIES
REPLACEMENT OF AUGER, WATER SEAL AND BEARINGS
…... raise the freezer
MF 41-51-61 SERIES
REPLACEMENT OF AUGER, WATER SEAL AND BEARINGS
…... raise the freezer
Слайд 123MF 41-51-61 SERIES
REPLACEMENT OF AUGER, WATER SEAL AND BEARINGS
….. the bottom bearing
MF 41-51-61 SERIES
REPLACEMENT OF AUGER, WATER SEAL AND BEARINGS
….. the bottom bearing
Слайд 124MF 41-51-61 SERIES
REPLACEMENT OF AUGER, WATER SEAL AND BEARINGS
It is good practice
MF 41-51-61 SERIES
REPLACEMENT OF AUGER, WATER SEAL AND BEARINGS
It is good practice
 Простое прошедшее время
 Народный русский костюм
 Три состояния воды
 Потолочные системы
 Сообщество краткосрочная стратегическая терапия
 Ремонт электролизёров на месте установки
 Проектное управление
 Итоги рубежной аттестации на специальности 140448 «Техническая эксплуатация и обслуживание электрического и электромеханического
  Презентация на тему Культура самураев
  Поддержи свое здоровье. Стань на 10 лет моложе. Программа по снижению веса
 Объявление. В охранную службу ООО ЧОО Страж требуются охранники
 ПУТЕШЕСТВИЕ ПО МАТЕРИКАМ
 Проблема текста
 Weihnachtskarten. Dezember feiern die Deutschen Weihnachten. An diesem Tag ist Jesus Christus geboren
 Make your soul happy here
 Проверка фактического проведения работы с персоналом. Вопрос №5
 Отдых в Daima biz
 Стройкузбасс. Почему не получается с первого раза
 Россия рубежа XIX – XX веков
 Сохранение жизни и здоровья работников – приоритетное направление государственной политики в области охраны труда Заместитель
  DeVita Cosmo - цифровое устройство оздоровления
 Гипсонаполненные системы строительных смесях
 «Завоевание» или «присоединение» Сибири? Распространение русского владычества и русской колонизации в Сибири, прерванное Смутой
 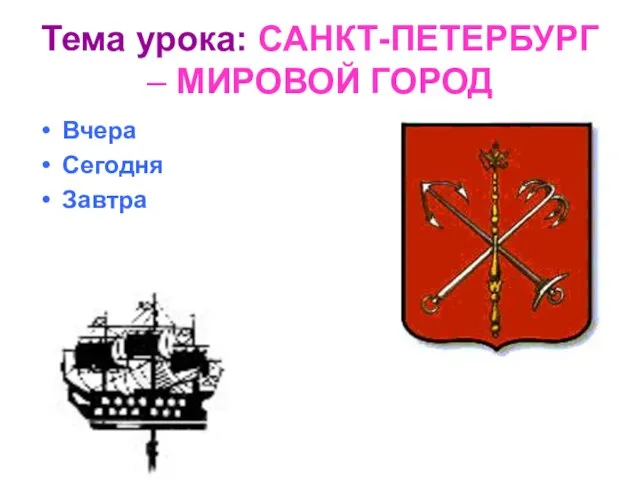 Санкт - Петербург - мировой город
 Куклы Тильды
 ПОДТВЕРЖДЕНИЕ СООТВЕСТВИЯ
 Понятие уголовного права
 Мой любимый учитель