- Salesforce Admin Training

Содержание
- 2. Settings Company Information, Login History, Sharing Settings Agenda 1 2 Intro Setup Navigation, Setup Access Administration
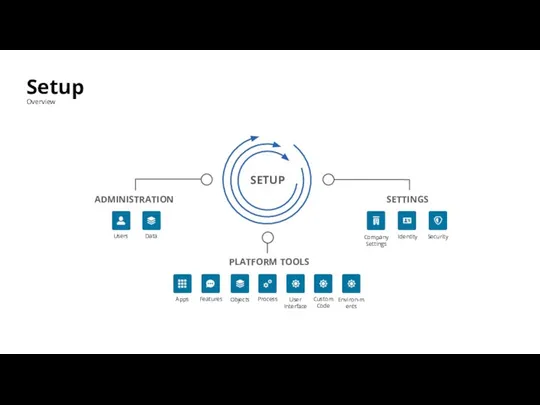
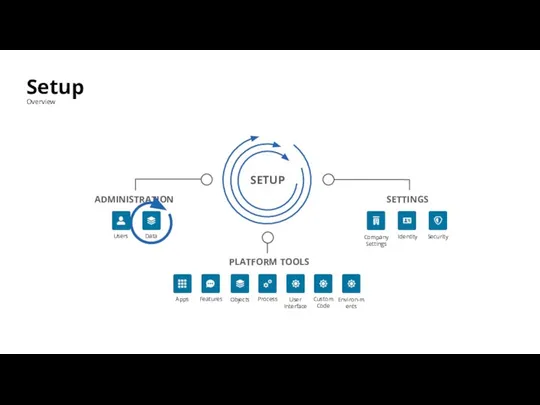
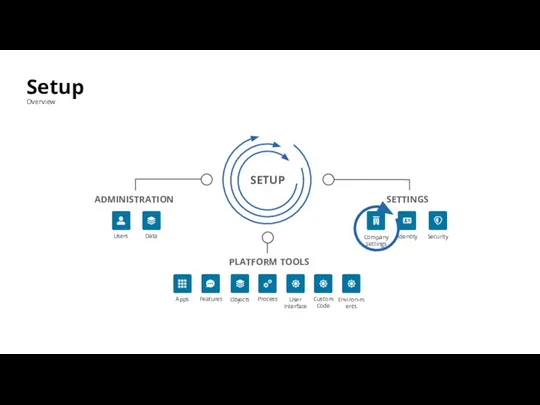
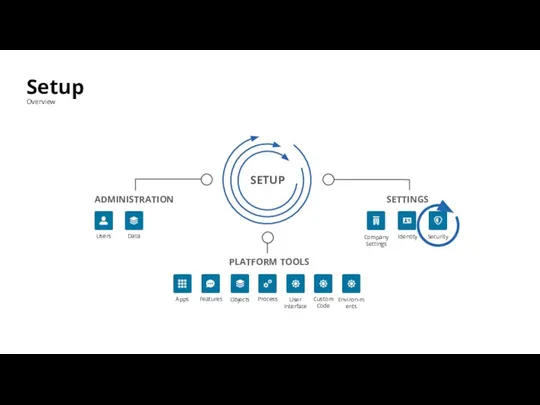
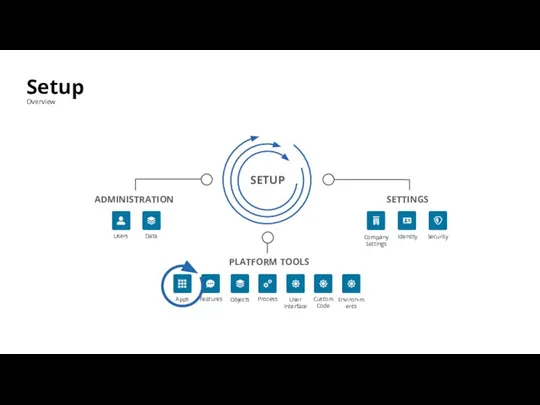
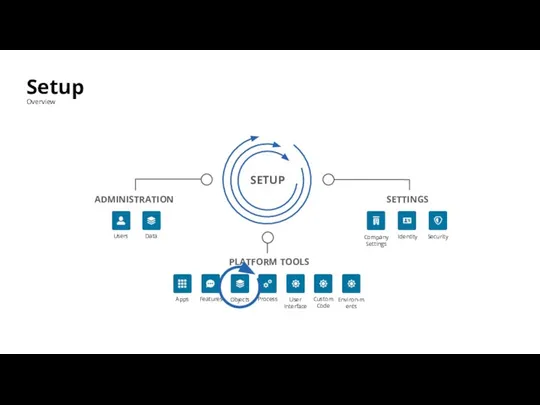
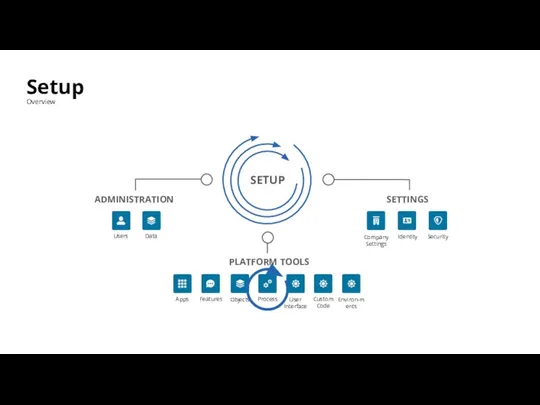
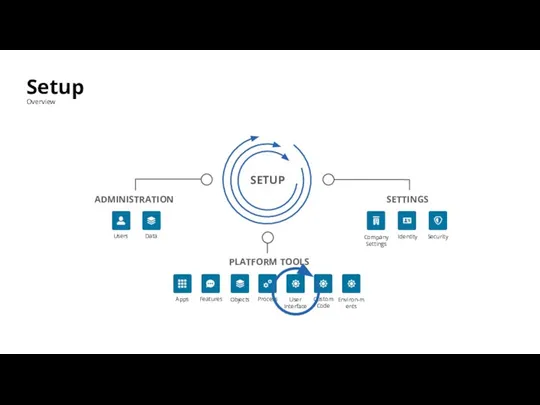
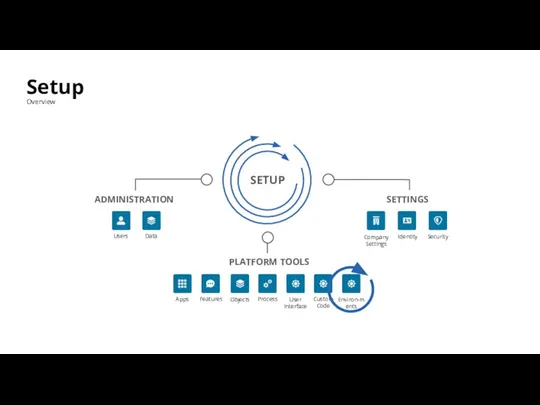
- 3. Setup Overview ADMINISTRATION PLATFORM TOOLS SETTINGS Users Data Apps Features Objects Process User Interface Custom Code
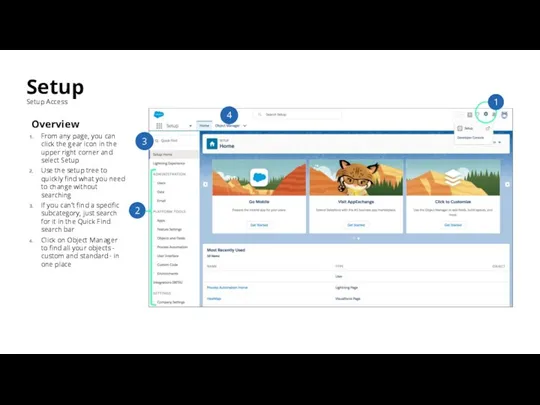
- 4. Setup Setup Access Overview From any page, you can click the gear icon in the upper
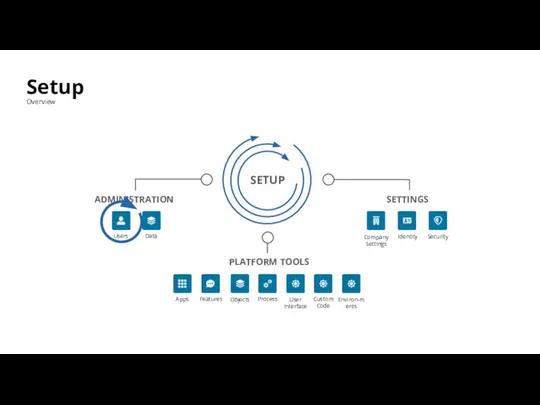
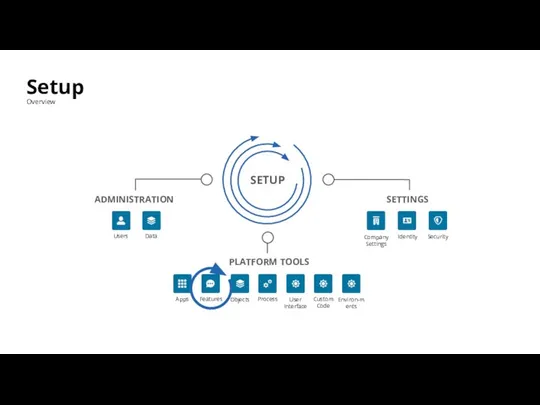
- 5. Setup Overview ADMINISTRATION PLATFORM TOOLS SETTINGS Apps Features Objects Process User Interface Custom Code Environ-ments Company
- 6. Users Setup | Users | Users Manage User In the user list, you can view and
- 7. Profiles Setup | Users | Profiles Profiles define how users access objects and data, and what
- 8. Profiles Setup | Users | Profiles Object Settings Use the search box to find the setting
- 9. Profiles Setup | Users | Profiles Important System Permissions Create and Customize Dashboards Create and Customize
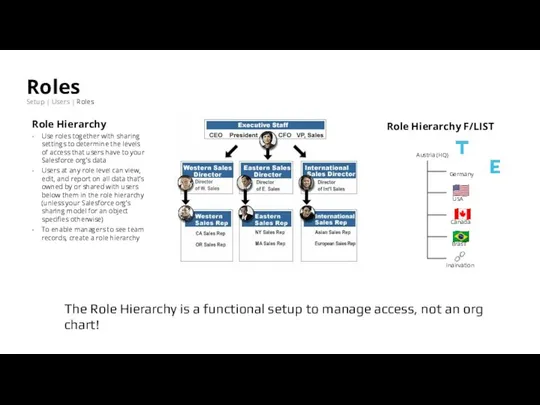
- 10. Roles Setup | Users | Roles Role Hierarchy Use roles together with sharing settings to determine
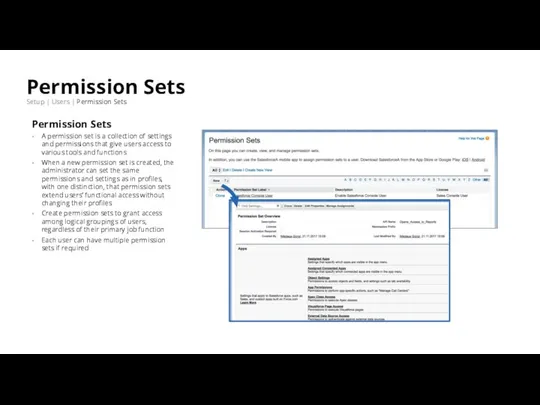
- 11. Permission Sets Setup | Users | Permission Sets Permission Sets A permission set is a collection
- 12. Public Groups Setup | Users | Public Groups Groups A public group consists of a set
- 13. Setup Overview ADMINISTRATION PLATFORM TOOLS SETTINGS Apps Features Objects Process User Interface Custom Code Environ-ments Company
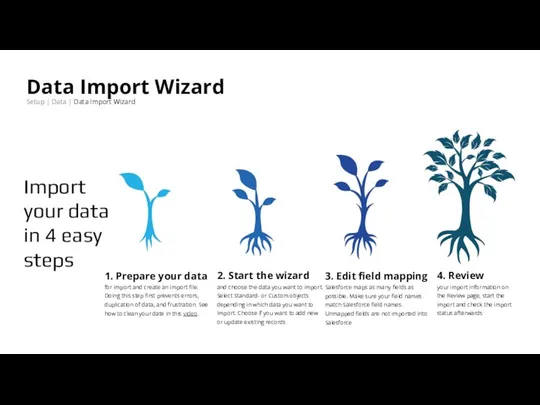
- 14. Data Import Wizard Setup | Data | Data Import Wizard 1. Prepare your data for import
- 15. Import Wizard Test a small fraction of your import data first to make sure that you’ve
- 16. Data Export Setup | Data | Data Export Export your data Data Export generates backup files
- 17. Duplicate Rules Setup | Data | Duplicate Management | Duplicate Rules and Matching Rules Duplicate Rule
- 18. Mass Delete/Transfer Records Setup | Data | Mass Delete/Transfer Records Mass Delete Records Delete multiple reports
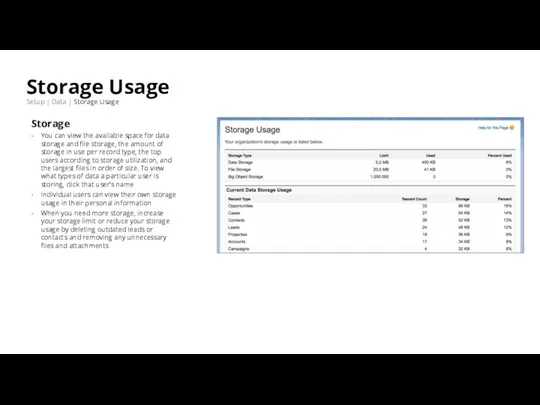
- 19. Storage Usage Setup | Data | Storage Usage Storage You can view the available space for
- 20. Setup Overview ADMINISTRATION PLATFORM TOOLS SETTINGS Apps Features Objects Process User Interface Custom Code Environ-ments Company
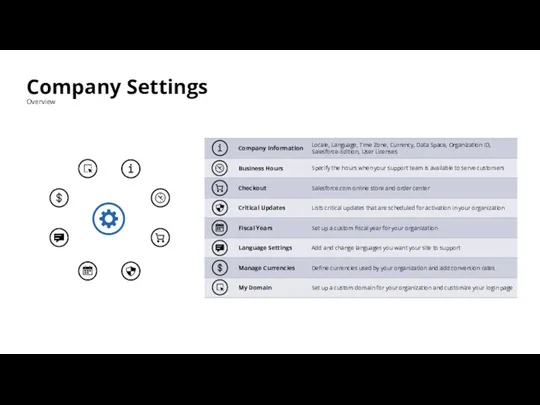
- 21. Company Settings Overview
- 22. Setup Overview ADMINISTRATION PLATFORM TOOLS SETTINGS Apps Features Objects Process User Interface Custom Code Environ-ments Company
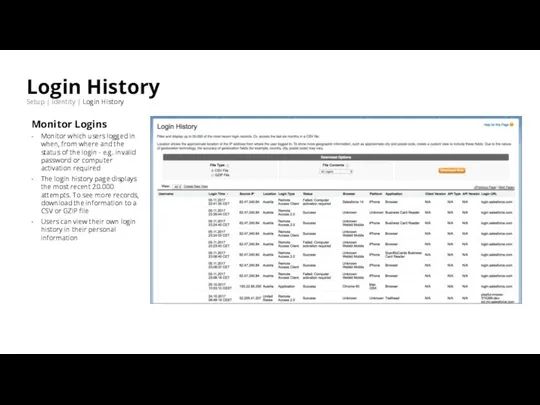
- 23. Login History Setup | Identity | Login History Monitor Logins Monitor which users logged in when,
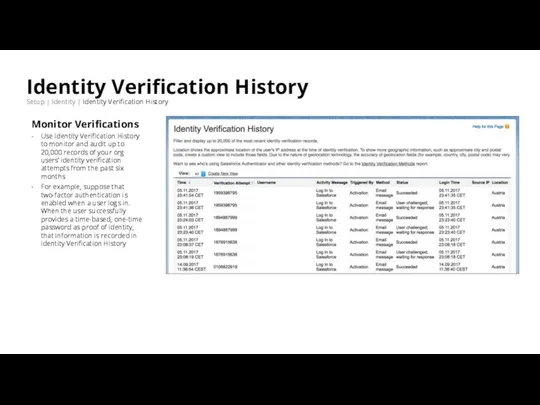
- 24. Identity Verification History Setup | Identity | Identity Verification History Monitor Verifications Use Identity Verification History
- 25. Setup Overview ADMINISTRATION PLATFORM TOOLS SETTINGS Users Data Apps Features Objects Process User Interface Custom Code
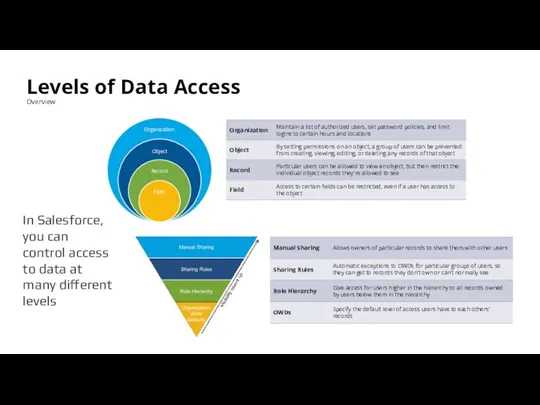
- 26. Levels of Data Access Overview In Salesforce, you can control access to data at many different
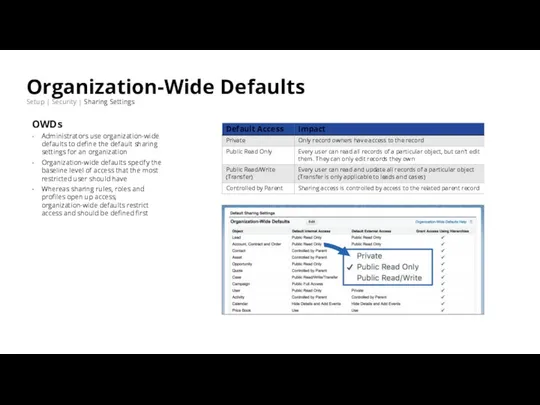
- 27. Organization-Wide Defaults Setup | Security | Sharing Settings OWDs Administrators use organization-wide defaults to define the
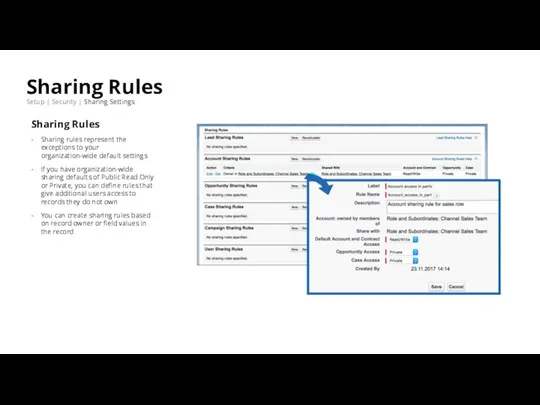
- 28. Sharing Rules Setup | Security | Sharing Settings Sharing Rules Sharing rules represent the exceptions to
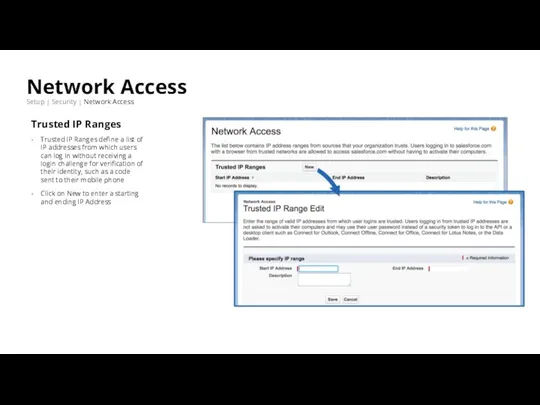
- 29. Network Access Setup | Security | Network Access Trusted IP Ranges Trusted IP Ranges define a
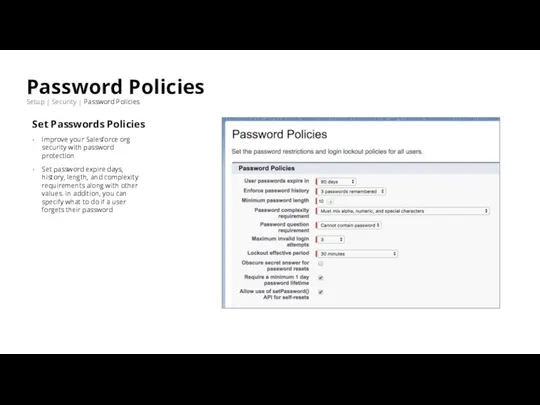
- 30. Password Policies Setup | Security | Password Policies Set Passwords Policies Improve your Salesforce org security
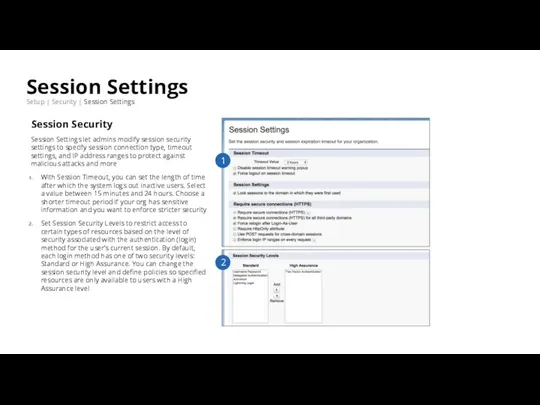
- 31. Session Settings Setup | Security | Session Settings Session Security Session Settings let admins modify session
- 32. Setup Overview ADMINISTRATION PLATFORM TOOLS SETTINGS Apps Features Objects Process User Interface Custom Code Environ-ments Company
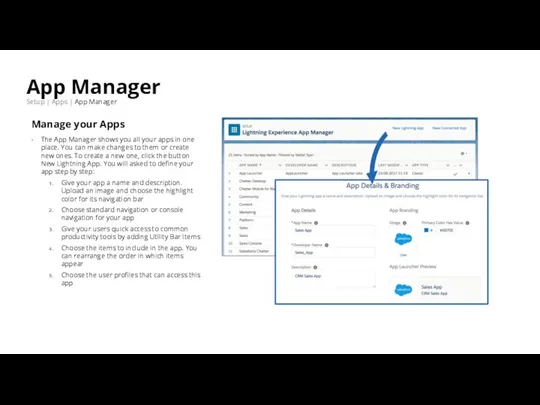
- 33. App Manager Setup | Apps | App Manager Manage your Apps The App Manager shows you
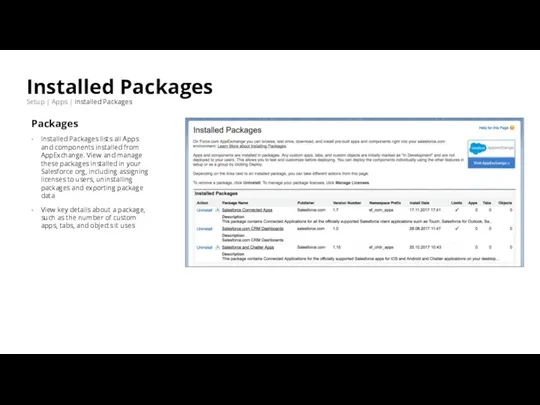
- 34. Installed Packages Setup | Apps | Installed Packages Packages Installed Packages lists all Apps and components
- 35. Salesforce Mobile App Setup | Apps | Mobile Apps | Salesforce Mobile Quick Start The Salesforce
- 36. Setup Overview ADMINISTRATION PLATFORM TOOLS SETTINGS Apps Features Objects Process User Interface Custom Code Environ-ments Company
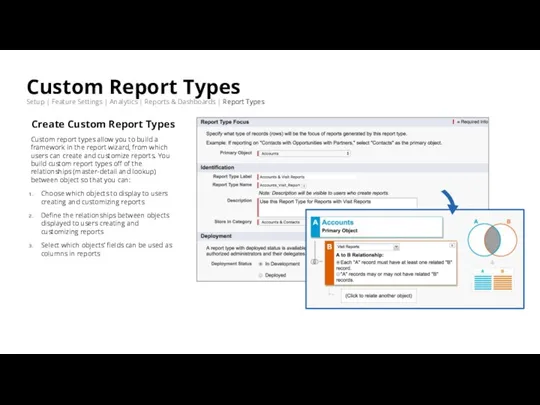
- 37. Custom Report Types Setup | Feature Settings | Analytics | Reports & Dashboards | Report Types
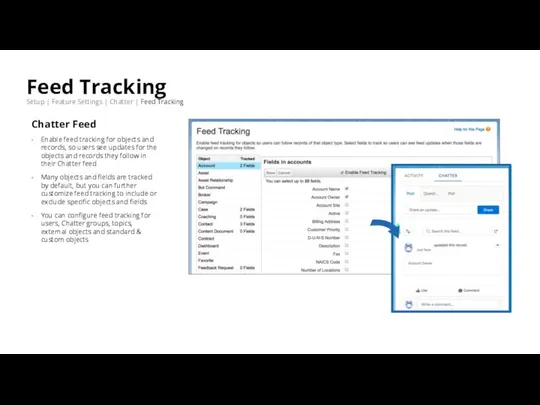
- 38. Feed Tracking Setup | Feature Settings | Chatter | Feed Tracking Chatter Feed Enable feed tracking
- 39. Setup Overview ADMINISTRATION PLATFORM TOOLS SETTINGS Apps Features Objects Process User Interface Custom Code Environ-ments Company
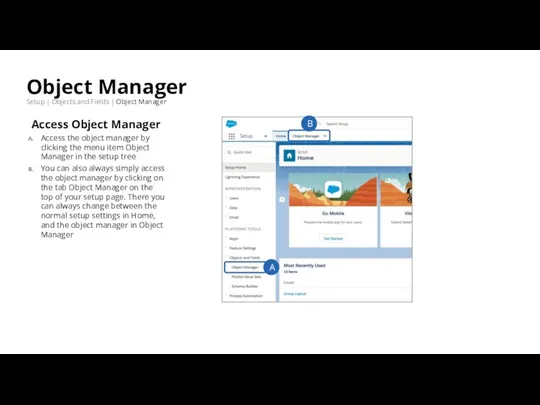
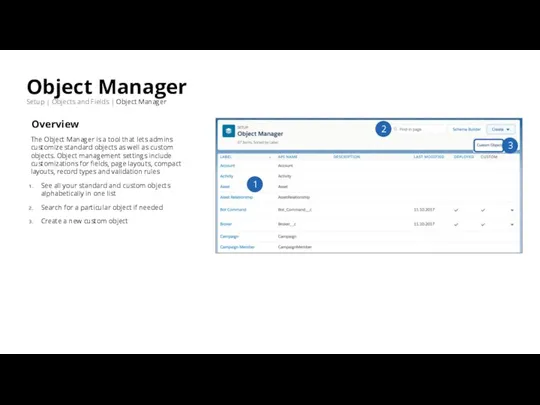
- 40. Object Manager Setup | Objects and Fields | Object Manager Access Object Manager Access the object
- 41. Object Manager Setup | Objects and Fields | Object Manager Overview The Object Manager is a
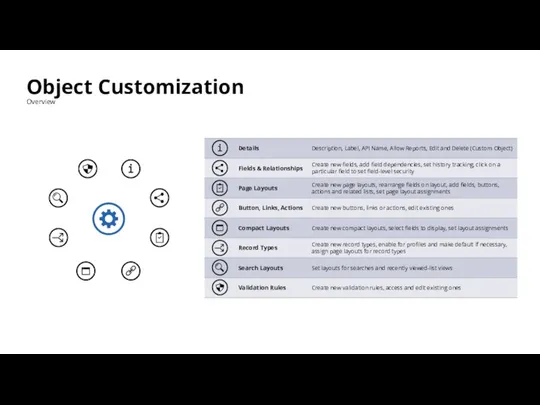
- 42. Object Customization Overview
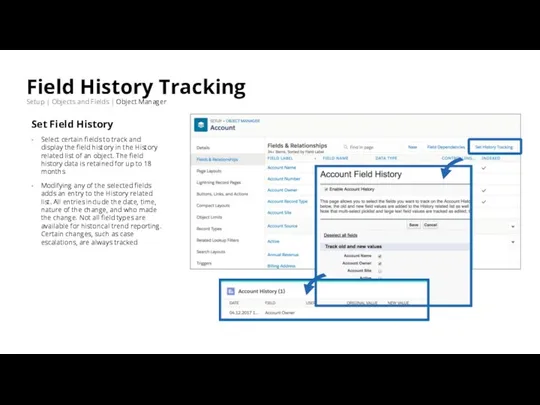
- 43. Field History Tracking Setup | Objects and Fields | Object Manager Set Field History Select certain
- 44. Validation Rules Setup | Object Manager | [select Object] | Validation Rules Validation Rules Validation rules
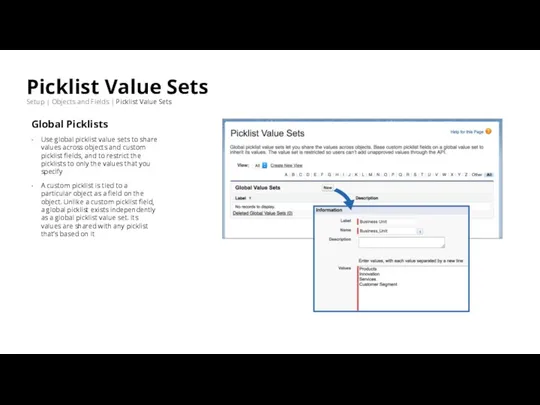
- 45. Picklist Value Sets Setup | Objects and Fields | Picklist Value Sets Global Picklists Use global
- 46. Schema Builder Setup | Objects and Fields | Schema Builder Viewing objects and relationships Schema Builder
- 47. Setup Overview ADMINISTRATION PLATFORM TOOLS SETTINGS Apps Features Objects Process User Interface Custom Code Environ-ments Company
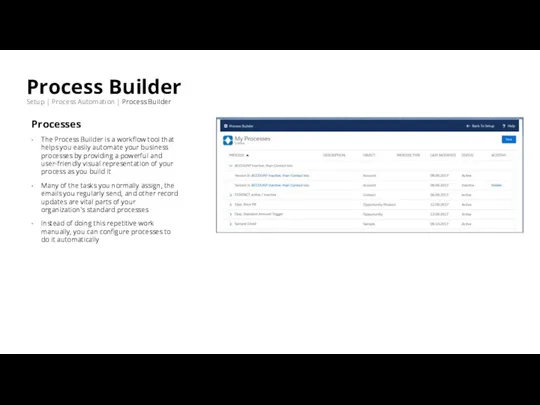
- 48. Process Builder Setup | Process Automation | Process Builder Processes The Process Builder is a workflow
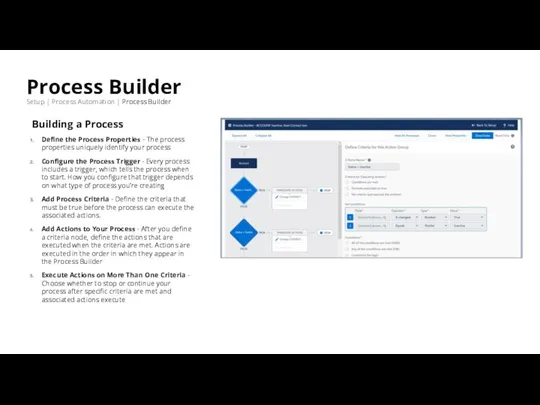
- 49. Process Builder Setup | Process Automation | Process Builder Building a Process Define the Process Properties
- 50. Setup Overview ADMINISTRATION PLATFORM TOOLS SETTINGS Apps Features Objects Process User Interface Custom Code Environ-ments Company
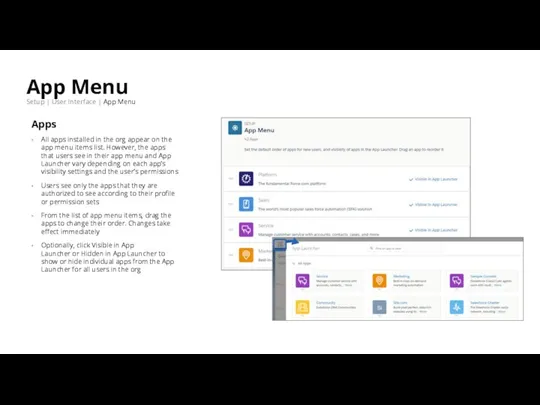
- 51. App Menu Setup | User Interface | App Menu Apps All apps installed in the org
- 52. Lightning App Builder Setup | User Interface | Lightning App Builder Lightning Apps The Lightning App
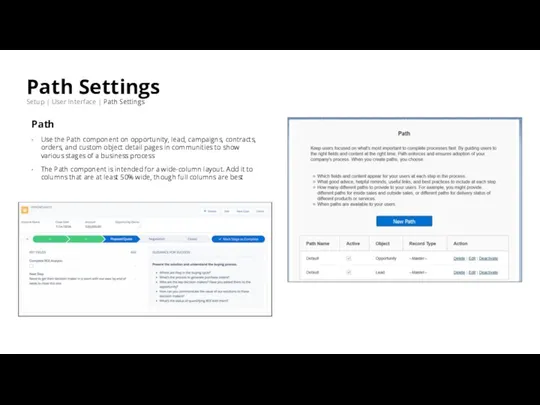
- 53. Path Settings Setup | User Interface | Path Settings Path Use the Path component on opportunity,
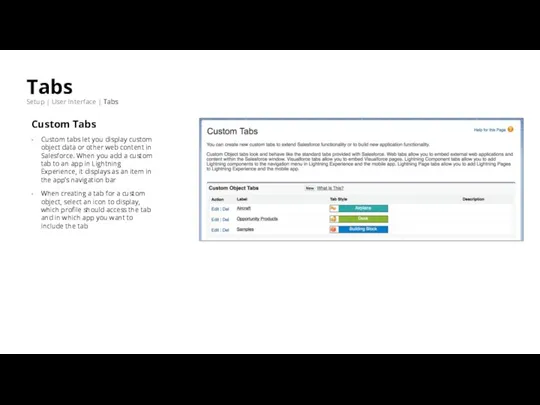
- 54. Tabs Setup | User Interface | Tabs Custom Tabs Custom tabs let you display custom object
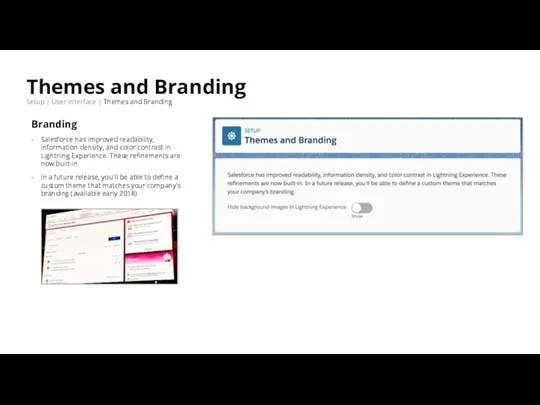
- 55. Themes and Branding Setup | User Interface | Themes and Branding Branding Salesforce has improved readability,
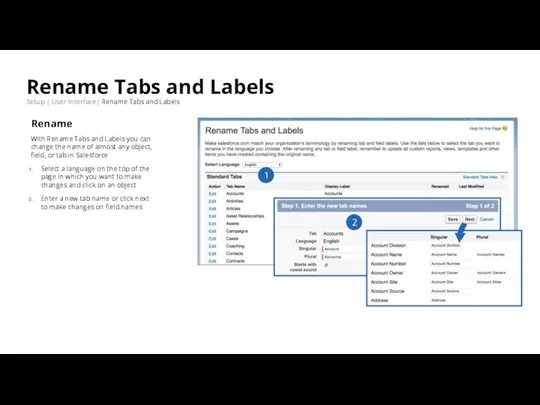
- 56. Rename Tabs and Labels Setup | User Interface| Rename Tabs and Labels Rename With Rename Tabs
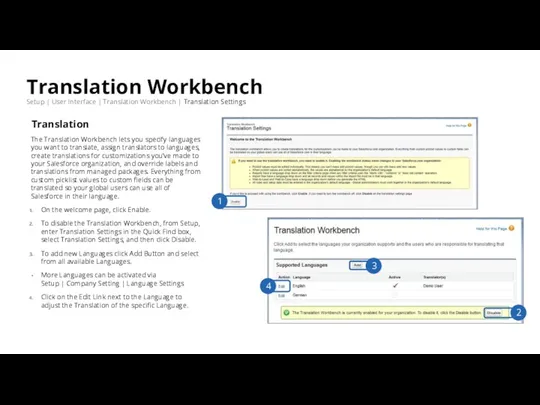
- 57. Translation Workbench Setup | User Interface | Translation Workbench | Translation Settings Translation The Translation Workbench
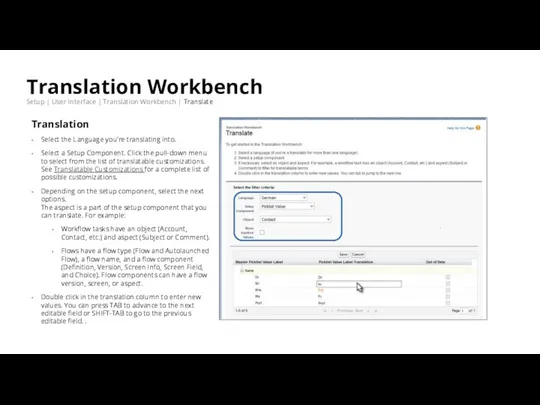
- 58. Translation Workbench Setup | User Interface | Translation Workbench | Translate Translation Select the Language you're
- 59. Translation Workbench Setup | User Interface | Translation Workbench | Export Translation Create files that contain
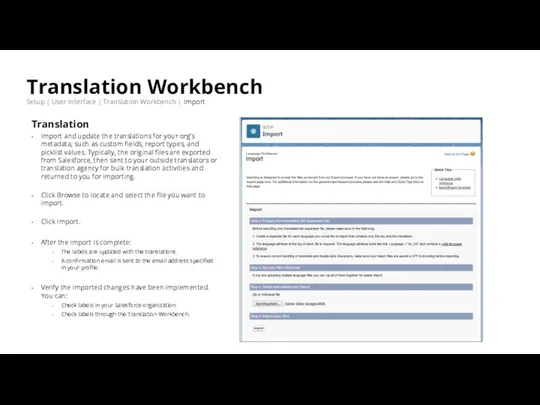
- 60. Translation Workbench Setup | User Interface | Translation Workbench | Import Translation Import and update the
- 61. Setup Overview ADMINISTRATION PLATFORM TOOLS SETTINGS Apps Features Objects Process User Interface Custom Code Environ-ments Company
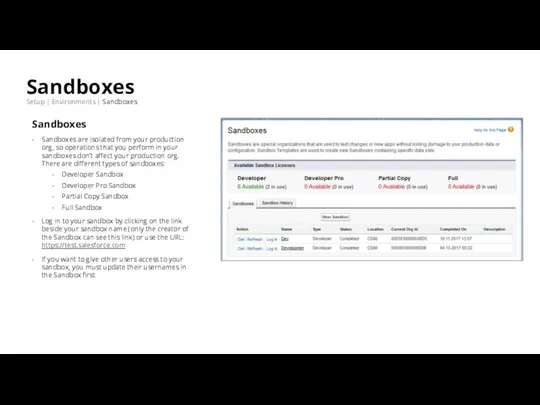
- 62. Sandboxes Setup | Environments | Sandboxes Sandboxes Sandboxes are isolated from your production org, so operations
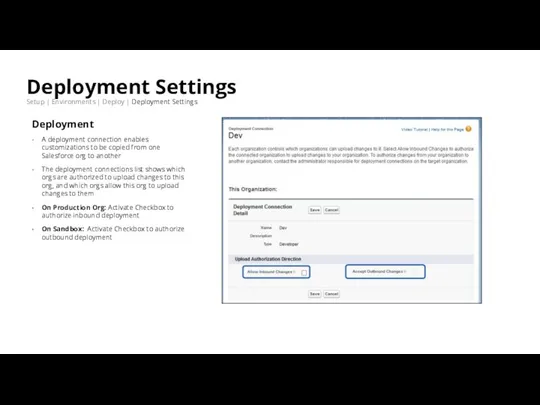
- 63. Deployment Settings Setup | Environments | Deploy | Deployment Settings Deployment A deployment connection enables customizations
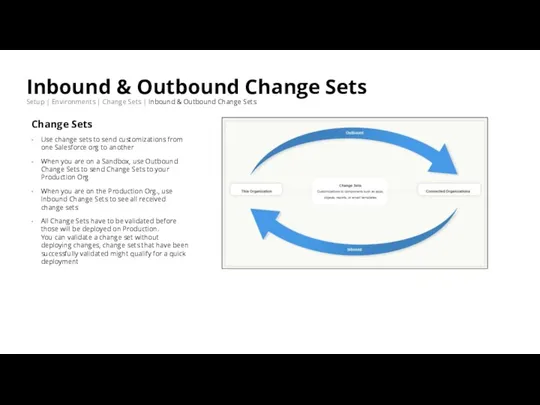
- 64. Inbound & Outbound Change Sets Setup | Environments | Change Sets | Inbound & Outbound Change
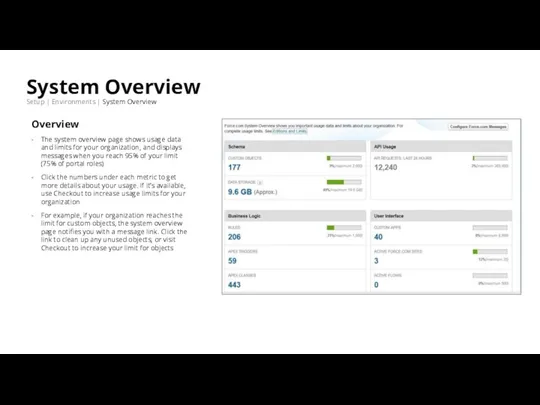
- 65. System Overview Setup | Environments | System Overview Overview The system overview page shows usage data
- 66. Reports & Dashboards
- 67. Reports & Dashboards Learn how to use Reports & Dashboards Dashboards represent data of a report
- 68. Reports Report Formats
- 69. Reports Landing page Overview New Report - Create a new report. (Click on “New Report (Salesforce
- 70. Reports Create a new report Report Builder Fields Pane - Lists all accessible fields in the
- 71. Reports Subscribe to reports Subscribe Reports On the report tab, click on the dropdown of the
- 72. Reports Sharing of Reports Sharing Reports in Salesforce are shared through folders. Click on the button
- 73. Dashboards Landing page Overview New Dashboard - Create a new Dashboard New Folder - Create a
- 74. Dashboards Dashboards chart types
- 75. Dashboards Create a new dashboard Add components New component - Add a new component (Report plus
- 76. Reports & Dashboards https://trailhead.salesforce.com/en/content/learn/modules/lex_implementation_reports_dashboards Project: Quickstart Reports & Dashboards https://trailhead.salesforce.com/projects/quickstart-reports Create Reports and Dashboards for Sales
- 77. Thank you.
- 78. Helpful Links View and Manage Users https://help.salesforce.com/articleView?id=admin_users.htm&type=0 Add a Single User https://help.salesforce.com/articleView?id=adding_new_users.htm&type=5 User Management https://help.salesforce.com/articleView?id=users_mgmt_overview.htm&type=5
- 79. Helpful Links Manage Profile Lists https://help.salesforce.com/articleView?id=users_profiles_view.htm&type=0 Clone Profiles https://help.salesforce.com/articleView?id=users_profiles_cloning.htm&type=5 Profiles https://help.salesforce.com/articleView?id=admin_userprofiles.htm&type=5
- 80. Helpful Links User Role Hierarchy https://help.salesforce.com/articleView?id=admin_roles.htm&type=0 Assign Users to Roles https://help.salesforce.com/articleView?id=assigning_users_to_roles.htm&type=5 Guidelines for Success with Roles
- 81. Helpful Links Permission Sets https://help.salesforce.com/articleView?id=perm_sets_overview.htm&type=5 Create Permission Sets https://help.salesforce.com/articleView?id=perm_sets_create.htm&type=5 Assign Permission Sets to a Single User
- 82. Helpful Links What Is a Group? https://help.salesforce.com/articleView?id=user_groups.htm&type=0 Create and Edit Groups https://help.salesforce.com/articleView?id=creating_and_editing_groups.htm&type=5 Public Group Considerations https://help.salesforce.com/articleView?id=user_groups_considerations.htm&type=5
- 83. Helpful Links Data Import Wizard https://help.salesforce.com/articleView?id=data_import_wizard.htm&type=0 Import Data with the Data Import Wizard https://help.salesforce.com/articleView?id=import_with_data_import_wizard.htm&type=5 Choosing a
- 84. Helpful Links Export Backup Data from Salesforce https://help.salesforce.com/articleView?id=admin_exportdata.htm&type=0 Delete Multiple Records and Reports https://help.salesforce.com/articleView?id=admin_massdelete.htm&type=0 Monitor Data
- 85. Helpful Links Things to Know About Duplicate Rules https://help.salesforce.com/articleView?id=duplicate_rules_overview.htm&type=0 Create or Edit Duplicate Rules https://help.salesforce.com/articleView?id=duplicate_rules_create.htm&type=5 Matching
- 86. Helpful Links Set Up Your Company in Salesforce https://help.salesforce.com/articleView?id=admin_profile.htm&type=0 Feature Licenses Overview https://help.salesforce.com/articleView?id=users_understanding_feature_licenses.htm&type=5 Language Settings Overview
- 87. Helpful Links Monitor Login History https://help.salesforce.com/articleView?id=users_login_history.htm&type=0 Identity Verification History https://help.salesforce.com/articleView?id=security_verification_history.htm&type=5 Set Trusted IP Ranges for Your
- 88. Helpful Links Sharing Settings https://help.salesforce.com/articleView?id=managing_the_sharing_model.htm&type=0 Organization-Wide Sharing Defaults https://help.salesforce.com/articleView?id=security_sharing_owd_about.htm&type=5 Sharing Rules https://help.salesforce.com/articleView?id=security_about_sharing_rules.htm&type=5
- 89. Helpful Links Passwords https://help.salesforce.com/articleView?id=security_overview_passwords.htm&type=5 Set Password Policies https://help.salesforce.com/articleView?id=admin_password.htm&type=0 Expire Passwords for All Users https://help.salesforce.com/articleView?id=expiring_passwords.htm&type=0
- 90. Helpful Links Modify Session Security Settings https://help.salesforce.com/articleView?id=admin_sessions.htm&type=0 Session Security https://help.salesforce.com/articleView?id=security_overview_sessions.htm&type=5 Manage Installed Packages https://help.salesforce.com/articleView?id=distribution_managing_packages.htm&type=0 View Installed
- 91. Helpful Links Create Lightning Apps https://help.salesforce.com/articleView?id=dev_apps_lightning_create.htm&type=5 Salesforce App Considerations https://help.salesforce.com/articleView?id=dev_apps_considerations.htm&type=5 Lightning Apps https://help.salesforce.com/articleView?id=dev_apps_lightning.htm&type=5 Create and Edit
- 92. Helpful Links Your Org’s Branding in the Salesforce App https://help.salesforce.com/articleView?id=customize_sf1_branding.htm&type=0 Customize Branding of the Salesforce App
- 93. Helpful Links Set Up a Custom Report Type https://help.salesforce.com/articleView?id=reports_report_type_setup.htm&type=0 Create a Custom Report Type https://help.salesforce.com/articleView?id=reports_defining_report_types.htm&type=5 Add
- 94. Helpful Links Feed Tracking https://help.salesforce.com/articleView?id=collab_feed_tracking_overview.htm&type=5 Customize Chatter Feed Tracking https://help.salesforce.com/articleView?id=collab_feed_tracking.htm&type=5 Chatter Feeds Overview https://help.salesforce.com/articleView?id=collab_feed_overview.htm&type=5
- 95. Helpful Links Find Object Management Settings in Lightning Experience https://help.salesforce.com/articleView?id=extend_click_find_objectmgmt_lex.htm&type=5 Create Custom Fields https://help.salesforce.com/articleView?id=adding_fields.htm&type=5 Page Layouts
- 96. Helpful Links Validation Rules https://help.salesforce.com/articleView?id=fields_about_field_validation.htm&type=5 Define Validation Rules https://help.salesforce.com/articleView?id=fields_defining_field_validation_rules.htm&type=5 Validation Rule Considerations https://help.salesforce.com/articleView?id=fields_validation_considerations.htm&type=5 Tips for Writing
- 97. Helpful Links Schema Builder https://help.salesforce.com/articleView?id=schema_builder_working.htm Schema Builder Custom Object Definition https://help.salesforce.com/articleView?id=schema_builder_elements_objects_ref.htm Trailhead – Data Modeling https://trailhead.salesforce.com/modules/data_modeling
- 98. Helpful Links Process Management https://help.salesforce.com/articleView?id=schema_builder_working.htm Create a Process https://help.salesforce.com/articleView?id=process_create.htm&type=5 Trailhead - Process Automation https://trailhead.salesforce.com/en/modules/business_process_automation
- 99. Helpful Links Lightning App Builder https://help.salesforce.com/articleView?id=lightning_app_builder_overview.htm Build Apps Visually with Lightning App Builder https://developer.salesforce.com/events/webinars/Lightning-App-Builder Create an
- 100. Helpful Links Path https://help.salesforce.com/articleView?id=rss_sales_path.htm Guide Users with Path https://help.salesforce.com/articleView?id=path_overview.htm Trailhead - Path & Workspaces https://trailhead.salesforce.com/en/modules/sales_admin_optimize_salesforce_for_selling
- 101. Helpful Links Rename Object, Tab, and Field Labels https://help.salesforce.com/articleView?id=customize_rename.htm Enable and Disable the Translation Workbench https://help.salesforce.com/articleView?id=customize_wbench.htm
- 102. Helpful Links Sandbox Types https://help.salesforce.com/articleView?id=create_test_instance.htm Sandbox Licenses and Storage by Type https://help.salesforce.com/articleView?id=data_sandbox_environments.htm Trailhead - Application Lifecycle
- 103. Helpful Links Change Sets https://help.salesforce.com/articleView?id=changesets.htm Change Sets Best Practices https://help.salesforce.com/articleView?id=changesets_best_practices.htm Deploy Inbound Change Sets https://help.salesforce.com/articleView?id=changesets_about_inbound.htm Upload
- 105. Скачать презентацию
Слайд 2Settings
Company Information, Login History, Sharing Settings
Agenda
1
2
Intro
Setup Navigation, Setup Access
Administration
Users, Data Management
3
Platform Tools
App
Settings
Company Information, Login History, Sharing Settings
Agenda
1
2
Intro
Setup Navigation, Setup Access
Administration
Users, Data Management
3
Platform Tools
App
Слайд 3Setup
Overview
ADMINISTRATION
PLATFORM TOOLS
SETTINGS
Users
Data
Apps
Features
Objects
Process
User Interface
Custom Code
Environ-ments
Company Settings
Identity
Security
SETUP
Setup
Overview
ADMINISTRATION
PLATFORM TOOLS
SETTINGS
Users
Data
Apps
Features
Objects
Process
User Interface
Custom Code
Environ-ments
Company Settings
Identity
Security
SETUP
Слайд 4Setup
Setup Access
Overview
From any page, you can click the gear icon in the
Setup
Setup Access
Overview
From any page, you can click the gear icon in the
Слайд 5Setup
Overview
ADMINISTRATION
PLATFORM TOOLS
SETTINGS
Apps
Features
Objects
Process
User Interface
Custom Code
Environ-ments
Company Settings
Identity
Security
SETUP
Users
Data
Setup
Overview
ADMINISTRATION
PLATFORM TOOLS
SETTINGS
Apps
Features
Objects
Process
User Interface
Custom Code
Environ-ments
Company Settings
Identity
Security
SETUP
Users
Data
Слайд 6Users
Setup | Users | Users
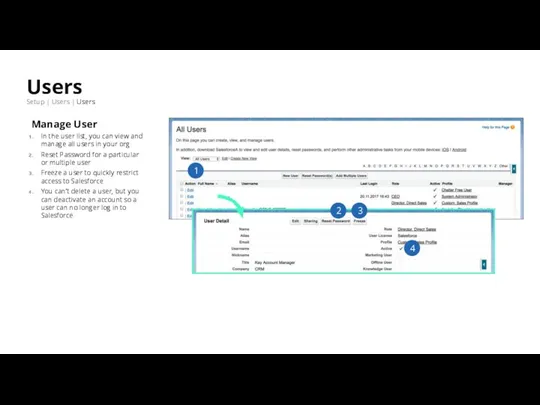
Manage User
In the user list, you can view
Users
Setup | Users | Users
Manage User
In the user list, you can view
Слайд 7Profiles
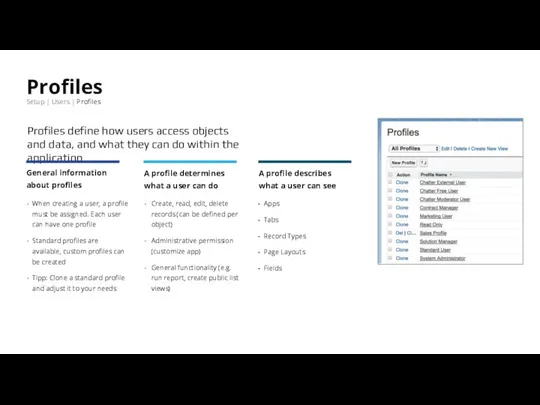
Setup | Users | Profiles
Profiles define how users access objects and data,
Profiles
Setup | Users | Profiles
Profiles define how users access objects and data,
Слайд 8Profiles
Setup | Users | Profiles
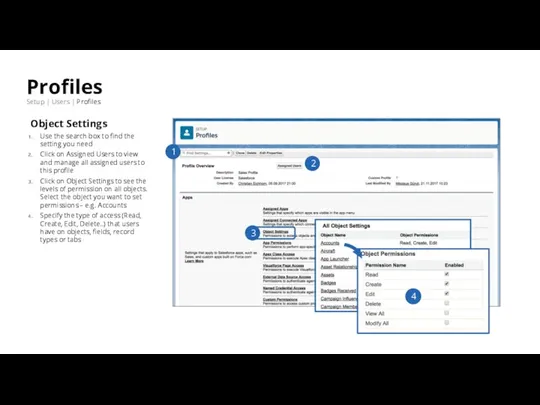
Object Settings
Use the search box to find the
Profiles
Setup | Users | Profiles
Object Settings
Use the search box to find the
Слайд 9Profiles
Setup | Users | Profiles
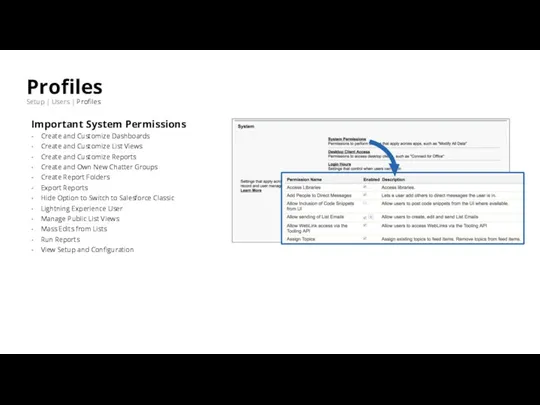
Important System Permissions
Create and Customize Dashboards
Create and Customize
Profiles
Setup | Users | Profiles
Important System Permissions
Create and Customize Dashboards
Create and Customize
Слайд 10Roles
Setup | Users | Roles
Role Hierarchy
Use roles together with sharing settings to
Roles
Setup | Users | Roles
Role Hierarchy
Use roles together with sharing settings to
Слайд 11Permission Sets
Setup | Users | Permission Sets
Permission Sets
A permission set is a
Permission Sets
Setup | Users | Permission Sets
Permission Sets
A permission set is a
Слайд 12Public Groups
Setup | Users | Public Groups
Groups
A public group consists of a
Public Groups
Setup | Users | Public Groups
Groups
A public group consists of a

Слайд 13Setup
Overview
ADMINISTRATION
PLATFORM TOOLS
SETTINGS
Apps
Features
Objects
Process
User Interface
Custom Code
Environ-ments
Company Settings
Identity
Security
SETUP
Users
Data
Setup
Overview
ADMINISTRATION
PLATFORM TOOLS
SETTINGS
Apps
Features
Objects
Process
User Interface
Custom Code
Environ-ments
Company Settings
Identity
Security
SETUP
Users
Data
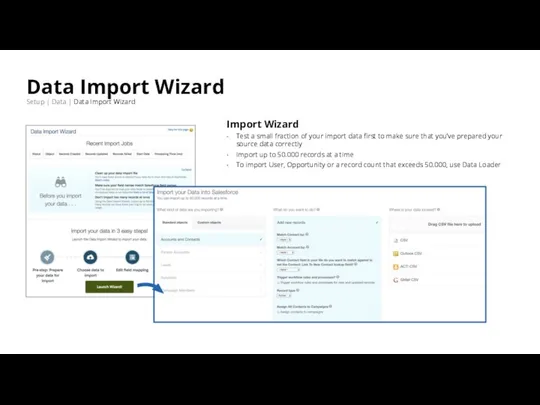
Слайд 14Data Import Wizard
Setup | Data | Data Import Wizard
1. Prepare your data
for
Data Import Wizard
Setup | Data | Data Import Wizard
1. Prepare your data
for
Слайд 15Import Wizard
Test a small fraction of your import data first to make
Import Wizard
Test a small fraction of your import data first to make
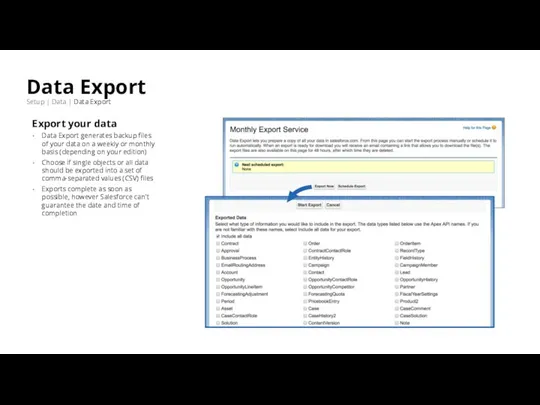
Слайд 16Data Export
Setup | Data | Data Export
Export your data
Data Export generates backup
Data Export
Setup | Data | Data Export
Export your data
Data Export generates backup
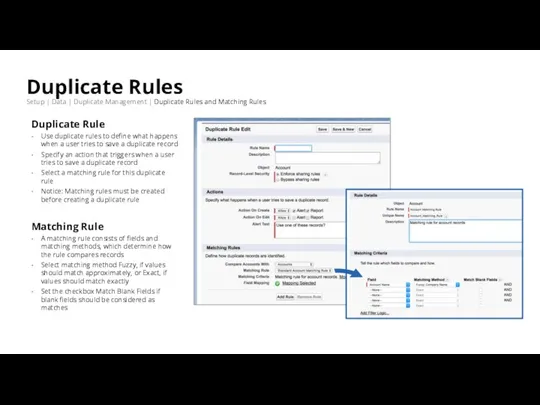
Слайд 17Duplicate Rules
Setup | Data | Duplicate Management | Duplicate Rules and Matching
Duplicate Rules
Setup | Data | Duplicate Management | Duplicate Rules and Matching
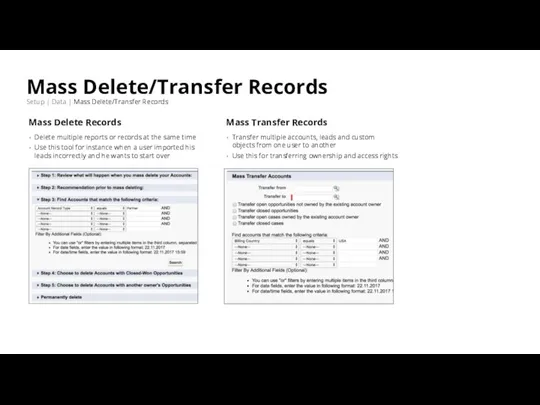
Слайд 18Mass Delete/Transfer Records
Setup | Data | Mass Delete/Transfer Records
Mass Delete Records
Delete multiple
Mass Delete/Transfer Records
Setup | Data | Mass Delete/Transfer Records
Mass Delete Records
Delete multiple
Слайд 19Storage Usage
Setup | Data | Storage Usage
Storage
You can view the available space
Storage Usage
Setup | Data | Storage Usage
Storage
You can view the available space
Слайд 20Setup
Overview
ADMINISTRATION
PLATFORM TOOLS
SETTINGS
Apps
Features
Objects
Process
User Interface
Custom Code
Environ-ments
Company Settings
Identity
Security
SETUP
Users
Data
Setup
Overview
ADMINISTRATION
PLATFORM TOOLS
SETTINGS
Apps
Features
Objects
Process
User Interface
Custom Code
Environ-ments
Company Settings
Identity
Security
SETUP
Users
Data
Слайд 21Company Settings
Overview
Company Settings
Overview
Слайд 22Setup
Overview
ADMINISTRATION
PLATFORM TOOLS
SETTINGS
Apps
Features
Objects
Process
User Interface
Custom Code
Environ-ments
Company Settings
Identity
Security
SETUP
Users
Data
Setup
Overview
ADMINISTRATION
PLATFORM TOOLS
SETTINGS
Apps
Features
Objects
Process
User Interface
Custom Code
Environ-ments
Company Settings
Identity
Security
SETUP
Users
Data

Слайд 23Login History
Setup | Identity | Login History
Monitor Logins
Monitor which users logged in
Login History
Setup | Identity | Login History
Monitor Logins
Monitor which users logged in
Слайд 24Identity Verification History
Setup | Identity | Identity Verification History
Monitor Verifications
Use Identity Verification
Identity Verification History
Setup | Identity | Identity Verification History
Monitor Verifications
Use Identity Verification
Слайд 25Setup
Overview
ADMINISTRATION
PLATFORM TOOLS
SETTINGS
Users
Data
Apps
Features
Objects
Process
User Interface
Custom Code
Environ-ments
Company Settings
Identity
Security
SETUP
Setup
Overview
ADMINISTRATION
PLATFORM TOOLS
SETTINGS
Users
Data
Apps
Features
Objects
Process
User Interface
Custom Code
Environ-ments
Company Settings
Identity
Security
SETUP
Слайд 26Levels of Data Access
Overview
In Salesforce,
you can
control access
to data at
Levels of Data Access
Overview
In Salesforce,
you can
control access
to data at
Слайд 27Organization-Wide Defaults
Setup | Security | Sharing Settings
OWDs
Administrators use organization-wide defaults to define
Organization-Wide Defaults
Setup | Security | Sharing Settings
OWDs
Administrators use organization-wide defaults to define
Слайд 28Sharing Rules
Setup | Security | Sharing Settings
Sharing Rules
Sharing rules represent the exceptions
Sharing Rules
Setup | Security | Sharing Settings
Sharing Rules
Sharing rules represent the exceptions
Слайд 29Network Access
Setup | Security | Network Access
Trusted IP Ranges
Trusted IP Ranges define
Network Access
Setup | Security | Network Access
Trusted IP Ranges
Trusted IP Ranges define
Слайд 30Password Policies
Setup | Security | Password Policies
Set Passwords Policies
Improve your Salesforce org
Password Policies
Setup | Security | Password Policies
Set Passwords Policies
Improve your Salesforce org
Слайд 31Session Settings
Setup | Security | Session Settings
Session Security
Session Settings let admins modify
Session Settings
Setup | Security | Session Settings
Session Security
Session Settings let admins modify
Слайд 32Setup
Overview
ADMINISTRATION
PLATFORM TOOLS
SETTINGS
Apps
Features
Objects
Process
User Interface
Custom Code
Environ-ments
Company Settings
Identity
Security
SETUP
Users
Data
Setup
Overview
ADMINISTRATION
PLATFORM TOOLS
SETTINGS
Apps
Features
Objects
Process
User Interface
Custom Code
Environ-ments
Company Settings
Identity
Security
SETUP
Users
Data
Слайд 33App Manager
Setup | Apps | App Manager
Manage your Apps
The App Manager shows
App Manager
Setup | Apps | App Manager
Manage your Apps
The App Manager shows
Слайд 34Installed Packages
Setup | Apps | Installed Packages
Packages
Installed Packages lists all Apps and
Installed Packages
Setup | Apps | Installed Packages
Packages
Installed Packages lists all Apps and
Слайд 35Salesforce Mobile App
Setup | Apps | Mobile Apps | Salesforce
Mobile Quick Start
The
Salesforce Mobile App
Setup | Apps | Mobile Apps | Salesforce
Mobile Quick Start
The

Слайд 36Setup
Overview
ADMINISTRATION
PLATFORM TOOLS
SETTINGS
Apps
Features
Objects
Process
User Interface
Custom Code
Environ-ments
Company Settings
Identity
Security
SETUP
Users
Data
Setup
Overview
ADMINISTRATION
PLATFORM TOOLS
SETTINGS
Apps
Features
Objects
Process
User Interface
Custom Code
Environ-ments
Company Settings
Identity
Security
SETUP
Users
Data
Слайд 37Custom Report Types
Setup | Feature Settings | Analytics | Reports & Dashboards
Custom Report Types
Setup | Feature Settings | Analytics | Reports & Dashboards
Слайд 38Feed Tracking
Setup | Feature Settings | Chatter | Feed Tracking
Chatter Feed
Enable feed
Feed Tracking
Setup | Feature Settings | Chatter | Feed Tracking
Chatter Feed
Enable feed
Слайд 39Setup
Overview
ADMINISTRATION
PLATFORM TOOLS
SETTINGS
Apps
Features
Objects
Process
User Interface
Custom Code
Environ-ments
Company Settings
Identity
Security
SETUP
Users
Data
Setup
Overview
ADMINISTRATION
PLATFORM TOOLS
SETTINGS
Apps
Features
Objects
Process
User Interface
Custom Code
Environ-ments
Company Settings
Identity
Security
SETUP
Users
Data
Слайд 40Object Manager
Setup | Objects and Fields | Object Manager
Access Object Manager
Access the
Object Manager
Setup | Objects and Fields | Object Manager
Access Object Manager
Access the
Слайд 41Object Manager
Setup | Objects and Fields | Object Manager
Overview
The Object Manager is
Object Manager
Setup | Objects and Fields | Object Manager
Overview
The Object Manager is
Слайд 42Object Customization
Overview
Object Customization
Overview
Слайд 43Field History Tracking
Setup | Objects and Fields | Object Manager
Set Field History
Select
Field History Tracking
Setup | Objects and Fields | Object Manager
Set Field History
Select
Слайд 44Validation Rules
Setup | Object Manager | [select Object] | Validation Rules
Validation Rules
Validation
Validation Rules
Setup | Object Manager | [select Object] | Validation Rules
Validation Rules
Validation
![Validation Rules Setup | Object Manager | [select Object] | Validation Rules](/_ipx/f_webp&q_80&fit_contain&s_1440x1080/imagesDir/jpg/996933/slide-43.jpg)
Слайд 45Picklist Value Sets
Setup | Objects and Fields | Picklist Value Sets
Global Picklists
Use
Picklist Value Sets
Setup | Objects and Fields | Picklist Value Sets
Global Picklists
Use
Слайд 46Schema Builder
Setup | Objects and Fields | Schema Builder
Viewing objects and relationships
Schema
Schema Builder
Setup | Objects and Fields | Schema Builder
Viewing objects and relationships
Schema

Слайд 47Setup
Overview
ADMINISTRATION
PLATFORM TOOLS
SETTINGS
Apps
Features
Objects
Process
User Interface
Custom Code
Environ-ments
Company Settings
Identity
Security
SETUP
Users
Data
Setup
Overview
ADMINISTRATION
PLATFORM TOOLS
SETTINGS
Apps
Features
Objects
Process
User Interface
Custom Code
Environ-ments
Company Settings
Identity
Security
SETUP
Users
Data
Слайд 48Process Builder
Setup | Process Automation | Process Builder
Processes
The Process Builder is a
Process Builder
Setup | Process Automation | Process Builder
Processes
The Process Builder is a
Слайд 49Process Builder
Setup | Process Automation | Process Builder
Building a Process
Define the Process
Process Builder
Setup | Process Automation | Process Builder
Building a Process
Define the Process
Слайд 50Setup
Overview
ADMINISTRATION
PLATFORM TOOLS
SETTINGS
Apps
Features
Objects
Process
User Interface
Custom Code
Environ-ments
Company Settings
Identity
Security
SETUP
Users
Data
Setup
Overview
ADMINISTRATION
PLATFORM TOOLS
SETTINGS
Apps
Features
Objects
Process
User Interface
Custom Code
Environ-ments
Company Settings
Identity
Security
SETUP
Users
Data
Слайд 51App Menu
Setup | User Interface | App Menu
Apps
All apps installed in the
App Menu
Setup | User Interface | App Menu
Apps
All apps installed in the
Слайд 52Lightning App Builder
Setup | User Interface | Lightning App Builder
Lightning Apps
The Lightning
Lightning App Builder
Setup | User Interface | Lightning App Builder
Lightning Apps
The Lightning

Слайд 53Path Settings
Setup | User Interface | Path Settings
Path
Use the Path component on
Path Settings
Setup | User Interface | Path Settings
Path
Use the Path component on
Слайд 54Tabs
Setup | User Interface | Tabs
Custom Tabs
Custom tabs let you display custom
Tabs
Setup | User Interface | Tabs
Custom Tabs
Custom tabs let you display custom
Слайд 55Themes and Branding
Setup | User Interface | Themes and Branding
Branding
Salesforce has improved
Themes and Branding
Setup | User Interface | Themes and Branding
Branding
Salesforce has improved
Слайд 56Rename Tabs and Labels
Setup | User Interface| Rename Tabs and Labels
Rename
With Rename
Rename Tabs and Labels
Setup | User Interface| Rename Tabs and Labels
Rename
With Rename
Слайд 57Translation Workbench
Setup | User Interface | Translation Workbench | Translation Settings
Translation
The Translation
Translation Workbench
Setup | User Interface | Translation Workbench | Translation Settings
Translation
The Translation
Слайд 58Translation Workbench
Setup | User Interface | Translation Workbench | Translate
Translation
Select the Language
Translation Workbench
Setup | User Interface | Translation Workbench | Translate
Translation
Select the Language
Слайд 59Translation Workbench
Setup | User Interface | Translation Workbench | Export
Translation
Create files that
Translation Workbench
Setup | User Interface | Translation Workbench | Export
Translation
Create files that

Слайд 60Translation Workbench
Setup | User Interface | Translation Workbench | Import
Translation
Import and update
Translation Workbench
Setup | User Interface | Translation Workbench | Import
Translation
Import and update
Слайд 61Setup
Overview
ADMINISTRATION
PLATFORM TOOLS
SETTINGS
Apps
Features
Objects
Process
User Interface
Custom Code
Environ-ments
Company Settings
Identity
Security
SETUP
Users
Data
Setup
Overview
ADMINISTRATION
PLATFORM TOOLS
SETTINGS
Apps
Features
Objects
Process
User Interface
Custom Code
Environ-ments
Company Settings
Identity
Security
SETUP
Users
Data
Слайд 62Sandboxes
Setup | Environments | Sandboxes
Sandboxes
Sandboxes are isolated from your production org, so
Sandboxes
Setup | Environments | Sandboxes
Sandboxes
Sandboxes are isolated from your production org, so
Слайд 63Deployment Settings
Setup | Environments | Deploy | Deployment Settings
Deployment
A deployment connection enables
Deployment Settings
Setup | Environments | Deploy | Deployment Settings
Deployment
A deployment connection enables
Слайд 64Inbound & Outbound Change Sets
Setup | Environments | Change Sets | Inbound
Inbound & Outbound Change Sets
Setup | Environments | Change Sets | Inbound
Слайд 65System Overview
Setup | Environments | System Overview
Overview
The system overview page shows usage
System Overview
Setup | Environments | System Overview
Overview
The system overview page shows usage
Слайд 66Reports & Dashboards
Reports & Dashboards
Слайд 67Reports & Dashboards
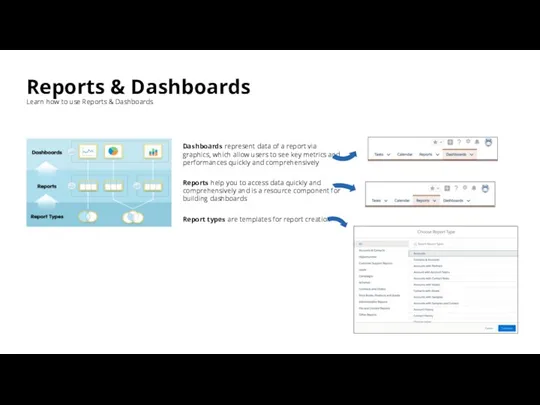
Learn how to use Reports & Dashboards
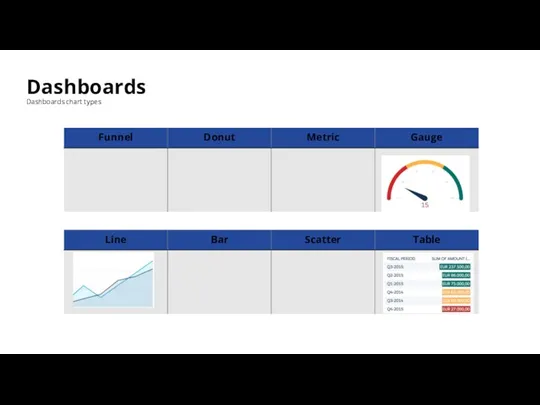
Dashboards represent data of
Reports & Dashboards
Learn how to use Reports & Dashboards
Dashboards represent data of
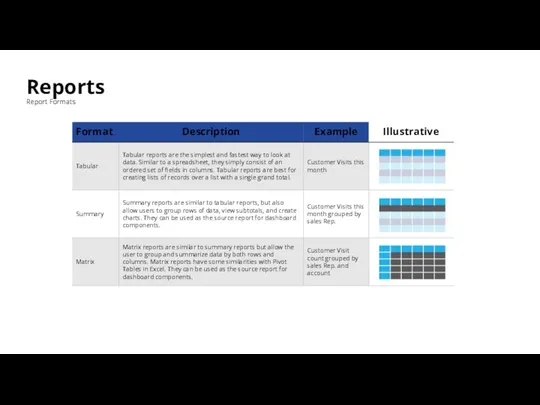
Слайд 68Reports
Report Formats
Reports
Report Formats
Слайд 69Reports
Landing page
Overview
New Report - Create a new report. (Click on “New Report
Reports
Landing page
Overview
New Report - Create a new report. (Click on “New Report
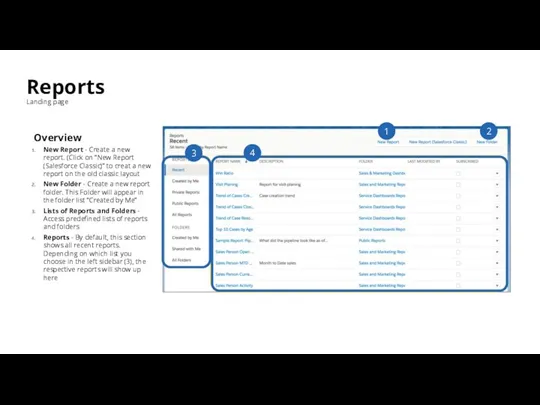
Слайд 70Reports
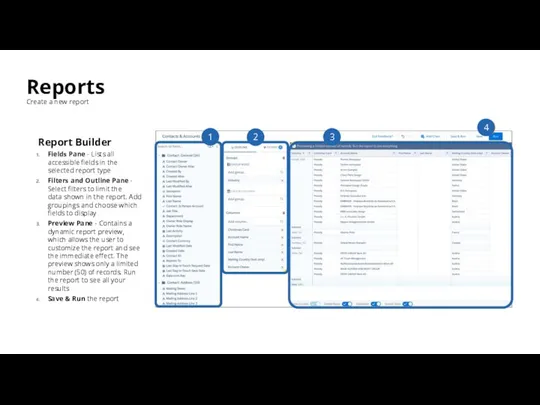
Create a new report
Report Builder
Fields Pane - Lists all accessible fields in
Reports
Create a new report
Report Builder
Fields Pane - Lists all accessible fields in
Слайд 71Reports
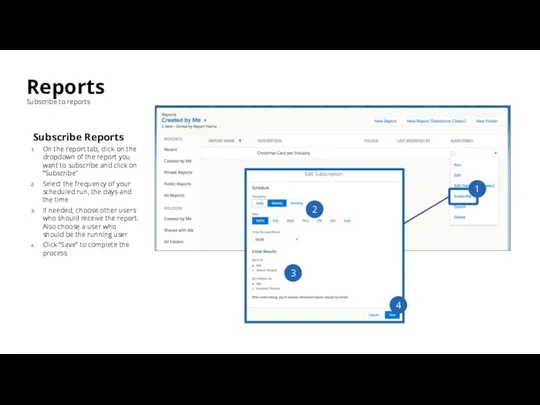
Subscribe to reports
Subscribe Reports
On the report tab, click on the dropdown of
Reports
Subscribe to reports
Subscribe Reports
On the report tab, click on the dropdown of
Слайд 72Reports
Sharing of Reports
Sharing
Reports in Salesforce are shared through folders. Click on the
Reports
Sharing of Reports
Sharing
Reports in Salesforce are shared through folders. Click on the

Слайд 73Dashboards
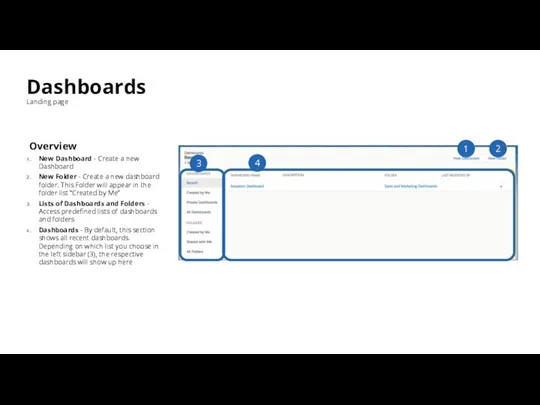
Landing page
Overview
New Dashboard - Create a new Dashboard
New Folder - Create a
Dashboards
Landing page
Overview
New Dashboard - Create a new Dashboard
New Folder - Create a
Слайд 74Dashboards
Dashboards chart types
Dashboards
Dashboards chart types
Слайд 75Dashboards
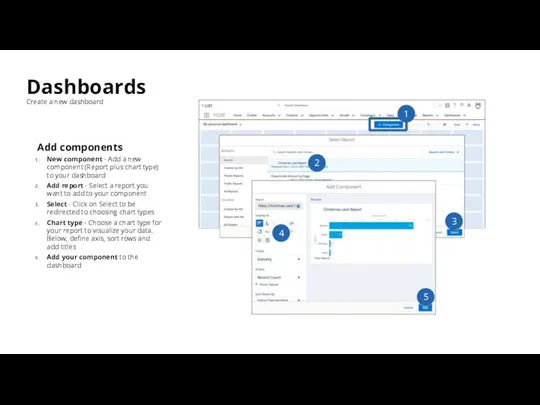
Create a new dashboard
Add components
New component - Add a new component (Report
Dashboards
Create a new dashboard
Add components
New component - Add a new component (Report
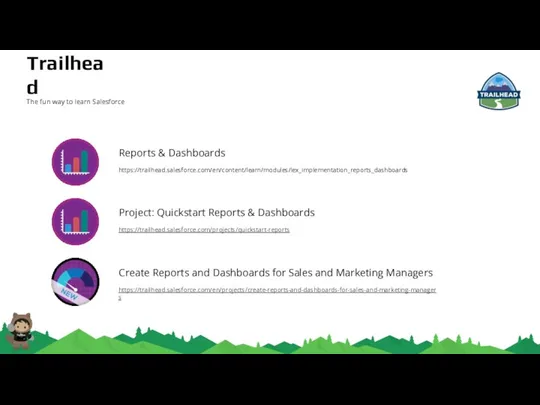
Слайд 76Reports & Dashboards
https://trailhead.salesforce.com/en/content/learn/modules/lex_implementation_reports_dashboards
Project: Quickstart Reports & Dashboards
https://trailhead.salesforce.com/projects/quickstart-reports
Create Reports and Dashboards for Sales
Reports & Dashboards
https://trailhead.salesforce.com/en/content/learn/modules/lex_implementation_reports_dashboards
Project: Quickstart Reports & Dashboards
https://trailhead.salesforce.com/projects/quickstart-reports
Create Reports and Dashboards for Sales
Слайд 77Thank you.
Thank you.

Слайд 78Helpful Links
View and Manage Users
https://help.salesforce.com/articleView?id=admin_users.htm&type=0
Add a Single User
https://help.salesforce.com/articleView?id=adding_new_users.htm&type=5
User Management
https://help.salesforce.com/articleView?id=users_mgmt_overview.htm&type=5
Helpful Links
View and Manage Users
https://help.salesforce.com/articleView?id=admin_users.htm&type=0
Add a Single User
https://help.salesforce.com/articleView?id=adding_new_users.htm&type=5
User Management
https://help.salesforce.com/articleView?id=users_mgmt_overview.htm&type=5

Слайд 79Helpful Links
Manage Profile Lists
https://help.salesforce.com/articleView?id=users_profiles_view.htm&type=0
Clone Profiles
https://help.salesforce.com/articleView?id=users_profiles_cloning.htm&type=5
Profiles
https://help.salesforce.com/articleView?id=admin_userprofiles.htm&type=5
Helpful Links
Manage Profile Lists
https://help.salesforce.com/articleView?id=users_profiles_view.htm&type=0
Clone Profiles
https://help.salesforce.com/articleView?id=users_profiles_cloning.htm&type=5
Profiles
https://help.salesforce.com/articleView?id=admin_userprofiles.htm&type=5
Слайд 80Helpful Links
User Role Hierarchy
https://help.salesforce.com/articleView?id=admin_roles.htm&type=0
Assign Users to Roles
https://help.salesforce.com/articleView?id=assigning_users_to_roles.htm&type=5
Guidelines for Success with Roles
https://help.salesforce.com/articleView?id=setup_roles_guidelines.htm&type=5
Helpful Links
User Role Hierarchy
https://help.salesforce.com/articleView?id=admin_roles.htm&type=0
Assign Users to Roles
https://help.salesforce.com/articleView?id=assigning_users_to_roles.htm&type=5
Guidelines for Success with Roles
https://help.salesforce.com/articleView?id=setup_roles_guidelines.htm&type=5
Слайд 81Helpful Links
Permission Sets
https://help.salesforce.com/articleView?id=perm_sets_overview.htm&type=5
Create Permission Sets
https://help.salesforce.com/articleView?id=perm_sets_create.htm&type=5
Assign Permission Sets to a Single User
https://help.salesforce.com/articleView?id=perm_sets_assigning.htm&type=5
Helpful Links
Permission Sets
https://help.salesforce.com/articleView?id=perm_sets_overview.htm&type=5
Create Permission Sets
https://help.salesforce.com/articleView?id=perm_sets_create.htm&type=5
Assign Permission Sets to a Single User
https://help.salesforce.com/articleView?id=perm_sets_assigning.htm&type=5
Слайд 82Helpful Links
What Is a Group?
https://help.salesforce.com/articleView?id=user_groups.htm&type=0
Create and Edit Groups
https://help.salesforce.com/articleView?id=creating_and_editing_groups.htm&type=5
Public Group Considerations
https://help.salesforce.com/articleView?id=user_groups_considerations.htm&type=5
Helpful Links
What Is a Group?
https://help.salesforce.com/articleView?id=user_groups.htm&type=0
Create and Edit Groups
https://help.salesforce.com/articleView?id=creating_and_editing_groups.htm&type=5
Public Group Considerations
https://help.salesforce.com/articleView?id=user_groups_considerations.htm&type=5
Слайд 83Helpful Links
Data Import Wizard
https://help.salesforce.com/articleView?id=data_import_wizard.htm&type=0
Import Data with the Data Import Wizard
https://help.salesforce.com/articleView?id=import_with_data_import_wizard.htm&type=5
Choosing a Method
Helpful Links
Data Import Wizard
https://help.salesforce.com/articleView?id=data_import_wizard.htm&type=0
Import Data with the Data Import Wizard
https://help.salesforce.com/articleView?id=import_with_data_import_wizard.htm&type=5
Choosing a Method

Слайд 84Helpful Links
Export Backup Data from Salesforce
https://help.salesforce.com/articleView?id=admin_exportdata.htm&type=0
Delete Multiple Records and Reports
https://help.salesforce.com/articleView?id=admin_massdelete.htm&type=0
Monitor Data and
Helpful Links
Export Backup Data from Salesforce
https://help.salesforce.com/articleView?id=admin_exportdata.htm&type=0
Delete Multiple Records and Reports
https://help.salesforce.com/articleView?id=admin_massdelete.htm&type=0
Monitor Data and
Слайд 85Helpful Links
Things to Know About Duplicate Rules
https://help.salesforce.com/articleView?id=duplicate_rules_overview.htm&type=0
Create or Edit Duplicate Rules
https://help.salesforce.com/articleView?id=duplicate_rules_create.htm&type=5
Matching Criteria
Helpful Links
Things to Know About Duplicate Rules
https://help.salesforce.com/articleView?id=duplicate_rules_overview.htm&type=0
Create or Edit Duplicate Rules
https://help.salesforce.com/articleView?id=duplicate_rules_create.htm&type=5
Matching Criteria

Слайд 86Helpful Links
Set Up Your Company in Salesforce
https://help.salesforce.com/articleView?id=admin_profile.htm&type=0
Feature Licenses Overview
https://help.salesforce.com/articleView?id=users_understanding_feature_licenses.htm&type=5
Language Settings Overview
https://help.salesforce.com/articleView?id=setting_your_language.htm&type=0
Manage Multiple
Helpful Links
Set Up Your Company in Salesforce
https://help.salesforce.com/articleView?id=admin_profile.htm&type=0
Feature Licenses Overview
https://help.salesforce.com/articleView?id=users_understanding_feature_licenses.htm&type=5
Language Settings Overview
https://help.salesforce.com/articleView?id=setting_your_language.htm&type=0
Manage Multiple
Слайд 87Helpful Links
Monitor Login History
https://help.salesforce.com/articleView?id=users_login_history.htm&type=0
Identity Verification History
https://help.salesforce.com/articleView?id=security_verification_history.htm&type=5
Set Trusted IP Ranges for Your Organization
https://help.salesforce.com/articleView?id=security_networkaccess.htm&type=0
Restrict
Helpful Links
Monitor Login History
https://help.salesforce.com/articleView?id=users_login_history.htm&type=0
Identity Verification History
https://help.salesforce.com/articleView?id=security_verification_history.htm&type=5
Set Trusted IP Ranges for Your Organization
https://help.salesforce.com/articleView?id=security_networkaccess.htm&type=0
Restrict
Слайд 88Helpful Links
Sharing Settings
https://help.salesforce.com/articleView?id=managing_the_sharing_model.htm&type=0
Organization-Wide Sharing Defaults
https://help.salesforce.com/articleView?id=security_sharing_owd_about.htm&type=5
Sharing Rules
https://help.salesforce.com/articleView?id=security_about_sharing_rules.htm&type=5
Helpful Links
Sharing Settings
https://help.salesforce.com/articleView?id=managing_the_sharing_model.htm&type=0
Organization-Wide Sharing Defaults
https://help.salesforce.com/articleView?id=security_sharing_owd_about.htm&type=5
Sharing Rules
https://help.salesforce.com/articleView?id=security_about_sharing_rules.htm&type=5

Слайд 89Helpful Links
Passwords
https://help.salesforce.com/articleView?id=security_overview_passwords.htm&type=5
Set Password Policies
https://help.salesforce.com/articleView?id=admin_password.htm&type=0
Expire Passwords for All Users
https://help.salesforce.com/articleView?id=expiring_passwords.htm&type=0
Helpful Links
Passwords
https://help.salesforce.com/articleView?id=security_overview_passwords.htm&type=5
Set Password Policies
https://help.salesforce.com/articleView?id=admin_password.htm&type=0
Expire Passwords for All Users
https://help.salesforce.com/articleView?id=expiring_passwords.htm&type=0
Слайд 90Helpful Links
Modify Session Security Settings
https://help.salesforce.com/articleView?id=admin_sessions.htm&type=0
Session Security
https://help.salesforce.com/articleView?id=security_overview_sessions.htm&type=5
Manage Installed Packages
https://help.salesforce.com/articleView?id=distribution_managing_packages.htm&type=0
View Installed Package Details
https://help.salesforce.com/articleView?id=distribution_package_detail.htm&type=5
Helpful Links
Modify Session Security Settings
https://help.salesforce.com/articleView?id=admin_sessions.htm&type=0
Session Security
https://help.salesforce.com/articleView?id=security_overview_sessions.htm&type=5
Manage Installed Packages
https://help.salesforce.com/articleView?id=distribution_managing_packages.htm&type=0
View Installed Package Details
https://help.salesforce.com/articleView?id=distribution_package_detail.htm&type=5
Слайд 91Helpful Links
Create Lightning Apps
https://help.salesforce.com/articleView?id=dev_apps_lightning_create.htm&type=5
Salesforce App Considerations
https://help.salesforce.com/articleView?id=dev_apps_considerations.htm&type=5
Lightning Apps
https://help.salesforce.com/articleView?id=dev_apps_lightning.htm&type=5
Create and Edit a Custom Lightning
Helpful Links
Create Lightning Apps
https://help.salesforce.com/articleView?id=dev_apps_lightning_create.htm&type=5
Salesforce App Considerations
https://help.salesforce.com/articleView?id=dev_apps_considerations.htm&type=5
Lightning Apps
https://help.salesforce.com/articleView?id=dev_apps_lightning.htm&type=5
Create and Edit a Custom Lightning
Слайд 92Helpful Links
Your Org’s Branding in the Salesforce App
https://help.salesforce.com/articleView?id=customize_sf1_branding.htm&type=0
Customize Branding of the Salesforce
Helpful Links
Your Org’s Branding in the Salesforce App
https://help.salesforce.com/articleView?id=customize_sf1_branding.htm&type=0
Customize Branding of the Salesforce
Слайд 93Helpful Links
Set Up a Custom Report Type
https://help.salesforce.com/articleView?id=reports_report_type_setup.htm&type=0
Create a Custom Report Type
https://help.salesforce.com/articleView?id=reports_defining_report_types.htm&type=5
Add Child
Helpful Links
Set Up a Custom Report Type
https://help.salesforce.com/articleView?id=reports_report_type_setup.htm&type=0
Create a Custom Report Type
https://help.salesforce.com/articleView?id=reports_defining_report_types.htm&type=5
Add Child
Слайд 94Helpful Links
Feed Tracking
https://help.salesforce.com/articleView?id=collab_feed_tracking_overview.htm&type=5
Customize Chatter Feed Tracking
https://help.salesforce.com/articleView?id=collab_feed_tracking.htm&type=5
Chatter Feeds Overview
https://help.salesforce.com/articleView?id=collab_feed_overview.htm&type=5
Helpful Links
Feed Tracking
https://help.salesforce.com/articleView?id=collab_feed_tracking_overview.htm&type=5
Customize Chatter Feed Tracking
https://help.salesforce.com/articleView?id=collab_feed_tracking.htm&type=5
Chatter Feeds Overview
https://help.salesforce.com/articleView?id=collab_feed_overview.htm&type=5

Слайд 95Helpful Links
Find Object Management Settings in Lightning Experience
https://help.salesforce.com/articleView?id=extend_click_find_objectmgmt_lex.htm&type=5
Create Custom Fields
https://help.salesforce.com/articleView?id=adding_fields.htm&type=5
Page Layouts
https://help.salesforce.com/articleView?id=customize_layout.htm&type=5
Create Record
Helpful Links
Find Object Management Settings in Lightning Experience
https://help.salesforce.com/articleView?id=extend_click_find_objectmgmt_lex.htm&type=5
Create Custom Fields
https://help.salesforce.com/articleView?id=adding_fields.htm&type=5
Page Layouts
https://help.salesforce.com/articleView?id=customize_layout.htm&type=5
Create Record
Слайд 96Helpful Links
Validation Rules
https://help.salesforce.com/articleView?id=fields_about_field_validation.htm&type=5
Define Validation Rules
https://help.salesforce.com/articleView?id=fields_defining_field_validation_rules.htm&type=5
Validation Rule Considerations
https://help.salesforce.com/articleView?id=fields_validation_considerations.htm&type=5
Tips for Writing Validation Rules
https://help.salesforce.com/articleView?id=fields_validation_rules_tips.htm&type=5
Trailhead -
Helpful Links
Validation Rules
https://help.salesforce.com/articleView?id=fields_about_field_validation.htm&type=5
Define Validation Rules
https://help.salesforce.com/articleView?id=fields_defining_field_validation_rules.htm&type=5
Validation Rule Considerations
https://help.salesforce.com/articleView?id=fields_validation_considerations.htm&type=5
Tips for Writing Validation Rules
https://help.salesforce.com/articleView?id=fields_validation_rules_tips.htm&type=5
Trailhead -
Слайд 97Helpful Links
Schema Builder
https://help.salesforce.com/articleView?id=schema_builder_working.htm
Schema Builder Custom Object Definition
https://help.salesforce.com/articleView?id=schema_builder_elements_objects_ref.htm
Trailhead – Data Modeling
https://trailhead.salesforce.com/modules/data_modeling
Helpful Links
Schema Builder
https://help.salesforce.com/articleView?id=schema_builder_working.htm
Schema Builder Custom Object Definition
https://help.salesforce.com/articleView?id=schema_builder_elements_objects_ref.htm
Trailhead – Data Modeling
https://trailhead.salesforce.com/modules/data_modeling
Слайд 98Helpful Links
Process Management
https://help.salesforce.com/articleView?id=schema_builder_working.htm
Create a Process
https://help.salesforce.com/articleView?id=process_create.htm&type=5
Trailhead - Process Automation
https://trailhead.salesforce.com/en/modules/business_process_automation
Helpful Links
Process Management
https://help.salesforce.com/articleView?id=schema_builder_working.htm
Create a Process
https://help.salesforce.com/articleView?id=process_create.htm&type=5
Trailhead - Process Automation
https://trailhead.salesforce.com/en/modules/business_process_automation

Слайд 99Helpful Links
Lightning App Builder
https://help.salesforce.com/articleView?id=lightning_app_builder_overview.htm
Build Apps Visually with Lightning App Builder
https://developer.salesforce.com/events/webinars/Lightning-App-Builder
Create an
Helpful Links
Lightning App Builder
https://help.salesforce.com/articleView?id=lightning_app_builder_overview.htm
Build Apps Visually with Lightning App Builder
https://developer.salesforce.com/events/webinars/Lightning-App-Builder
Create an
Слайд 100Helpful Links
Path
https://help.salesforce.com/articleView?id=rss_sales_path.htm
Guide Users with Path
https://help.salesforce.com/articleView?id=path_overview.htm
Trailhead - Path & Workspaces
https://trailhead.salesforce.com/en/modules/sales_admin_optimize_salesforce_for_selling
Helpful Links
Path
https://help.salesforce.com/articleView?id=rss_sales_path.htm
Guide Users with Path
https://help.salesforce.com/articleView?id=path_overview.htm
Trailhead - Path & Workspaces
https://trailhead.salesforce.com/en/modules/sales_admin_optimize_salesforce_for_selling
Слайд 101Helpful Links
Rename Object, Tab, and Field Labels
https://help.salesforce.com/articleView?id=customize_rename.htm
Enable and Disable the Translation Workbench
https://help.salesforce.com/articleView?id=customize_wbench.htm
Translate
Helpful Links
Rename Object, Tab, and Field Labels
https://help.salesforce.com/articleView?id=customize_rename.htm
Enable and Disable the Translation Workbench
https://help.salesforce.com/articleView?id=customize_wbench.htm
Translate
Слайд 102Helpful Links
Sandbox Types
https://help.salesforce.com/articleView?id=create_test_instance.htm
Sandbox Licenses and Storage by Type
https://help.salesforce.com/articleView?id=data_sandbox_environments.htm
Trailhead - Application Lifecycle
Helpful Links
Sandbox Types
https://help.salesforce.com/articleView?id=create_test_instance.htm
Sandbox Licenses and Storage by Type
https://help.salesforce.com/articleView?id=data_sandbox_environments.htm
Trailhead - Application Lifecycle
Слайд 103Helpful Links
Change Sets
https://help.salesforce.com/articleView?id=changesets.htm
Change Sets Best Practices
https://help.salesforce.com/articleView?id=changesets_best_practices.htm
Deploy Inbound Change Sets
https://help.salesforce.com/articleView?id=changesets_about_inbound.htm
Upload Outbound
Helpful Links
Change Sets
https://help.salesforce.com/articleView?id=changesets.htm
Change Sets Best Practices
https://help.salesforce.com/articleView?id=changesets_best_practices.htm
Deploy Inbound Change Sets
https://help.salesforce.com/articleView?id=changesets_about_inbound.htm
Upload Outbound

 Олимпиада по логопедии для учащихся 2 классов
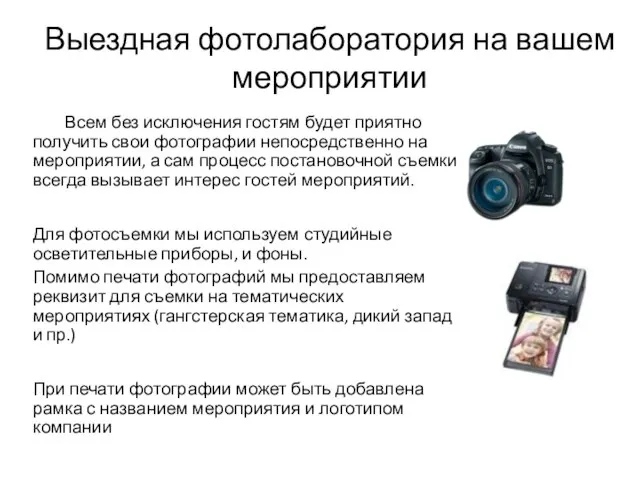 Выездная фотолаборатория на вашем мероприятии
 ЭВОЛЮЦИЯ БИЗНЕС-МОДЕЛЕЙ В ТЕЛЕКОММУНИКАЦИЯХ:откуда и куда мы движемся
 Спортивные загадки. Викторина
 Работа выполнена в рамках проекта «Повышение квалификаций различных категорий работников образования и формирование у них базов
 Интерьер бального зала
 Маскаринская школа-интернат для детей с ограниченными возможностями здоровья
 ГОРОДСКОЙ ИНФОРМАЦИОННО-МЕТОДИЧЕСКИЙ ЦЕНТР ОТДЕЛА ОБРАЗОВАНИЯ г.Комсомольск – на – Амуре.
 Экстремальные виды спорта для людей с безграничными возможностями
 Характеристика сельскохозяйственного машиностроения
 АДМИН
АДМИН Как реализовать новую идею
 Создание интерактивных кроссвордов в электронных таблицах
 ЦЕЛЬ УРОКА: Пройдем по знакомым страницам, Одну за другою решая задачи. Все, что скопили мы все по крупицам, В связях, в единстве, во в
 Проведення профорієнтаційної роботи для вступу до Лозівської філії Харківського автомобільно-дорожнього технікуму
 Мифы древних славян
 Сайлаушылар тізімінен өзіңді тексер
 Храм книги. Необыкновенные библиотеки. Виртуальная экскурсия
 Маркетинговые приемы ведения кофейного бизнеса в период пандемии на примере кофейни Anytime в г. Омск
 Строгание древесины
 Золотой век Афин
 Порядок остановки и стоянки транспортных средствдля 10 класса
 20141020_daosizm_i_konfutsianstvo_v_kitae
 20171116_proekt_pogoda_2017g._2
 Формирование средневековых городов
 Презентация на тему Солнце и жизнь Земли
 עמודי חיפוש ותוצאות
 Вот мы приехали на слет. Роман в стихах с иллюстрациями