- ECIS. User trraining

Содержание
- 2. User Training Guide History Page Version 1: base line version by ECIS development team Version 2:
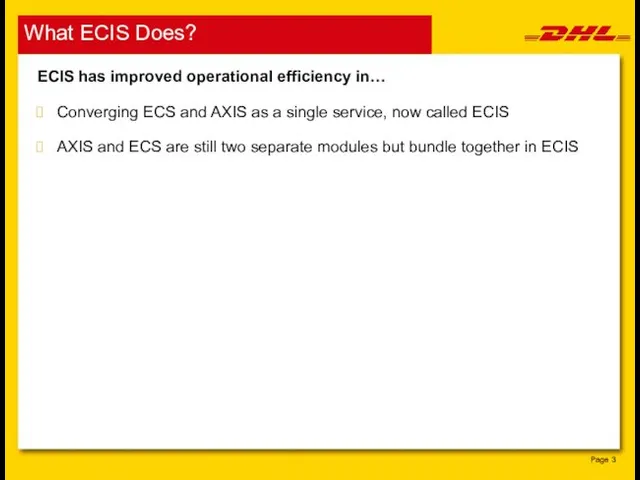
- 3. What ECIS Does? Page ECIS has improved operational efficiency in… Converging ECS and AXIS as a
- 4. What You Will Learn? Page By the end of this session, you will be able to…
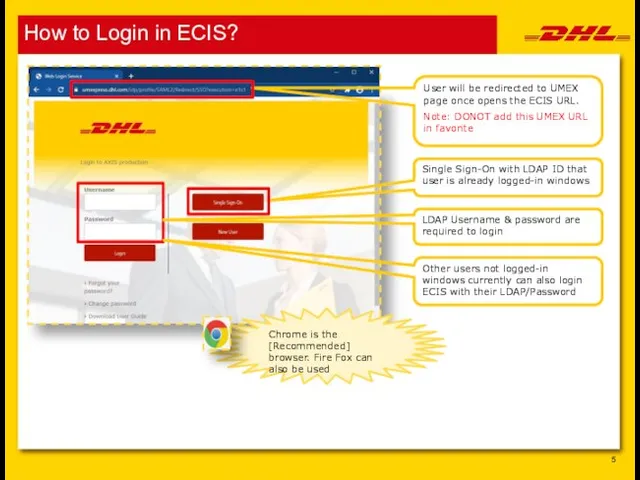
- 5. How to Login in ECIS? LDAP Username & password are required to login Single Sign-On with
- 6. Save Your Link – Before you start! Page [Right Click] on bookmarks bar in Chrome and
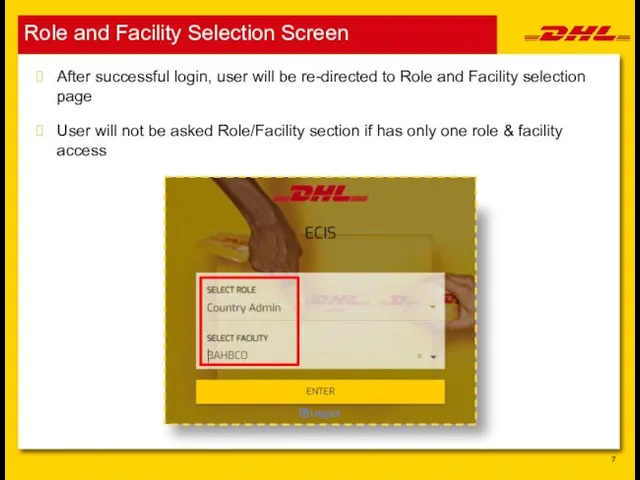
- 7. Role and Facility Selection Screen After successful login, user will be re-directed to Role and Facility
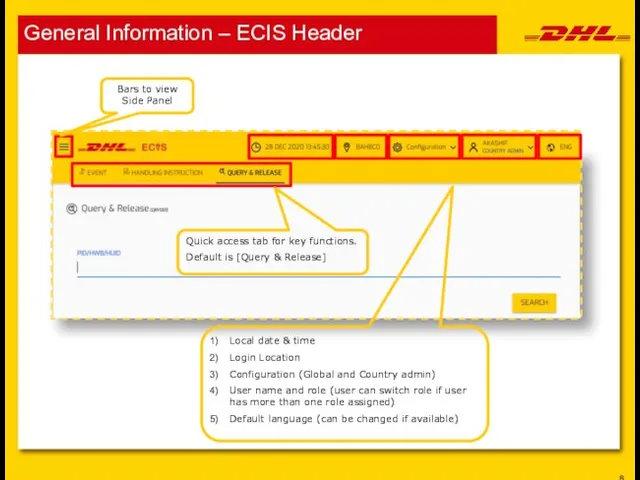
- 8. General Information – ECIS Header Bars to view Side Panel Local date & time Login Location
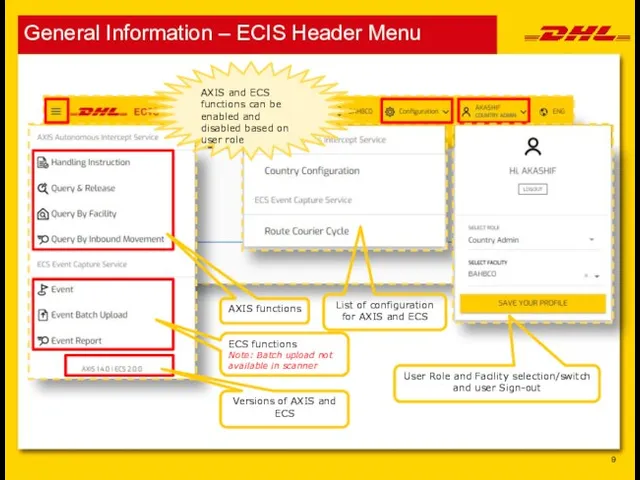
- 9. General Information – ECIS Header Menu User Role and Facility selection/switch and user Sign-out List of
- 10. Updating Role & Facility
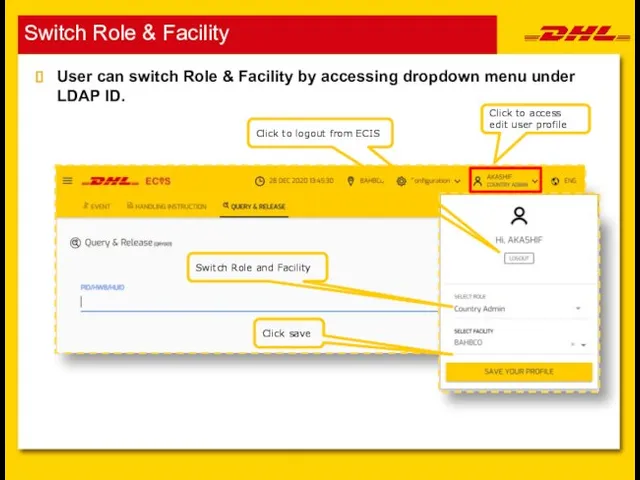
- 11. Switch Role & Facility User can switch Role & Facility by accessing dropdown menu under LDAP
- 12. Language Selection
- 13. Language Selection Users can switch between Preferred Language available in ECIS, Default language is English Preferred
- 14. Event Generation
- 15. Event Generation – Overview User can access Create Event by selecting “Event” in side panel or
- 16. Event Generation – Extra Information Events/Checkpoints Generation with Parameter Input Extra information textbox will appear to
- 17. Event Generation – No Extra Information Events/Checkpoints Generation without Parameter Input Extra information textbox will not
- 18. Event Generation – HI Detection HI is detected during Events/Checkpoints generation In order to detect HI
- 19. Event Generation – Duplication Detection Alert when scanning ID twice for an Event/Checkpoint The alert will
- 20. Batch Upload
- 21. Batch Upload – How to… User is allowed to download the Checkpoints CSV template based on
- 23. Скачать презентацию

Слайд 3What ECIS Does?
Page
ECIS has improved operational efficiency in…
Converging ECS and
What ECIS Does?
Page
ECIS has improved operational efficiency in…
Converging ECS and
Слайд 4What You Will Learn?
Page
By the end of this session, you will
What You Will Learn?
Page
By the end of this session, you will
Слайд 5How to Login in ECIS?
LDAP Username & password are required to login
Single
How to Login in ECIS?
LDAP Username & password are required to login
Single
Слайд 6Save Your Link – Before you start!
Page
[Right Click] on bookmarks bar
Save Your Link – Before you start!
Page
[Right Click] on bookmarks bar
![Save Your Link – Before you start! Page [Right Click] on bookmarks](/_ipx/f_webp&q_80&fit_contain&s_1440x1080/imagesDir/jpg/915455/slide-5.jpg)
Слайд 7Role and Facility Selection Screen
After successful login, user will be re-directed to
Role and Facility Selection Screen
After successful login, user will be re-directed to
Слайд 8General Information – ECIS Header
Bars to view Side Panel
Local date & time
Login
General Information – ECIS Header
Bars to view Side Panel
Local date & time
Login
Слайд 9General Information – ECIS Header Menu
User Role and Facility selection/switch and user
General Information – ECIS Header Menu
User Role and Facility selection/switch and user
Слайд 10Updating Role & Facility
Updating Role & Facility
Слайд 11Switch Role & Facility
User can switch Role & Facility by accessing dropdown
Switch Role & Facility
User can switch Role & Facility by accessing dropdown
Слайд 12Language Selection
Language Selection

Слайд 13Language Selection
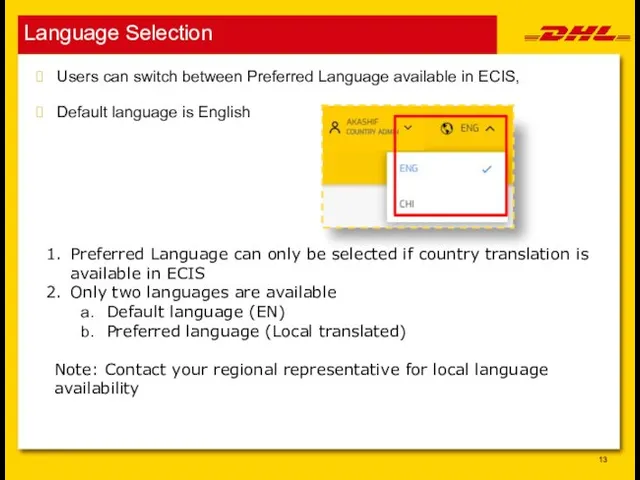
Users can switch between Preferred Language available in ECIS,
Default language
Language Selection
Users can switch between Preferred Language available in ECIS,
Default language
Слайд 14Event Generation
Event Generation
Слайд 15Event Generation – Overview
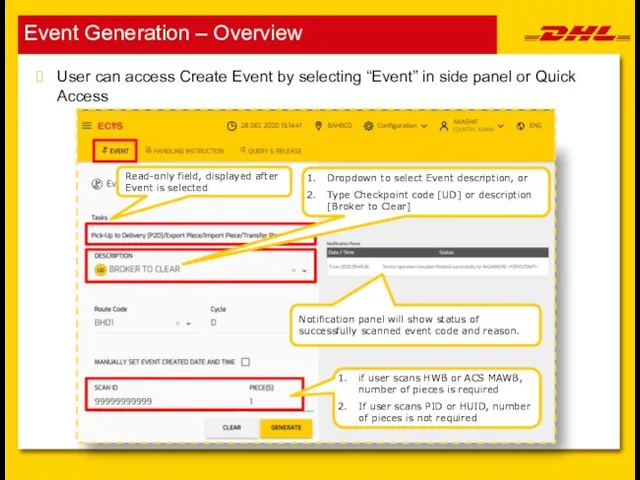
User can access Create Event by selecting “Event”
Event Generation – Overview
User can access Create Event by selecting “Event”
Слайд 16Event Generation – Extra Information
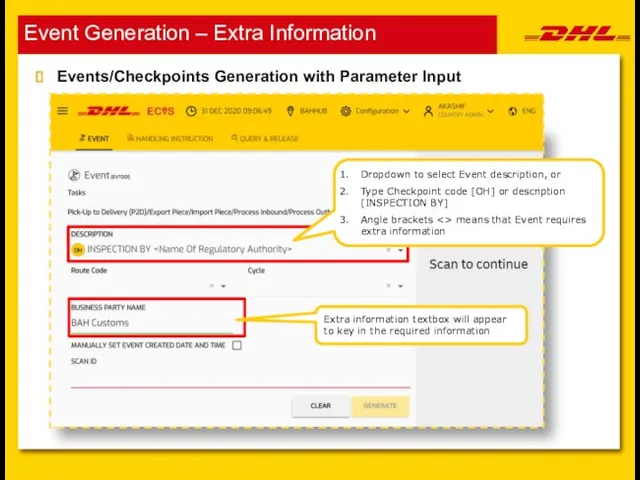
Events/Checkpoints Generation with Parameter Input
Extra information textbox will
Event Generation – Extra Information
Events/Checkpoints Generation with Parameter Input
Extra information textbox will
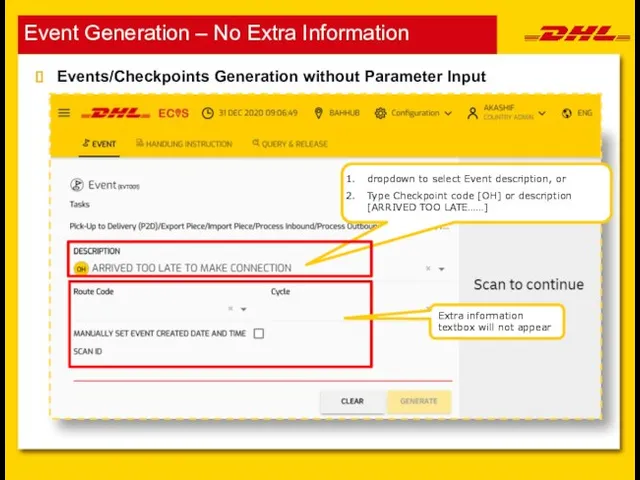
Слайд 17Event Generation – No Extra Information
Events/Checkpoints Generation without Parameter Input
Extra information textbox
Event Generation – No Extra Information
Events/Checkpoints Generation without Parameter Input
Extra information textbox
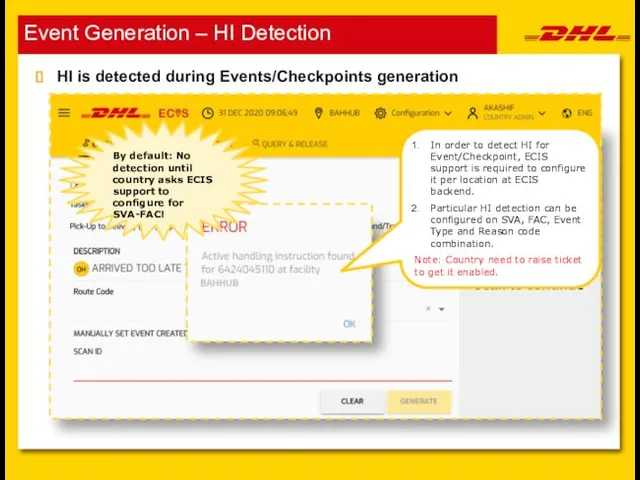
Слайд 18Event Generation – HI Detection
HI is detected during Events/Checkpoints generation
In order to
Event Generation – HI Detection
HI is detected during Events/Checkpoints generation
In order to
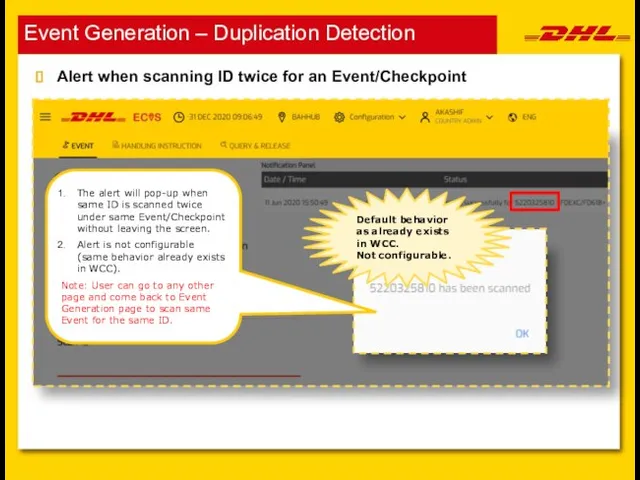
Слайд 19Event Generation – Duplication Detection
Alert when scanning ID twice for an Event/Checkpoint
The
Event Generation – Duplication Detection
Alert when scanning ID twice for an Event/Checkpoint
The
Слайд 20Batch Upload
Batch Upload
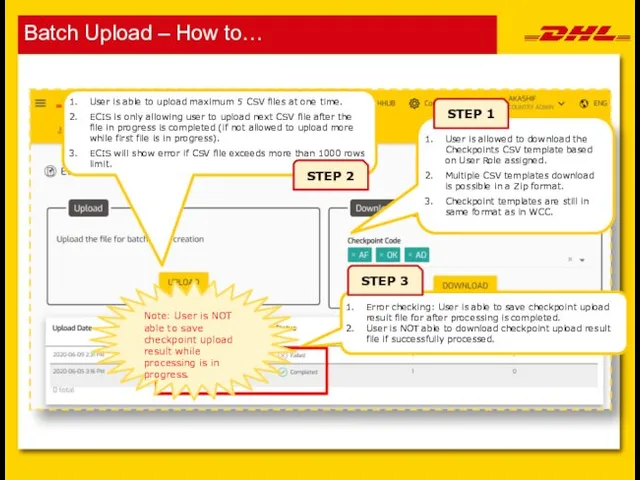
Слайд 21Batch Upload – How to…
User is allowed to download the Checkpoints CSV
Batch Upload – How to…
User is allowed to download the Checkpoints CSV
 Система диспетчеризации инженерного оборудования аэровокзального комплекса
 Розробка Web-Сайту Ресторану
 Инструкция по настройке гид-доступа
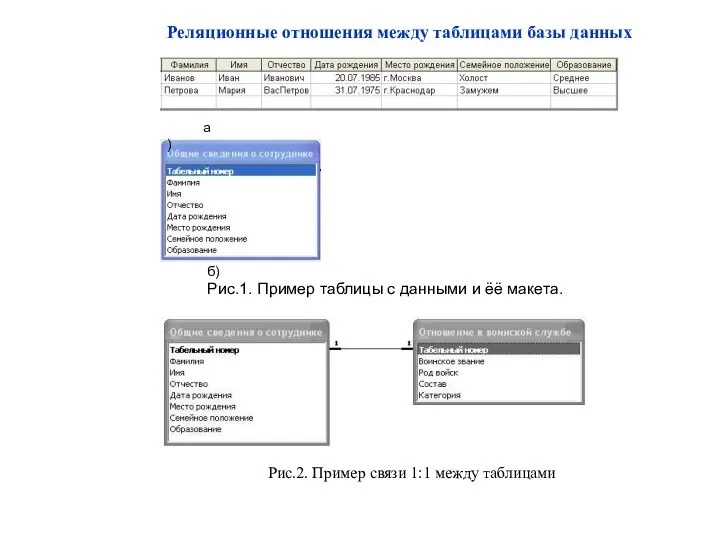 Реляционные отношения между таблицами базы данных
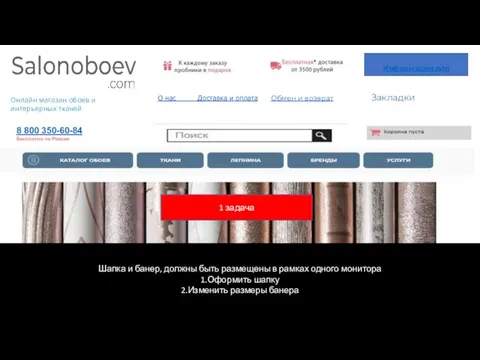 Salonoboev.com Онлайн магазин обоев и интерьерных тканей
 Программная инженерия. Лекция 5. Рабочее проектирование
 Игры в смартфоне: польза или вред? 1 класс
 Работа с видео и звуком. Практическое задание
 Устройство компьютера
 Пятое занятие. Функции
 Работа со строками и файлами
 Инструкция по работе с ЭБС BOOK.RU
 Презентация на тему Дискретные и непрерывные сигналы. Носители информации
  Шаблон презентации
 Хэштег #ДетиВнеПолитики
 Лукбук причины социального детокса
 Базы данных. Реляционная модель данных
 Критическая секция программы
 Основы программирования. Лабораторная работа №13
 Учимся делать размерные сетки
 ВКонтакте для бизнеса
 Информационные таможенные технологии
 Общее понятие системы
 Роль информационной деятельности в современном обществе
 Презентация на тему Биты в байты
  Модернизация ИТ-инфраструктуры
 Файловая система. 2 часть. 8 класс
 Мы идём в библиотеку