- The Boot Process. Lection #3

Содержание
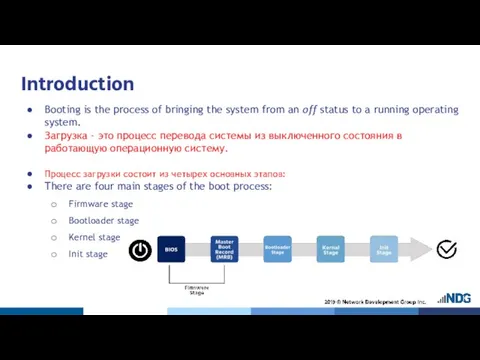
- 2. Introduction Booting is the process of bringing the system from an off status to a running
- 3. Firmware Stage The firmware stage is the first stage to take place after the computer is
- 4. Bootloader Stage The MBR contains the first stage bootloader whose purpose is to load the second
- 5. Bootloader Stage Most common bootloaders: GRUB/GRUB2 (GRand Unified Bootloader) – Supports systems with UEFI. Наиболее распространенные
- 6. Kernel Stage The kernel initializes the hardware drivers and get the root / filesystem mounted for
- 7. The init Stage Final booting stage The first process of the operating system (also called init)
- 8. The init Stage If init has been replaced by Upstart: The scripts in /etc/init are used
- 9. initramfs The initramfs is the initial root filesystem that a Linux system typically has access to.
- 10. initramfs The main advantage of placing drivers in initramfs instead of compiling them into the kernel
- 11. Kernel Messages The dmesg command can be executed after booting the system to see the messages
- 12. The /var/log/messages File Kernel messages and other system-related messages are typically stored in the /var/log/messages file.
- 13. The /var/log/messages File Traditionally, the primary log file is updated with new log entries by the
- 14. Bootloaders
- 15. Introduction Bootloaders are small programs that are used to load other programs. The two bootloaders most
- 16. Introduction The bootloader will perform several operations. Primary task of the bootloader is to load the
- 17. GRUB Legacy Bootloader All bootloaders work in stages: GRUB Legacy typically writes the stage 1 bootloader
- 18. GRUB Legacy Configuration In GRUB Legacy, the first disk detected is referred to as hd0, the
- 19. GRUB Legacy Configuration Only the root user can modify the /boot/grub/grub.conf file. Только пользователь root может
- 20. GRUB Legacy Configuration
- 21. Interacting with GRUB Legacy When a system first starts up with GRUB Legacy installed as the
- 22. Interacting with GRUB Legacy Example of GRUB Legacy menu: Пример меню GRUB Legacy:
- 23. GRUB 2 The new GRUB, GRand Unified Bootloader 2, offers several advantages: Dynamically loaded modules. Non-ASCII
- 24. GRUB 2 Boot Steps When a GRUB 2 system is powered on, the first stage loader
- 25. GRUB 2 Configuration The GRUB 2 configuration files are: /boot/grub2/grub.cfg for Fedora /boot/grub/grub.cfg for Ubuntu These
- 26. GRUB 2 Configuration Summary of the GRUB 2 configuration files: /boot/grub2 Contains many module files. Contains
- 27. GRUB 2 Configuration If GRUB 2 needs to be installed or reinstalled, then an administrator would
- 28. Runlevels
- 29. Introduction Linux uses the concept of different runlevels to define what services or processes will be
- 30. Introduction The Linux Standards Base 4.1 defines the purpose of each runlevel like this: В Linux
- 31. Default Runlevel For traditional init graphical mode, modify the /etc/inittab entry to look like: Для традиционного
- 32. Viewing Current Runlevel Execute runlevel command to view previous and current runlevel: Выполните команду уровня запуска,
- 33. Changing Runlevels and Targets To specify a different target at boot time in Systemd, append to
- 34. Changing Runlevels and Targets To bring the system down to runlevel zero, execute the halt, poweroff,
- 35. The wall Command The wall (write to all) command is used to send a message regarding
- 36. Managing System Services The administrator can control which services will be provided by the various daemons.
- 37. Managing System Services The administrator can use these scripts to manually start or stop a service
- 38. Managing System Services The following table summarizes common script arguments: В следующей таблице перечислены распространенные аргументы
- 39. Managing System Services
- 40. Runlevel Directories Although it is possible to start up services manually, most services are automatically started
- 41. Runlevel Directories To have a service started in a runlevel: Create a symbolic link in the
- 42. The chkconfig Command The chkconfig command displays which services are started and stopped at specific runlevels.
- 43. The chkconfig Command The runlevel a service is active on depends on chkconfig line of script.
- 44. The /etc/init Directory For Debian-derived Linux distributions, the /etc/init directory is used to store Upstart scripts.
- 45. The systemctl Command The systemctl command is used in systems that have Systemd. To start a
- 46. The systemctl Command To configure a service to start automatically: Чтобы настроить автоматический запуск службы, выполните
- 47. Boot Target Many modern systems use systemd rather than init for setting boot targets. The following
- 48. Default Runlevel To check the current runlevel on a Linux system: To boot into single-user mode:
- 49. acpid Linux systems use the Advanced Configuration and Power Interface (ACPI) event daemon acpid to notify
- 51. Скачать презентацию
Слайд 3Firmware Stage
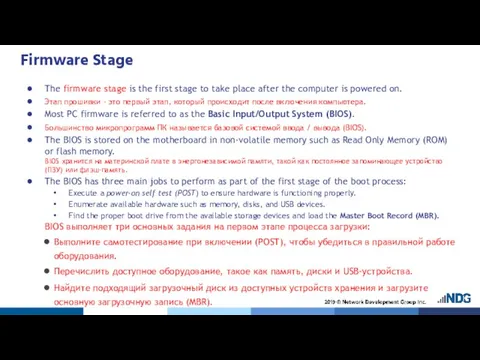
The firmware stage is the first stage to take place after
Firmware Stage
The firmware stage is the first stage to take place after
Слайд 4Bootloader Stage
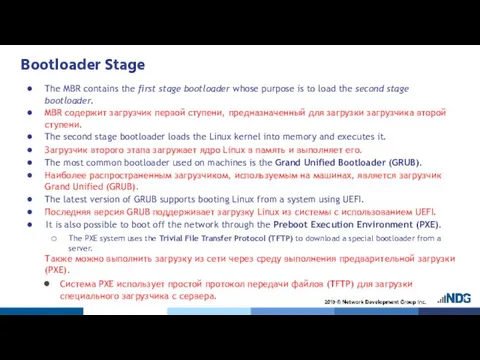
The MBR contains the first stage bootloader whose purpose is to load the
Bootloader Stage
The MBR contains the first stage bootloader whose purpose is to load the
Слайд 5Bootloader Stage
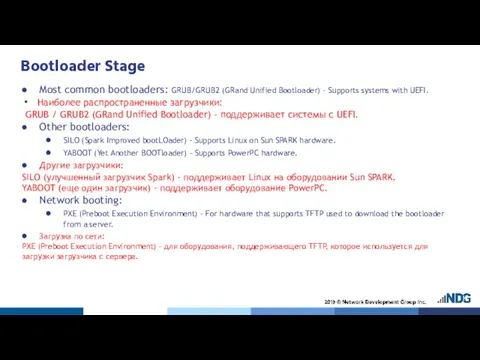
Most common bootloaders: GRUB/GRUB2 (GRand Unified Bootloader) – Supports systems with
Bootloader Stage
Most common bootloaders: GRUB/GRUB2 (GRand Unified Bootloader) – Supports systems with
Слайд 6Kernel Stage
The kernel initializes the hardware drivers and get the root / filesystem mounted
Kernel Stage
The kernel initializes the hardware drivers and get the root / filesystem mounted
Слайд 7The init Stage
Final booting stage
The first process of the operating system (also
The init Stage
Final booting stage
The first process of the operating system (also
Слайд 8The init Stage
If init has been replaced by Upstart:
The scripts in
The init Stage
If init has been replaced by Upstart:
The scripts in
Слайд 9initramfs
The initramfs is the initial root filesystem that a Linux system typically has access to.
Think of
initramfs
The initramfs is the initial root filesystem that a Linux system typically has access to.
Think of
Слайд 10initramfs
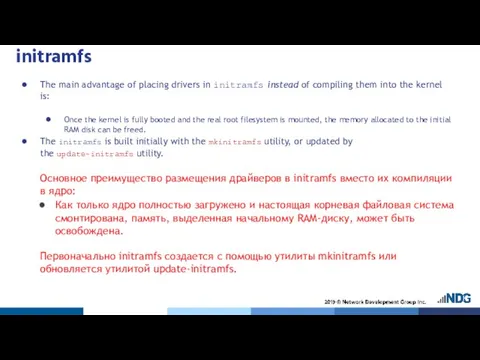
The main advantage of placing drivers in initramfs instead of compiling them into the
initramfs
The main advantage of placing drivers in initramfs instead of compiling them into the
Слайд 11Kernel Messages
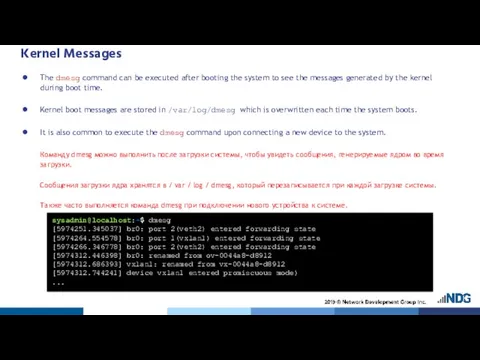
The dmesg command can be executed after booting the system to see the
Kernel Messages
The dmesg command can be executed after booting the system to see the
Слайд 12The /var/log/messages File
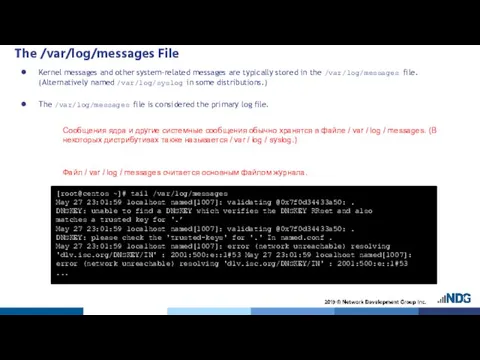
Kernel messages and other system-related messages are typically stored in
The /var/log/messages File
Kernel messages and other system-related messages are typically stored in
Слайд 13The /var/log/messages File
Traditionally, the primary log file is updated with new log
The /var/log/messages File
Traditionally, the primary log file is updated with new log

Слайд 14Bootloaders
Bootloaders

Слайд 15Introduction
Bootloaders are small programs that are used to load other programs.
The two
Introduction
Bootloaders are small programs that are used to load other programs.
The two
Слайд 16Introduction
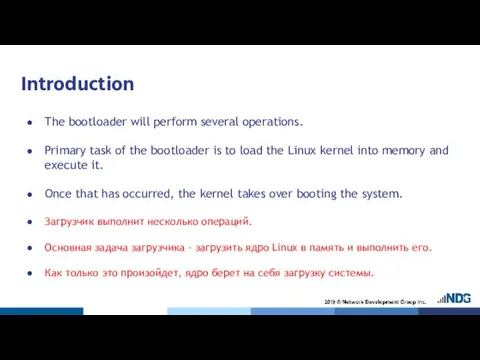
The bootloader will perform several operations.
Primary task of the bootloader is to
Introduction
The bootloader will perform several operations.
Primary task of the bootloader is to
Слайд 17GRUB Legacy Bootloader
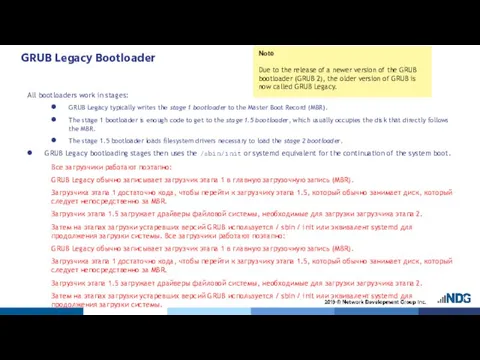
All bootloaders work in stages:
GRUB Legacy typically writes the stage 1
GRUB Legacy Bootloader
All bootloaders work in stages:
GRUB Legacy typically writes the stage 1
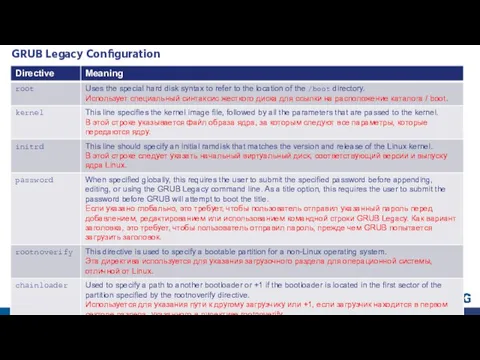
Слайд 18GRUB Legacy Configuration
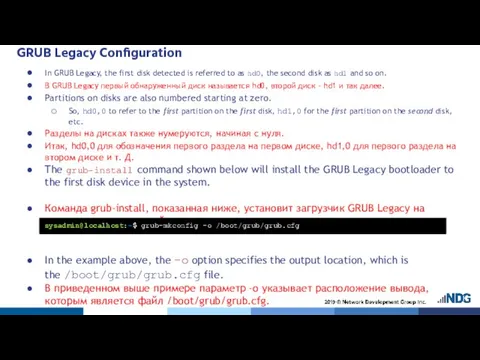
In GRUB Legacy, the first disk detected is referred to
GRUB Legacy Configuration
In GRUB Legacy, the first disk detected is referred to
Слайд 19GRUB Legacy Configuration
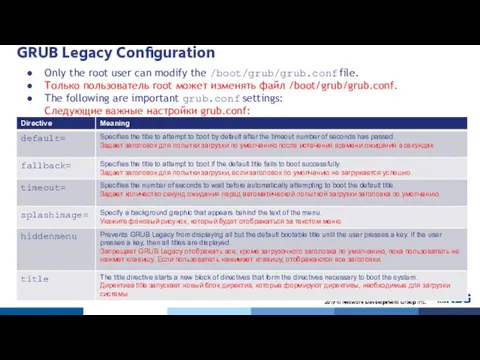
Only the root user can modify the /boot/grub/grub.conf file.
Только пользователь
GRUB Legacy Configuration
Only the root user can modify the /boot/grub/grub.conf file.
Только пользователь
Слайд 20GRUB Legacy Configuration
GRUB Legacy Configuration
Слайд 21Interacting with GRUB Legacy
When a system first starts up with GRUB Legacy
Interacting with GRUB Legacy
When a system first starts up with GRUB Legacy
Слайд 22Interacting with GRUB Legacy
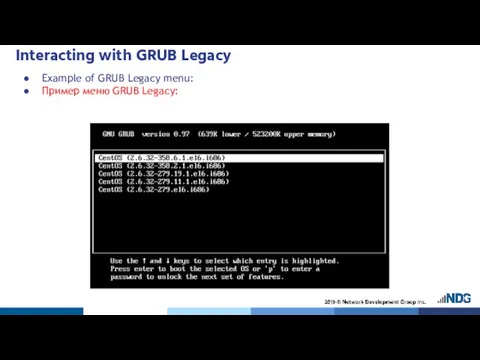
Example of GRUB Legacy menu:
Пример меню GRUB Legacy:
Interacting with GRUB Legacy
Example of GRUB Legacy menu:
Пример меню GRUB Legacy:
Слайд 23GRUB 2
The new GRUB, GRand Unified Bootloader 2, offers several advantages:
Dynamically loaded
GRUB 2
The new GRUB, GRand Unified Bootloader 2, offers several advantages:
Dynamically loaded
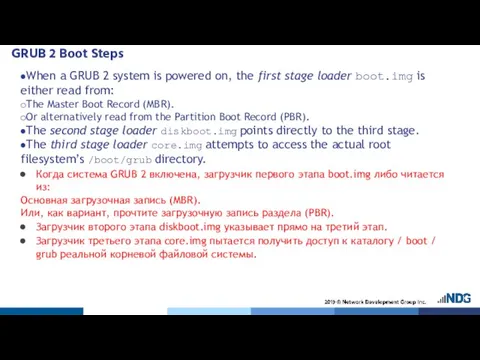
Слайд 24GRUB 2 Boot Steps
When a GRUB 2 system is powered on, the first
GRUB 2 Boot Steps
When a GRUB 2 system is powered on, the first
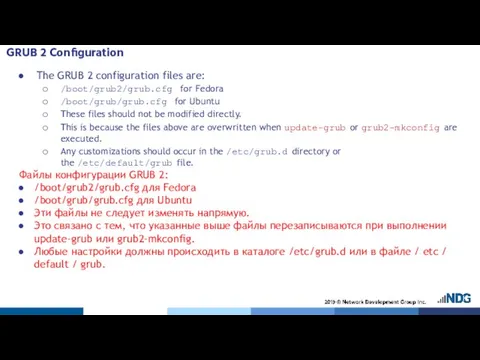
Слайд 25GRUB 2 Configuration
The GRUB 2 configuration files are:
/boot/grub2/grub.cfg for Fedora
/boot/grub/grub.cfg for Ubuntu
These
GRUB 2 Configuration
The GRUB 2 configuration files are:
/boot/grub2/grub.cfg for Fedora
/boot/grub/grub.cfg for Ubuntu
These
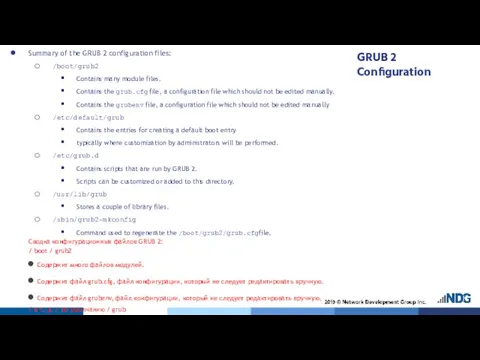
Слайд 26GRUB 2 Configuration
Summary of the GRUB 2 configuration files:
/boot/grub2
Contains many module files.
Contains
GRUB 2 Configuration
Summary of the GRUB 2 configuration files:
/boot/grub2
Contains many module files.
Contains
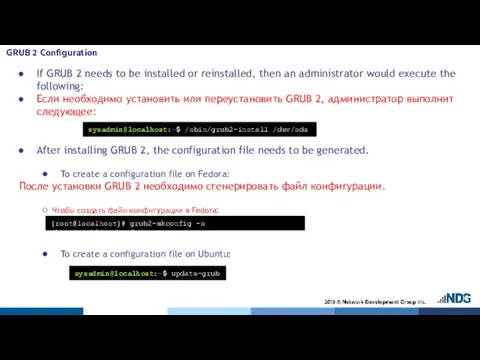
Слайд 27GRUB 2 Configuration
If GRUB 2 needs to be installed or reinstalled, then
GRUB 2 Configuration
If GRUB 2 needs to be installed or reinstalled, then
Слайд 28Runlevels
Runlevels

Слайд 29Introduction
Linux uses the concept of different runlevels to define what services or processes will
Introduction
Linux uses the concept of different runlevels to define what services or processes will
Слайд 30Introduction
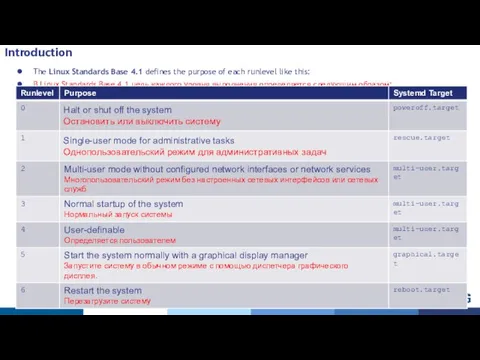
The Linux Standards Base 4.1 defines the purpose of each runlevel like this:
В Linux
Introduction
The Linux Standards Base 4.1 defines the purpose of each runlevel like this:
В Linux
Слайд 31Default Runlevel
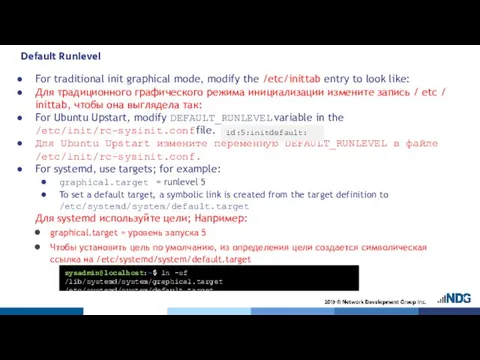
For traditional init graphical mode, modify the /etc/inittab entry to look
Default Runlevel
For traditional init graphical mode, modify the /etc/inittab entry to look
Слайд 32Viewing Current Runlevel
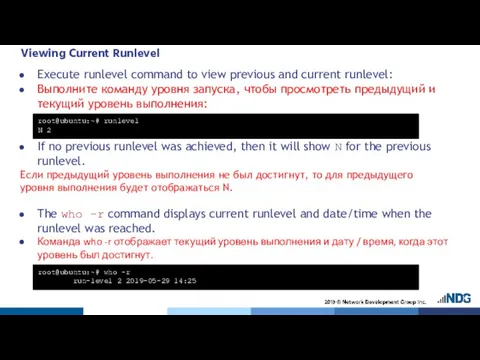
Execute runlevel command to view previous and current runlevel:
Выполните команду
Viewing Current Runlevel
Execute runlevel command to view previous and current runlevel:
Выполните команду
Слайд 33Changing Runlevels and Targets
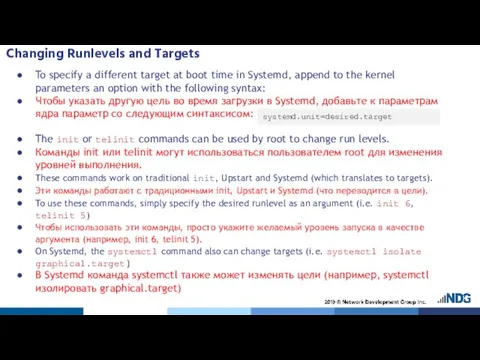
To specify a different target at boot time in
Changing Runlevels and Targets
To specify a different target at boot time in
Слайд 34Changing Runlevels and Targets
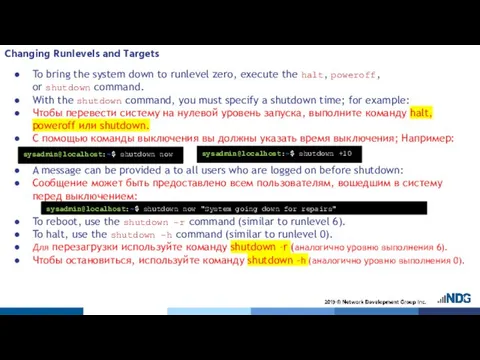
To bring the system down to runlevel zero, execute
Changing Runlevels and Targets
To bring the system down to runlevel zero, execute
Слайд 35The wall Command
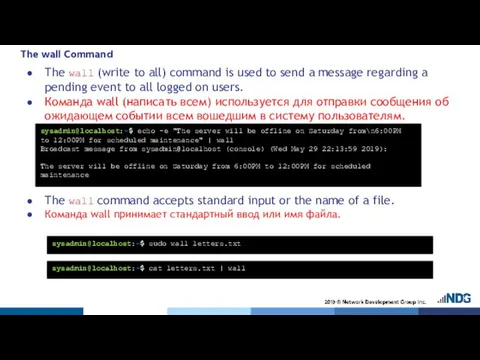
The wall (write to all) command is used to send
The wall Command
The wall (write to all) command is used to send
Слайд 36Managing System Services
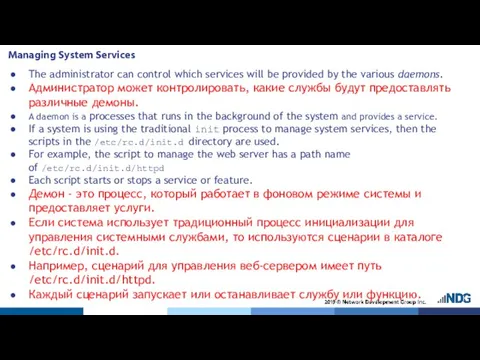
The administrator can control which services will be provided by
Managing System Services
The administrator can control which services will be provided by
Слайд 37Managing System Services
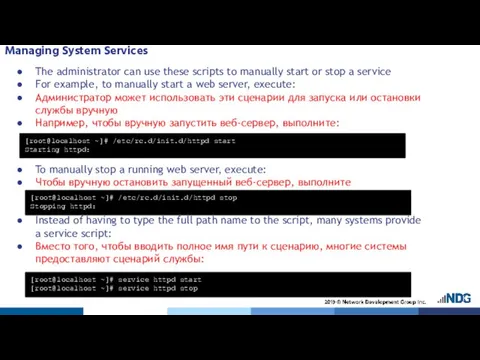
The administrator can use these scripts to manually start or
Managing System Services
The administrator can use these scripts to manually start or
Слайд 38Managing System Services
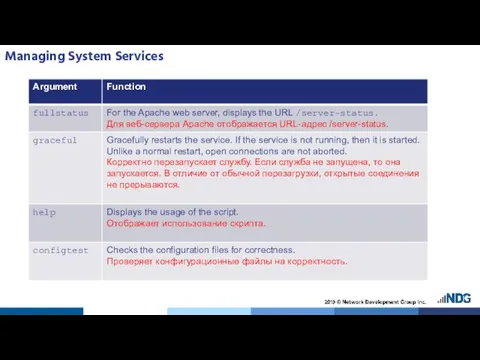
The following table summarizes common script arguments:
В следующей таблице перечислены
Managing System Services
The following table summarizes common script arguments:
В следующей таблице перечислены

Слайд 39Managing System Services
Managing System Services
Слайд 40Runlevel Directories
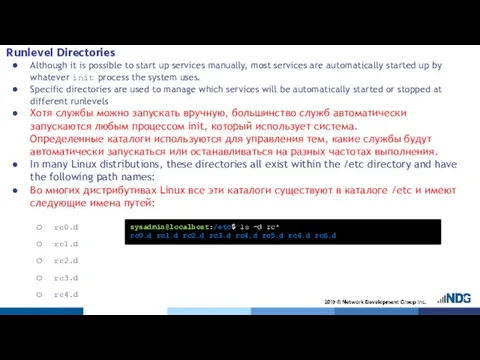
Although it is possible to start up services manually, most services
Runlevel Directories
Although it is possible to start up services manually, most services
Слайд 41Runlevel Directories
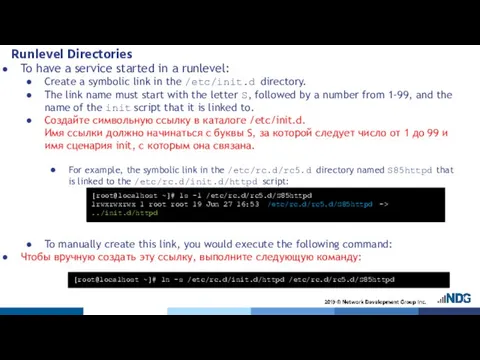
To have a service started in a runlevel:
Create a symbolic
Runlevel Directories
To have a service started in a runlevel:
Create a symbolic
Слайд 42The chkconfig Command
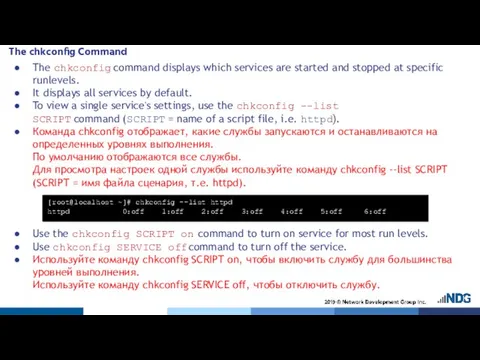
The chkconfig command displays which services are started and stopped
The chkconfig Command
The chkconfig command displays which services are started and stopped
Слайд 43The chkconfig Command
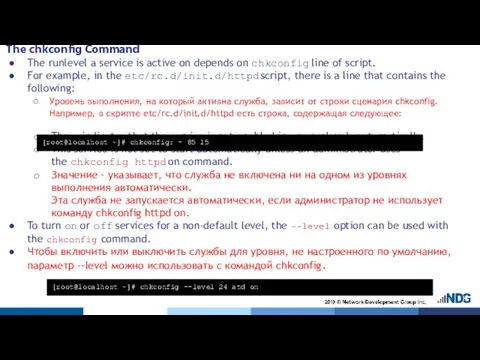
The runlevel a service is active on depends on chkconfig
The chkconfig Command
The runlevel a service is active on depends on chkconfig
Слайд 44The /etc/init Directory
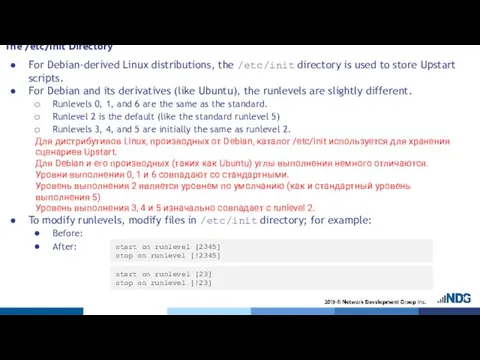
For Debian-derived Linux distributions, the /etc/init directory is used to
The /etc/init Directory
For Debian-derived Linux distributions, the /etc/init directory is used to
Слайд 45The systemctl Command
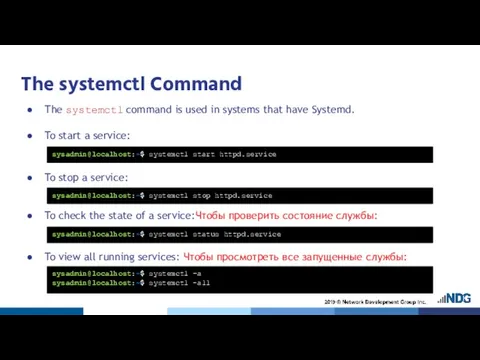
The systemctl command is used in systems that have Systemd.
To
The systemctl Command
The systemctl command is used in systems that have Systemd.
To
Слайд 46The systemctl Command
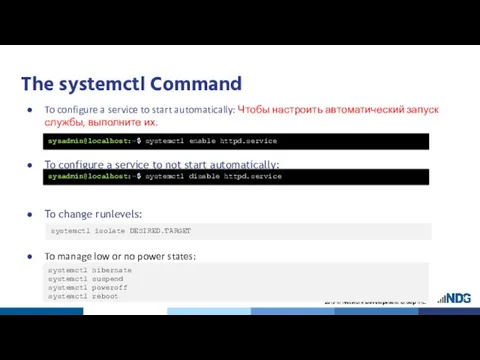
To configure a service to start automatically: Чтобы настроить автоматический
The systemctl Command
To configure a service to start automatically: Чтобы настроить автоматический
Слайд 47Boot Target
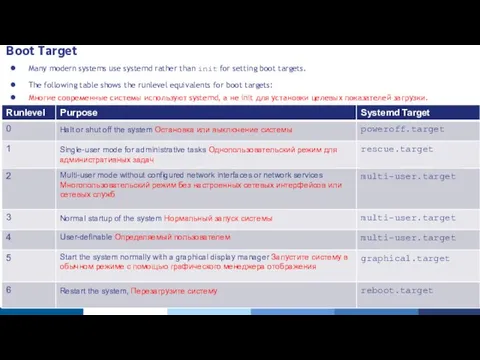
Many modern systems use systemd rather than init for setting boot
Boot Target
Many modern systems use systemd rather than init for setting boot
Слайд 48Default Runlevel
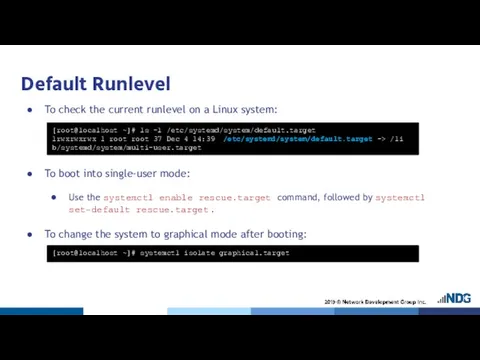
To check the current runlevel on a Linux system:
To boot into
Default Runlevel
To check the current runlevel on a Linux system:
To boot into
Слайд 49acpid
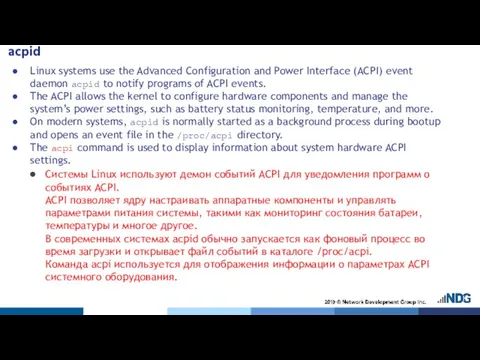
Linux systems use the Advanced Configuration and Power Interface (ACPI) event daemon acpid to
acpid
Linux systems use the Advanced Configuration and Power Interface (ACPI) event daemon acpid to
 Количество информации
 История создания и развития сети интернет
 Разработка приложения “Star Platinum: Математика”
 Распознавание информационных вирусов, VIII фестиваль ХС. Базовая теория
 Каскадные таблицы стилей CSS
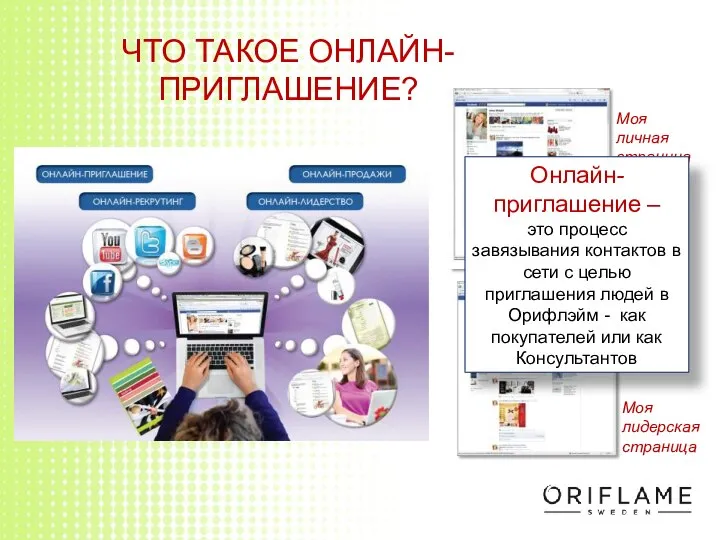 Что такое онлайн-приглашение
 Современные веб-технологии. Лекция 2.1
 Использование электронных образовательных технологий в очном и дистанционном обучении. Создание и оформление группы
 Использование электронных образовательных технологий в очном и дистанционном обучении. Документы в облачных хранилищах
 Разработка электронного учебника по дисциплине Сети ЭВМ и телекоммуникаций
 Neural Networks
 Поиск информации
 8-1-2
8-1-2 Отладчик кодов
 Уведомления о повышенной нагрузке (LA)
 Системы диспетчерского контроля на новой элементной базе
 Развитие социальных сетей: история создания
 Визуализация стенда
 Інформаційна технологія
 Голосование
 Информационные системы для электронного бизнеса
 Электронный документооборот в системе муниципального управления Климовского района
 Наглядные формы представления информации
 Базы данных - основа информационной системы
 Графический редактор PAINT
 Системы отображения информации пилотируемых космических аппаратов
 12_Строки
 Основные понятия. Области применения БД